v25.04.04 (January 2026)
1. Image push with NFC option
Feature Overview
The API now supports Image Push with NFC functionality. Integrators can include NFC-related data—such as default NFC URL or NFC tag information—when sending image push requests from external systems.
This enhancement enables:
- Automatic association of NFC data with image content
- Better support for NFC-enabled workflows
The feature is backward-compatible and does not affect existing image push API calls.
API Documentation
Endpoint
POST /api/v2/imagepush/
Sample Request:
Note: Both v1 & v2 api support NFC
https://stage00.common.solumesl.com/common/api/v2/common/labels/image?company=SOLU&store=MORE1
{
  "labelCode": "0D381D276898",
  "page": 1,
  "frontPage": 1,
  "image": "Base64 code",
  "articleList": [
    {
      "articleId": "A107",
      "articleName": "HOT CAFE LATTE",
      "nfcUrl": "[http://web.coffeeday.com/mycoffeeday/](http://web.coffeeday.com/mycoffeeday/)",
      "data": {
        "ARTICLE_ID": "A107",
        "ARTICLE_NAME": "HOT CAFE LATTE",
        "NFC_URL": "[http://web.coffeeday.com/mycoffeeday/](http://web.coffeeday.com/mycoffeeday/)",
        "SALE_PRICE": "$100",
        "DISCOUNT_PRICE": "$90"
      }
    }
  ],
  "ssid": "SoluM-WiFi",
  "dithering": true,
  "optAlgType": 1,
  "buttonConfigId": 0
}
Note: The "nfcUrl" field is highlighted above
Behavior
- If
nfcUrlis provided → System uses the supplied NFC URL - If
useDefaultNfc = trueand nonfcUrlgiven while pushing → System picks default NFC URL - During a multiproduct assign via Image Push, the system does not use the NFC information from any of the assigned products. It will only apply the default NFC URL if configured; otherwise, no NFC data will be associated.
2. Temporary and permanent password option while creating user.
Overview
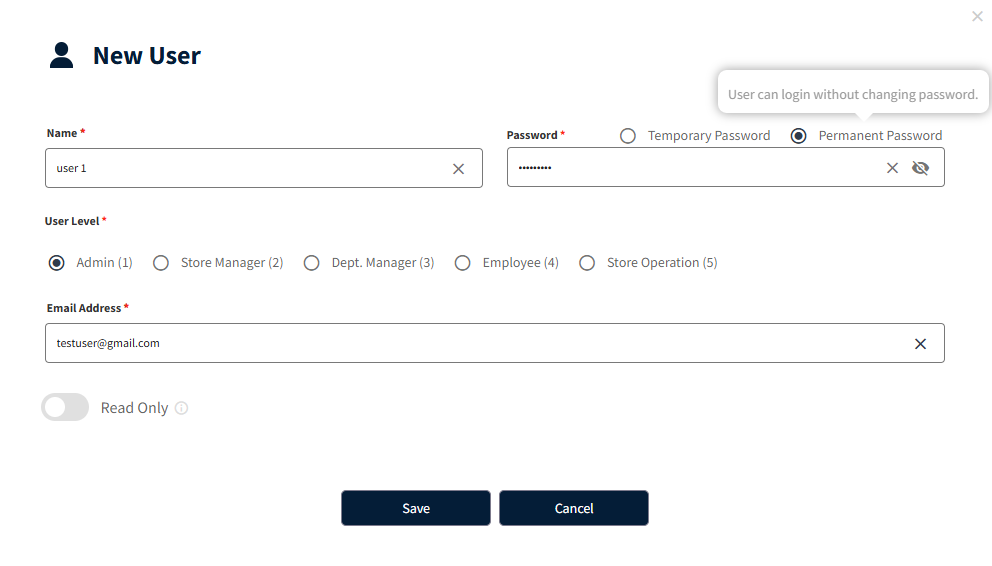
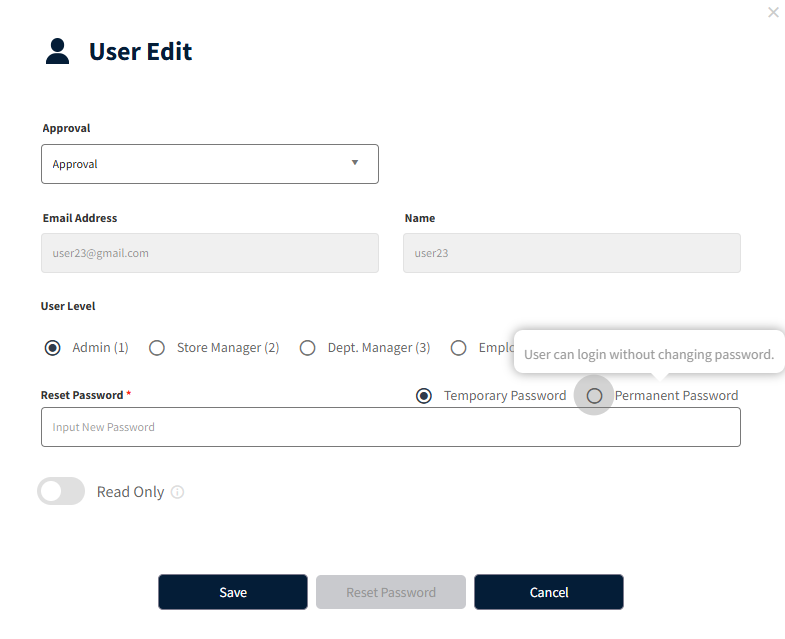
A new Password Configuration option has been added to both the user creation and edit user sections, allowing the password to be set as either temporary or permanent.
1. New Behavior
Temporary Password (default)
- Works exactly as today.
- On first login, the user is prompted to reset their password.
- Suitable for onboarding flows where initial credentials are distributed manually or via email.
Permanent Password
- The password set at user creation remains valid until changed by the user or an administrator.
- No forced password change at first login.
- Users can still voluntarily update their password later via My Account → Change Password.
2. Password Management After Creation
Users with permanent passwords can later change their credentials at any time via:
- My Account → Change Password in the dashboard.
- Change Password API (if available in integration environments).
3. Template mapping condition enhancements.
Overview
New function Multi-Product Template Mapping has been introduced to provides flexibility to assign and render templates based on the number of products linked to a label. This feature is controlled by a customer-level configuration key.
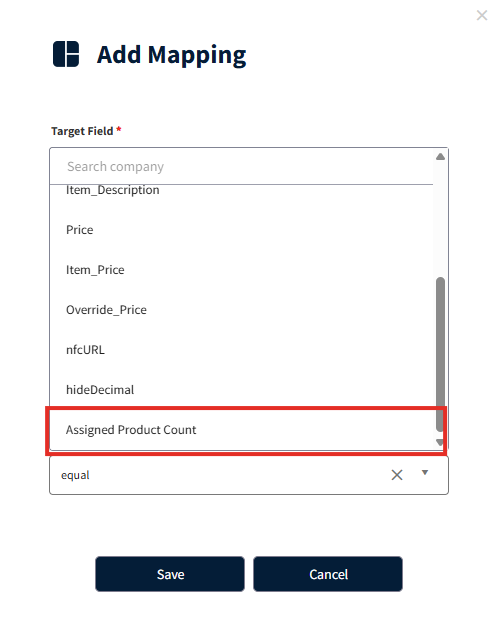
When this function key is enabled for a customer, an additional key will be automatically populated in the template mapping conditions:
- New Key:
ASSIGNED_PRODUCT_COUNT
- Usage:
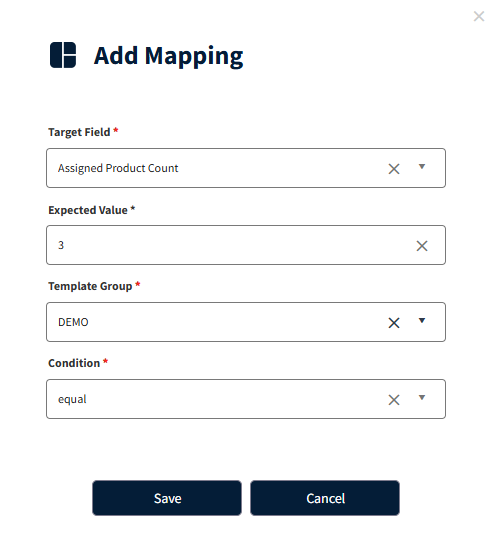
- User can select this key in mapping conditions.
- A numeric value (e.g., 2, 3, 4, etc.) can be defined.
- A template group must be assigned to this condition.
Template Selection Flow
-
Check Customer-Level Setting: System checks if Multi-Product Template Mapping is enabled for the customer.
-
Count Assigned Products: When selecting a template, the system checks how many products are linked to the label.
-
Condition Validation:
- If more than one product is linked and the function is enabled:
- Check if there is any template mapping condition defined with the key
ASSIGNED_PRODUCT_COUNT. - If such a condition exists, the system selects the template group defined for that condition.
-
Normal Flow: After applying the
ASSIGNED_PRODUCT_COUNTcondition (if any), template selection proceeds normally within the assigned template group.
Example Scenarios
Scenario 1: Single Product Assignment
- Label linked with 1 product.
- Even if the function is enabled,
ASSIGNED_PRODUCT_COUNTcondition does not apply. - Template is selected using normal rules.
Scenario 2: Multiple Product Assignment (Function Enabled)
- Label linked with 3 products.
- Function key enabled at customer level.
ASSIGNED_PRODUCT_COUNT = 3condition defined in mapping.- System selects the template group assigned to this condition.
- Template selection then proceeds within this group.
Scenario 3: Multiple Product Assignment (No Matching Condition)
- Label linked with 2 products.
- Function key enabled.
- No
ASSIGNED_PRODUCT_COUNT = 2condition exists. - System falls back to normal template mapping flow.
4. Custom template area-wise support.
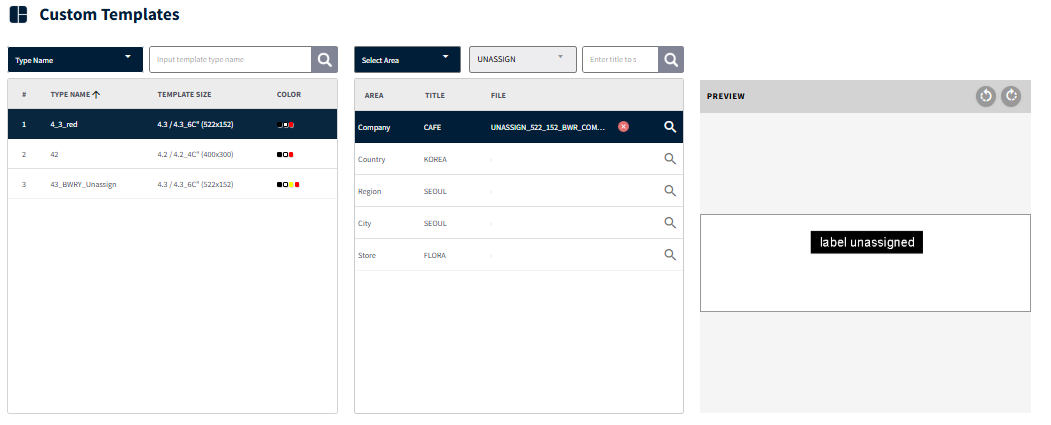
The custom template functionality has been enhanced to support area-wise templates with improved upload and preference rules across Company and Store levels.
Key Enhancements:
-
Area-wise template functionality is now fully supported, allowing user to upload templates from Store, City, Region, Country, Company level.
-
Unassign templates can now be uploaded at both Company level to Store level.
-
A refined preference hierarchy has been implemented:
-
Store-level templates take priority over Company-level templates.
-
If a Store-level template is not available, the system automatically falls back to the City, Region, Country, Company-level template.
-
Improves the customization workflow for customers with multiple stores and varying layout needs.
Benefits:
- Greater flexibility in managing templates for different stores.
- Clear and transparent template precedence eliminates conflicts.
- Efficient template reuse and easier maintenance across Company and Store hierarchies.
Steps:
- Enable “Custom Template” at Company level.
- Check for “Custom Template” menu in ESL.
- Upload templates at Store/City/Region/Country/Company level.
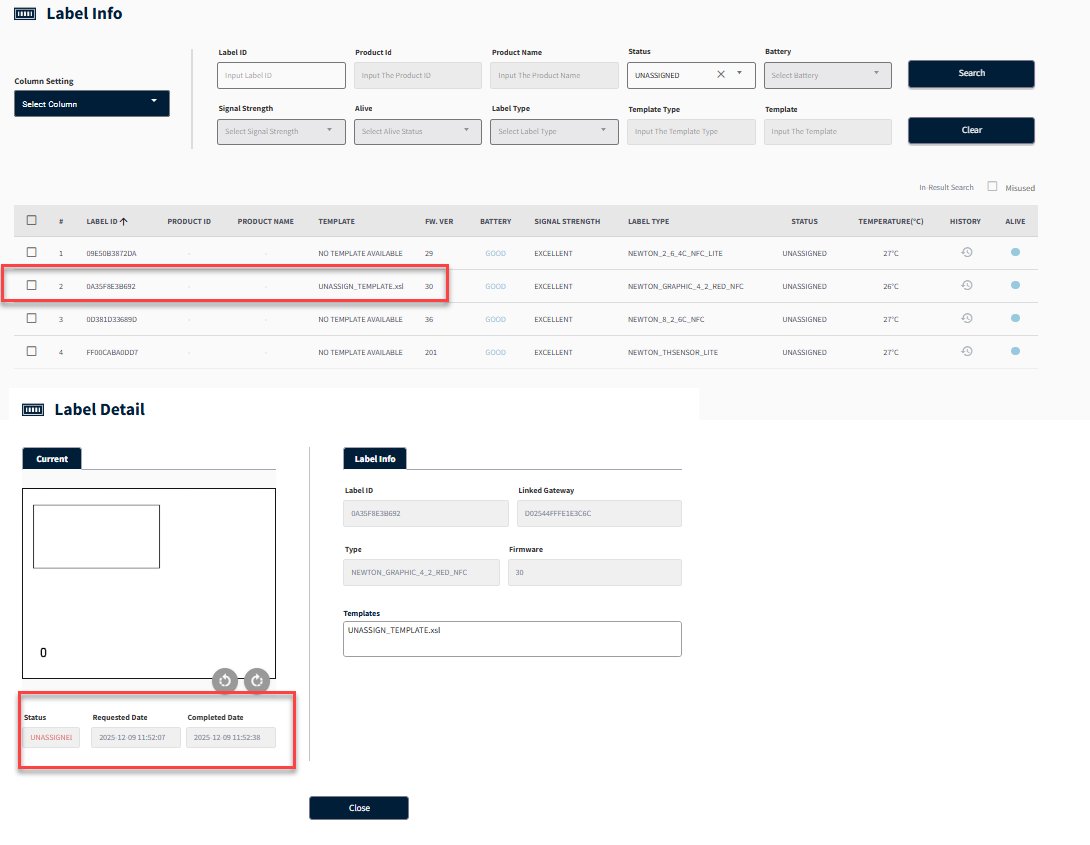
- Unassign the Label.
- Check under “unassigned” status list and ensure the label picked the uploaded unassign template.
5. Gateway status timeline extended to 1 week from 24 hours.
Description:
The Gateway Status view has been enhanced to provide a longer and more comprehensive history of gateway connectivity.
Key Enhancements:
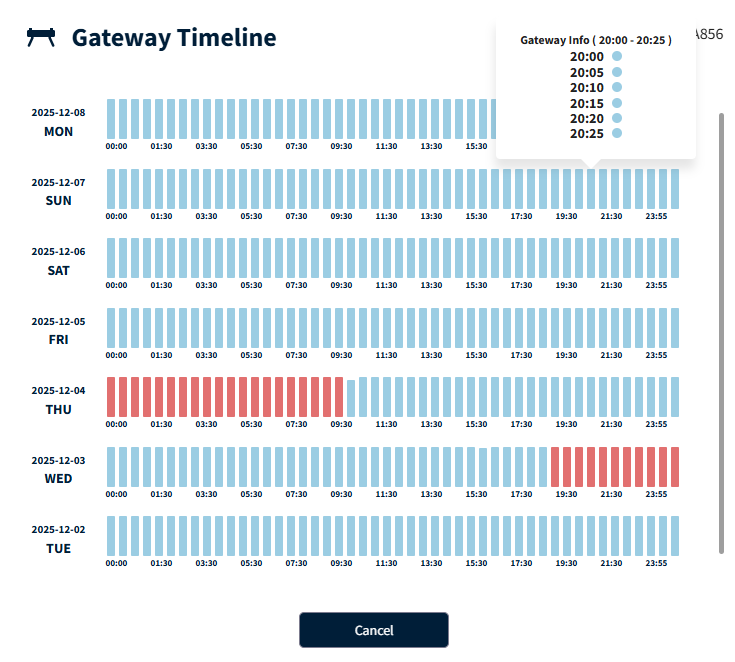
- The gateway status timeline has been extended from 24 hours to 7 days.
- Users can now review one full week of gateway online/offline history.
- This improvement helps in better troubleshooting, historical analysis, and monitoring of gateway stability.
Dashboard Path: ESL => Gateway => Click on timer icon/history icon (See attached reference Image)
Benefits:
- Improved visibility of gateway behavior over a longer duration.
- Helps identify recurring patterns, intermittent issues, and environment-level connectivity problems.
6. Article info API Enhancements
Endpoint: /v2/common/config/article/info
Change Summary
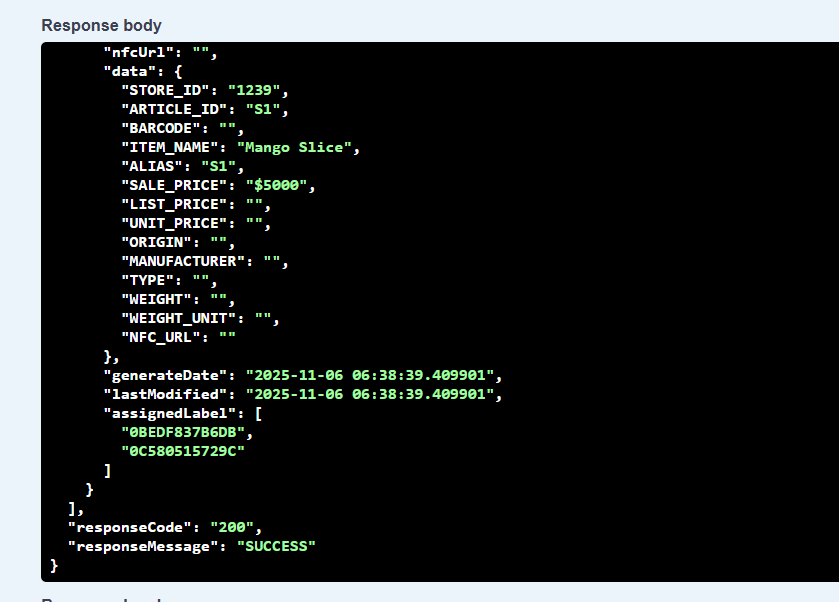
The API now correctly returns actual label codes in the assignedLabel field when multiple article IDs are requested. Previously, assignedLabel remained empty in multi-article queries. This update ensures accurate article–label mapping for all integrations.
What’s Improved
assignedLabel now includes:
- All label codes linked to the article ID (from
m_label_articletable). - An empty array
[]if no labels exist for that article. - No other fields or structures in the API response have been changed.
Sample Response:
{
  "articleList": [
    {
      "articleId": "100",
      "articleName": "Sample",
      "assignedLabel": [
        "0BEDF837B6DB",
        "0C580515729C"
      ]
    }
  ],
  "responseCode": "200",
  "responseMessage": "SUCCESS"
}
Key Notes
- ✔
assignedLabel→ now returns the full list of mapped label codes. - ✔ Empty list returned if no mapping exists.
- ✔ Fully backward compatible — no breaking changes.
- ✔ Useful for sync, audits, and reporting of label–article mapping.
7. EAN export enhancements
Feature Overview
Customers faced failures when exporting very large EAN datasets (e.g., 1 million+ EANs). The previous export mechanism could not efficiently handle high-volume data, leading to memory overload and export failure. The implementation has been optimized to ensure stable, scalable, and faster processing for large exports.
Issues with the Previous Approach
- The system attempted to load all EAN records into memory at once.
- This caused excessive memory usage for datasets above 100K+ records.
- Resulted in performance delays, timeouts, or complete export failure when handling large data volumes.
Benefits
- Large EAN exports now complete successfully without errors.
- Much faster and more consistent performance during export.
- Improved system reliability for enterprise-scale datasets.
- No workflow changes required — fully backward compatible.
Impact
- No UI or functional changes for users.
- All improvements are backend-only internal optimizations.
- Existing export processes continue to work as before, now with improved stability.
8. Template group delete enhancements.
Overview
Currently, when a template that belongs to a Template Group is deleted from template type list, it still remains listed within the group. However, since the actual template no longer exists, the group becomes partially broken, and the user is unable to edit the Template Group.
Fix Applied
When a template is deleted from the Template Type list, it will now be automatically removed from all Template Groups where it is associated. This ensures that any Template Group referencing the deleted template is updated accordingly and remains functional.
9. New time zone support.
Overview
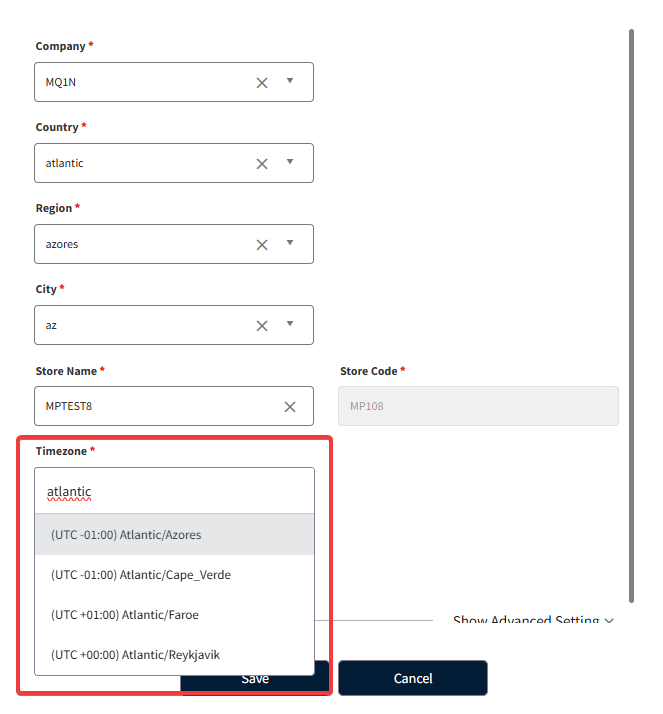
- The GMT-01:00 Atlantic (Azores, Cape Verde) time zone has been added to the SaaS platform. This enhancement enables full support for store creation, store configuration, and all related operations using this time zone.
- The update applies to both Add Store and Edit Store functionalities.
10. Http status code & response message enhancements.
10.1. COMPANY_NOT_FOUND
Updated the system to ensure that the COMPANY_NOT_FOUND message is never shown to any customer or to any user role, including:
- SI Partner
- Customer Admin
- Store-level users
When an invalid or mismatched companyId is provided, the system now returns a generic and secure error response without exposing internal company identification details (e.g., “Unauthorized”). This change prevents unintended disclosure of company information and ensures consistent error handling across all API consumers.
API Documentation
- Endpoint: Any API accessed by a user outside of their authorized company scope.
Sample Request:
Note: Expired company - BNVT Note: Both v1 & v2 api support NFC
Response:
{
  "responseCode": "401",
  "responseMessage": "Unauthorized"
}
10.2. LICENSE_EXPIRED
Improved response handling for scenarios where a company’s license has expired.
The system now:
- Returns the
LICENSE_EXPIREDmessage only when the requesting user belongs to the same company whose license is expired. - Ensures that for cross-company API calls, license status is not revealed. Instead, the system returns:
- HTTP Status:
401 Unauthorized - Message: Generic unauthorized error without license details.
-
Note: User can be super admin, custom admin, SI partner, Store level user
This enhancement strengthens security and aligns error messages with expected privacy rules.
API Documentation
- Endpoint: Any API accessed by a user outside of their authorized company scope.
Sample Request 1:
Note: Both v1 & v2 api support NFC
Response:
{
  "responseCode": "401",
  "responseMessage": "Unauthorized"
}
Sample Request 2: User belongs to company, but license is expired.
Response:
{
  "responseCode": "403",
  "responseMessage": "LICENSE_EXPIRED"
}
11. New token generation APIs with SSO login support.
Please refer to the below documentation for detailed information on the new token generation process,
including support for Single Sign-On (SSO) login flows. The documentation provides comprehensive guidance on how
to implement and utilize these APIs effectively within your applications.
View Documentation
12. Yellow dogs PoS support
Overview:
The Yellow Dog POS Integration enhancement enables seamless data exchange between SoluM label management systems and Yellow Dog POS solutions. This integration aims to:
- Automate product synchronization from Yellow Dog to SoluM stores
- Eliminate manual data entry and reduce operational overhead
- Provide store and location mapping capabilities.
System Requirements:
- Yellow Dog POS system active and accessible
- Valid Yellow Dog API credentials
- Network connectivity between SoluM and Yellow Dog servers
- Function flag:
yellowDogPosIntegrationenabled for company.
Integration Setup & Authentication
Please contact SoluM to integrate
Step 2: Configure Yellow Dog Authentication
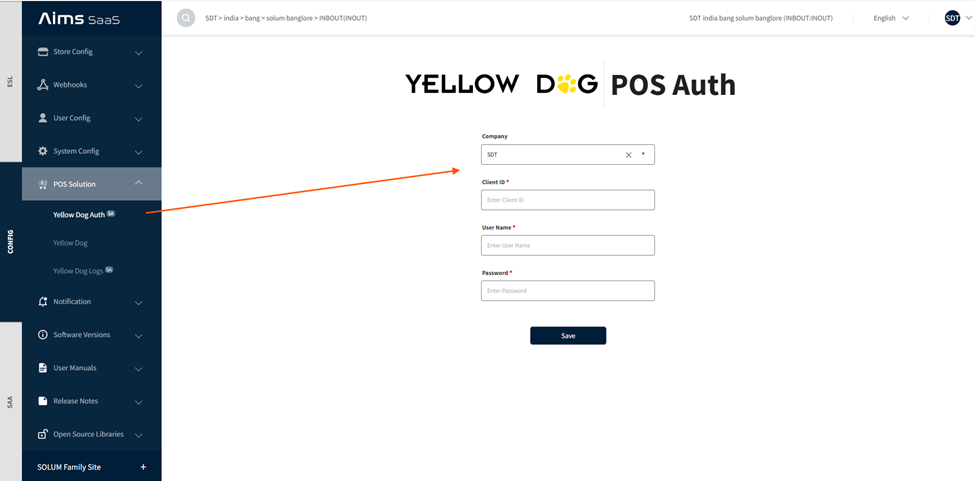
- Navigation: Config > POS Solution > Yellow Dog Auth
- Access Level: Super Admin Only
- Configuration Steps:
- Navigate to Config > POS Solution > Yellow Dog Auth
- Click Add Integration or New Configuration
- Fill in the Yellow Dog authentication form with:
- Customer Code: Select the company to integrate
- Client ID: Yellow Dog POS client identifier
- Username: Yellow Dog POS account username
- Password: Yellow Dog POS account password
- API Endpoint: Yellow Dog server URL
- Save the configuration
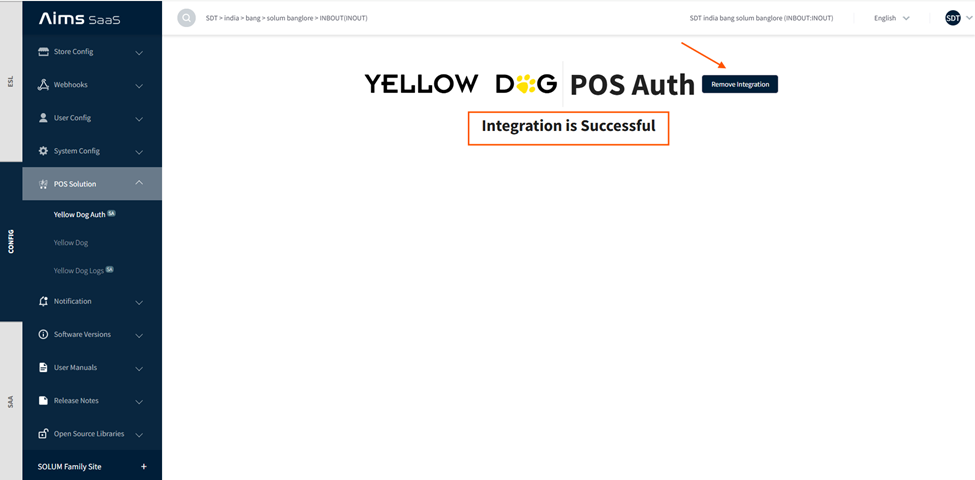
- Expected Outcome:
- Record inserted into
e_yellow_dog_postable - Integration status shows as successful
- Option to Remove Integration appears
Store & Location Mapping
Step 3: Access Yellow Dog Configuration Page
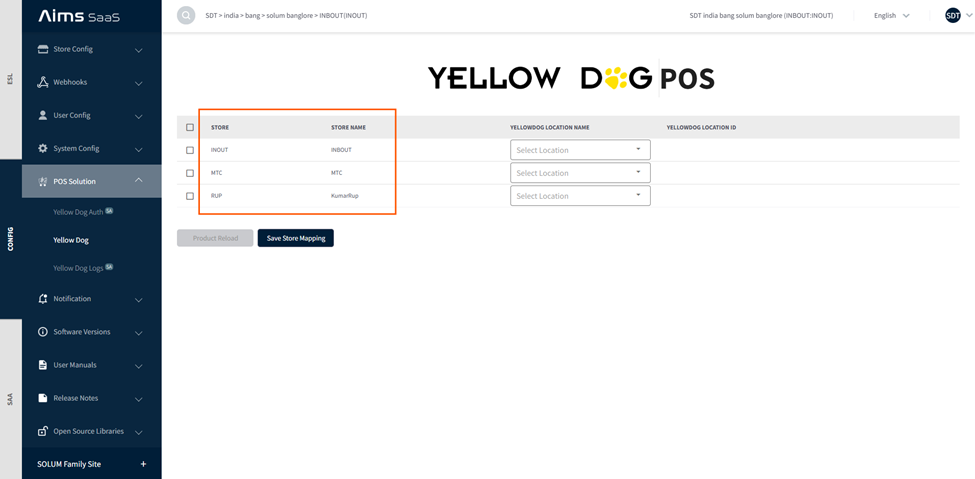
- Navigation: Config > POS Solution > Yellow Dog
- Steps:
- Navigate to the Yellow Dog configuration page
- View the populated list of all SoluM stores in the system
- Stores are displayed in a table format with mapping
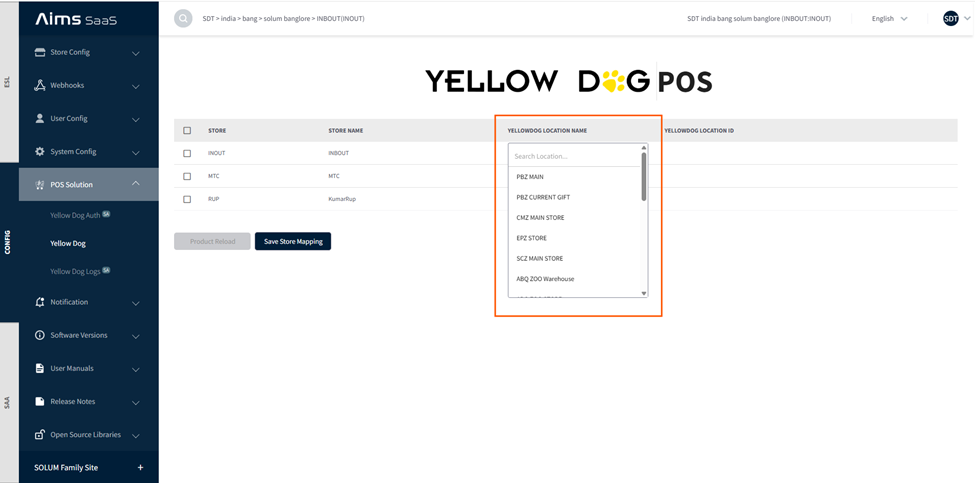
Step 4: View Available Yellow Dog Locations
- Steps:
- Locate the Yellow Dog Location dropdown menu on the page
- Click to expand and view all available locations from Yellow Dog system
- Expected Outcome: Complete list of all Yellow Dog POS locations available for mapping.
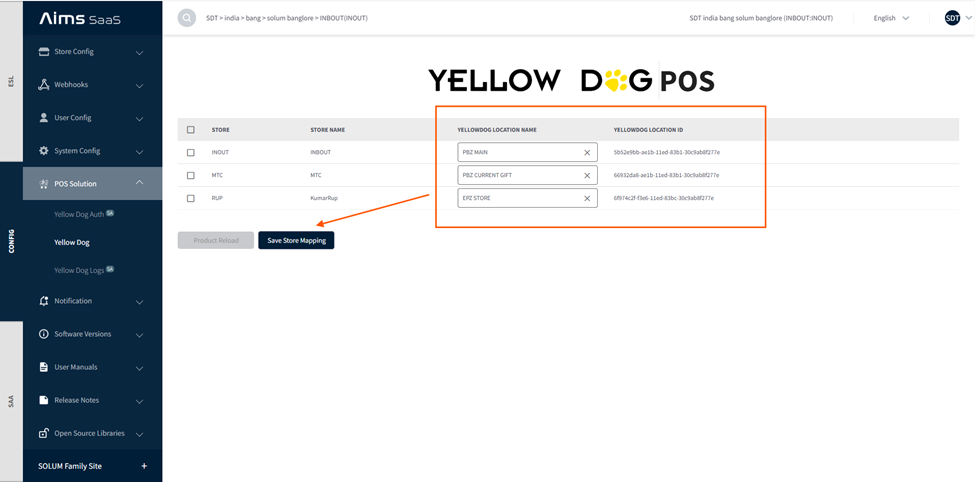
Step 5: Map Stores to Locations
- Steps:
- For each SoluM store requiring mapping:
- Click on the store row
- Select the corresponding Yellow Dog Location from the dropdown
- Click Save Store Mapping button
-
System validates the mapping combination:
-
Validation Rules:
-
Each SoluM store can map to only one Yellow Dog location
-
Both store and location values are required before saving
-
Composite primary key prevents duplicate mappings
-
Expected Outcome: Ready for product synchronization
Product Synchronization & Loading
Step 6: Trigger Initial Product Load
- Navigation: Yellow Dog Configuration Page
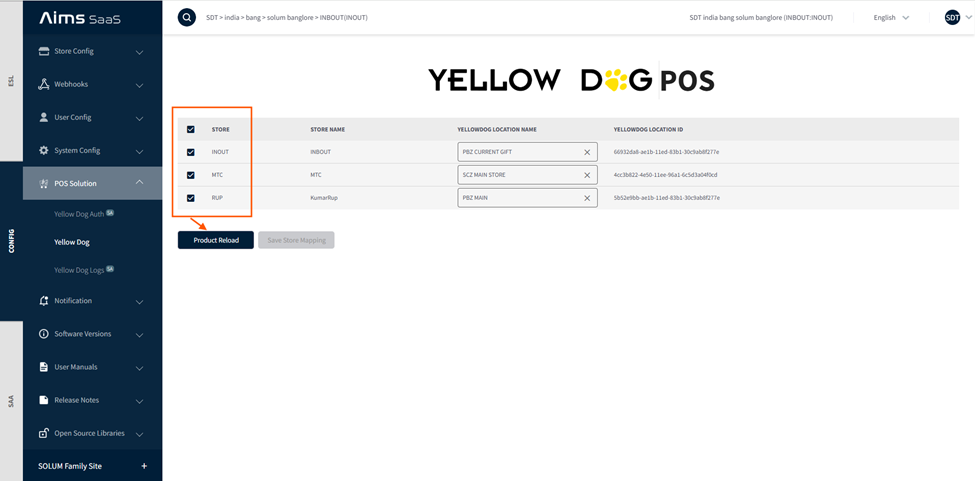
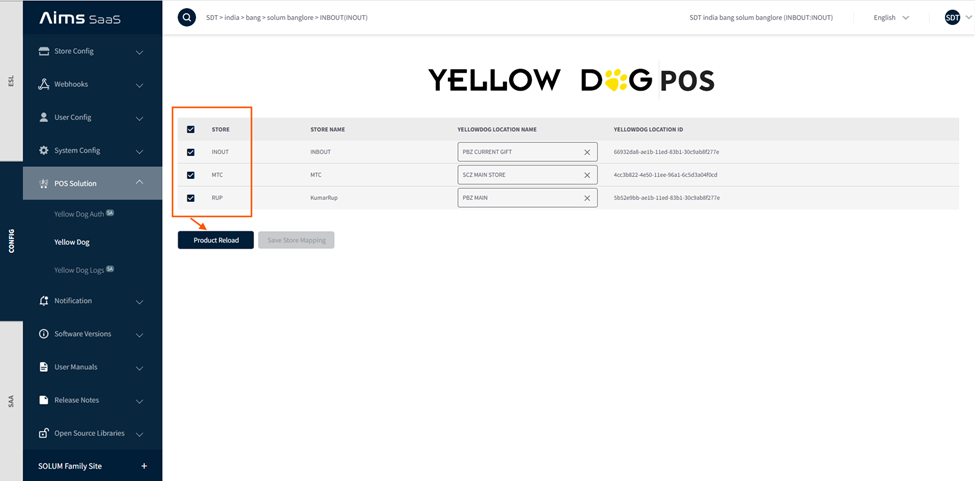
- Steps:
- On the Yellow Dog configuration page, locate the store row for which mapping is complete
- Verify both Store and Location values are populated
- Click Product Reload button
-
Prerequisites:
-
Selected row must have both store and location values in
m_yellow_dog_pos_store_mapping -
Integration credentials must exist in
e_yellow_dog_posfor the customer -
Integration token must be valid and not expired
-
User must have appropriate permissions
-
Expected Outcome: Products available in SoluM system for the selected store.
Step 7: View Product Information
- Navigation: Product Info > Store Selection
- Steps:
- Navigate to Product Info section
- Use the Store Selector dropdown
- Select the store for which mapping has been configured
- Product list will appear
- Expected Outcome: Complete product catalog from Yellow Dog is displayed for the selected store.
13. ECRS PoS Support
Introduction
Enables POS vendors, including ECRS POS, to submit product and store-mapping data to SoluM.
- API validates, transforms, logs, and stores data for asynchronous processing.
- Processed data is automatically pushed to AIMS SaaS.
- Improves automation and reduces manual product onboarding.
Purpose
- Accept product/store data from POS systems.
- Transform incoming payload into SoluM’s internal data model.
- Save submitted data for background (async) processing.
- Sync validated product data with AIMS SaaS.
- Support a stable, scalable POS → SoluM → AIMS SaaS integration flow.
API Endpoint Information
- Environment: Stage
- Method:
POST - URL: https://stage00.common.solumesl.com/custompos/api/data
- Functionality:
- Accepts POS product payloads
- Validates headers and required fields
- Logs and persists transactions
- Sends processed data to AIMS SaaS asynchronously
Required Request Headers
X-API-KEY→ Vendor authentication tokenX-Company→ Company identifier (e.g., SHAN)X-Vendor→ Vendor code - ECRSContent-Type→application/json(Mandatory format)
Payload Requirements
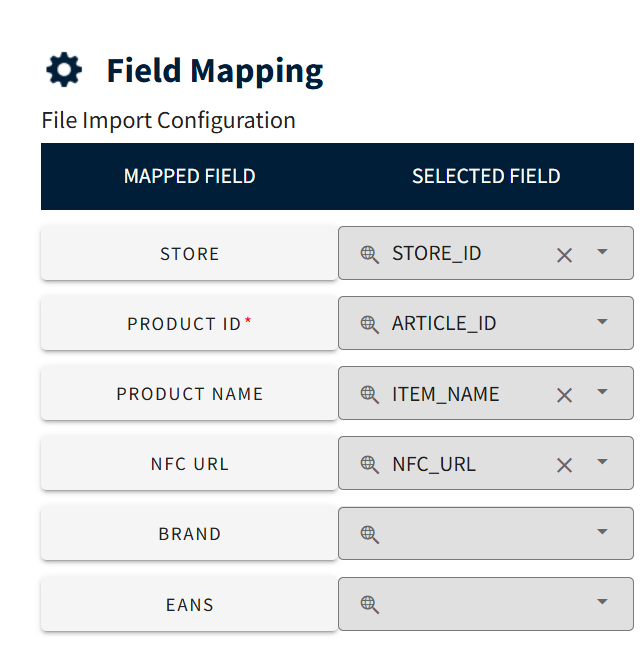
Only two fields are mandatory. All others are optional.
- Required Fields
itemId→ Unique product identifierstores[].storeNumber→ Store mapping information
- Optional Fields
itemNamenfcUrlcategoryName
Example Payloads
Add a Single Product to One Store
[
  {
    "itemId": "9401136",
    "itemName": "Organic Yellow melon NAPA",
    "nfcUrl": "[www.google.com](https://www.google.com)",
    "categoryName": "4494967296601.jpg",
    "stores": [
      {
        "storeNumber": "S1"
      }
    ]
  }
]
Headers:
X-API-KEY:UrUAT5joC+zBtPDH6gXhBvvKFTUrNfCLH2t5ClG+Bik=X-Company:SHANX-Vendor:ECRSContent-Type:application/json
Add Products to Different Stores
[
  {
    "itemId": "9401136",
    "itemName": "Organic Yellow melon NAPA",
    "nfcUrl": "[www.google.com](https://www.google.com)",
    "categoryName": "4494967296601.jpg",
    "stores": [
      {
        "storeNumber": "S2"
      }
    ]
  },
  {
    "itemId": "9401135",
    "itemName": "SQA",
    "nfcUrl": "[www.google.com](https://www.google.com)",
    "categoryName": "4494967296601.jpg",
    "stores": [
      {
        "storeNumber": "S3"
      }
    ]
  }
]