v25.04 (April 2025)
1. Label level button configuration brought back with additional button info
- Changeable left page
- Changeable right page
Only Level one (Customer Admin) user have access to the button configuration setting. User can configure the button actions for both short and long-press buttons.
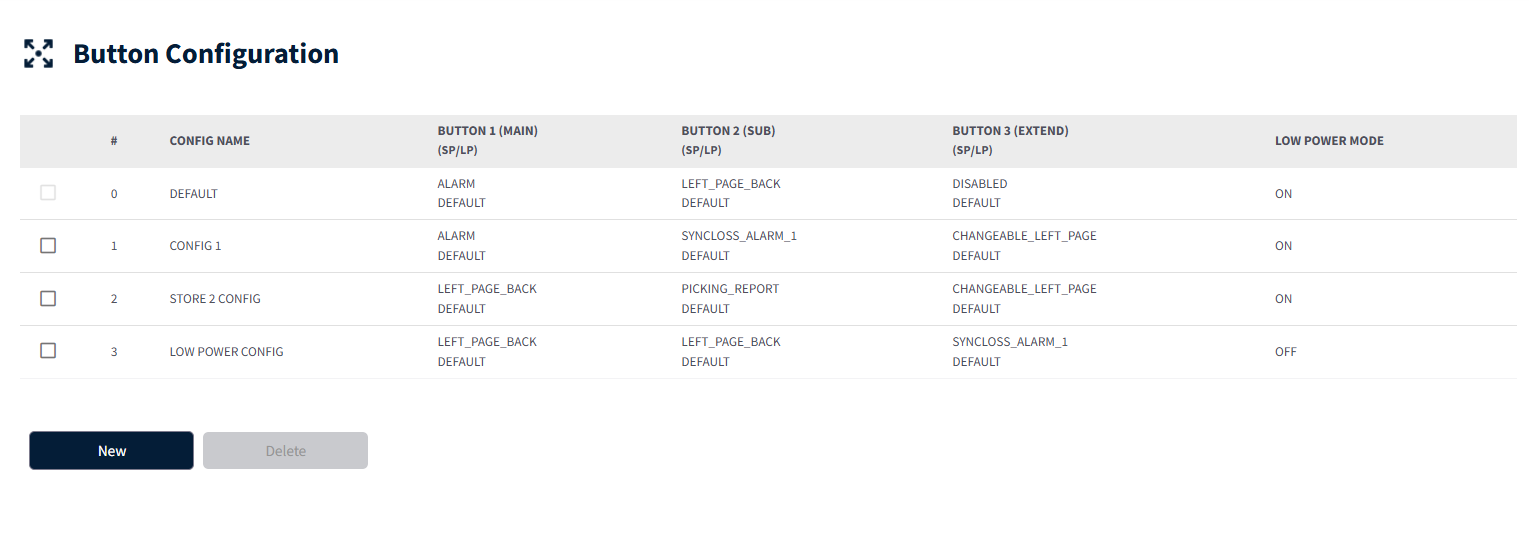
Button Action List
- LED OFF: This button is sent to stop/switch off the blinking LED.
- Alarm:
- Always green LED color will be blinked, Use for alerts or out of stock or other customer based requirement. If the link with the GW is disconnected, the red LED color will be blinked.
- Left Page Back: the page will be changed to the lower number of pages but after 10 seconds, it'll move back to the original page.
- Right Page Back:
- The page will be changed to a higher number of page but after 10 seconds, it'll move back to the original page.
- Left Page: The page will be changed to the lower number of pages and get locked. even if there is an update with the current page is 1 or other value, the lock will not be released.
- Right Page: The page will be changed to the higher number of pages and locked. even if there is an update with the current page is 1 or other value, the lock is not released.
- Sync Loss Alarm: Initially, it's a different feature from Alarm. but now It's working the same as Alarm.
- Picking Report:
- When the external app is linked like Wine or Tool etc. This button is used while picking the object - the user presses the button while the LED is blinking. Ping status response will be delivered to the server. If a user presses the button while there is no LED blinking, an alarm status response will be delivered to the server.
- Changeable Left Page:
- It's similar to the left page. but the lock will be released when there is a page change update.
- Changeable Right Page: It's similar to the Right page. but the lock will be released when there is a page change update.
- Clear: All the info. will be cleared on the tag side. so the barcode will be shown up.
Default Button Configuration
A default button configuration is automatically added. However, users with appropriate permissions (Level one users) can edit the default button configuration and save.
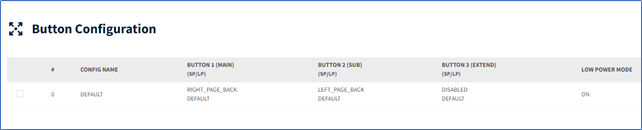
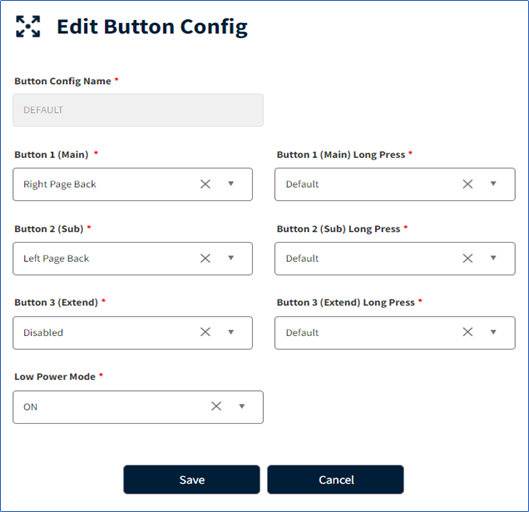
If long press button fields are configured as Default, then actions will be configured as per factory saved actions. Button 1 long press (Default) – Right page Back Button 2 long press (Default) – Left page Back Button 3 long press (Default) – Disable.
Low Power Mode:
- Low Power Mode: ON Label reset can only be performed if low power mode is ON. Long press buttons will be active only if low power mode is ON.
- Low Power Mode: OFF Label reset cannot be performed if low power mode is OFF. Long press button will be disabled.
- Gateway Firmware should be 1.3.14.0/1.3.14.11 (Newton Normal/USB gateway) and Label Firmware should be 36 or above to associate long press button configuration to label.
- To perform long press button action- press and hold the button for 3 or more seconds.
Custom Button Configuration:
A default button configuration is automatically added. However, users with appropriate permissions (admin users) can add a new button configuration.
Steps to Add Custom Button Configuration:
- Click on the "New" button to start creating a new button configuration.
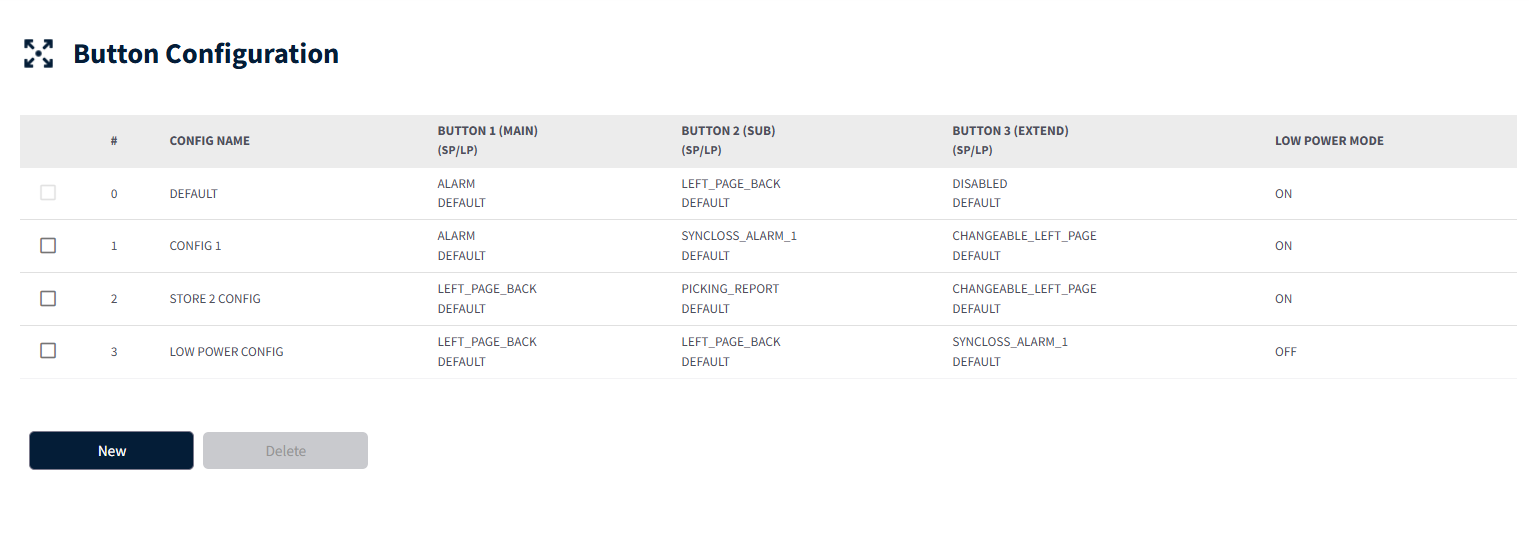
- Input the button configuration name select the button press action from the dropdown list for all buttons, select low power mode accordingly, and click on the Save button.
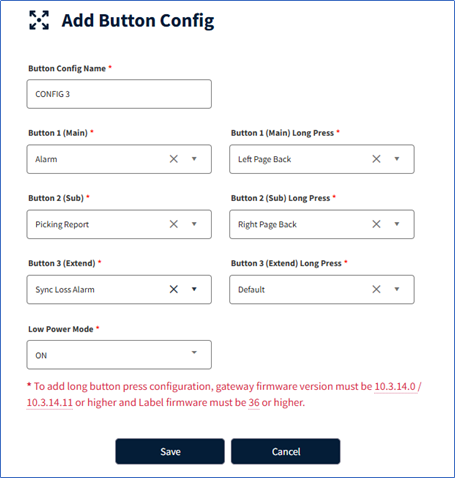
- Once it is saved, the new button configuration will be added to the Button Configuration List.
- The newly added configuration will now be available for assignment, use.
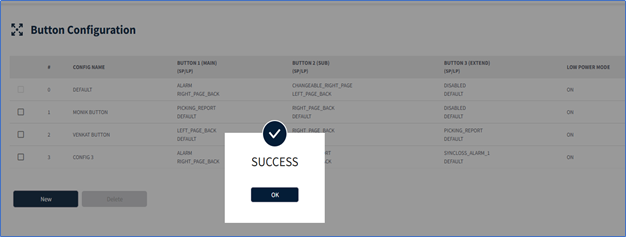
Edit Button Configuration:
- Identify the button configuration you wish to edit from the list (default or custom button configuration).
- Click on the particular button configuration to open it for editing.
- Make the necessary changes to the button configuration details.
- After making the changes, click on the "Save" button.
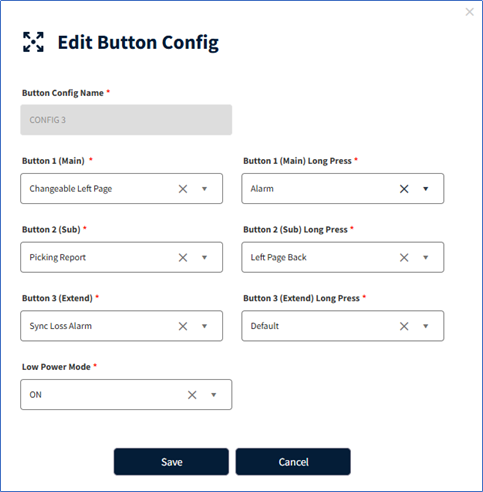
- If the button configuration is not associated with any label, then it saves successfully.
- If the button configuration is associated with any label, then the user will be prompted with a confirmation alert pop-up with the count of labels it is associated and if saved it will be applied to these labels.
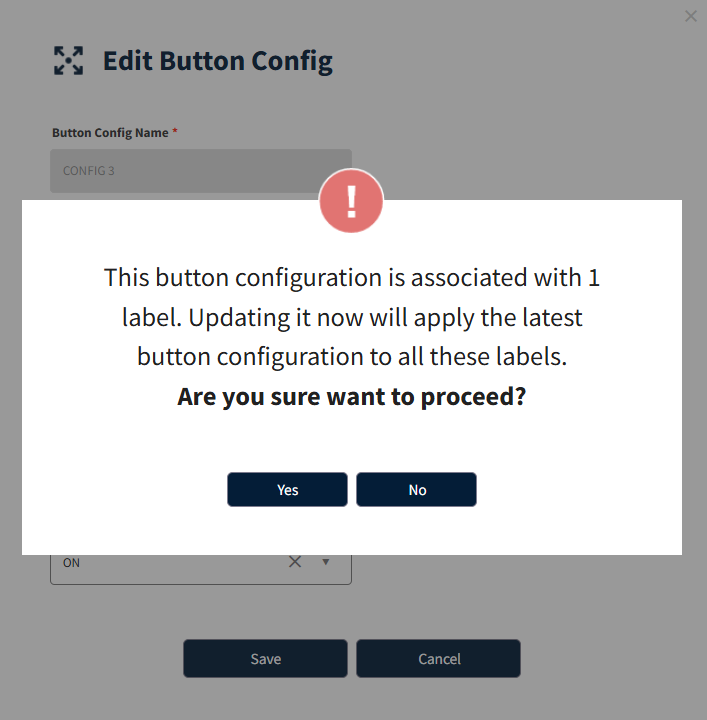
- Click on the "Yes" button to confirm.
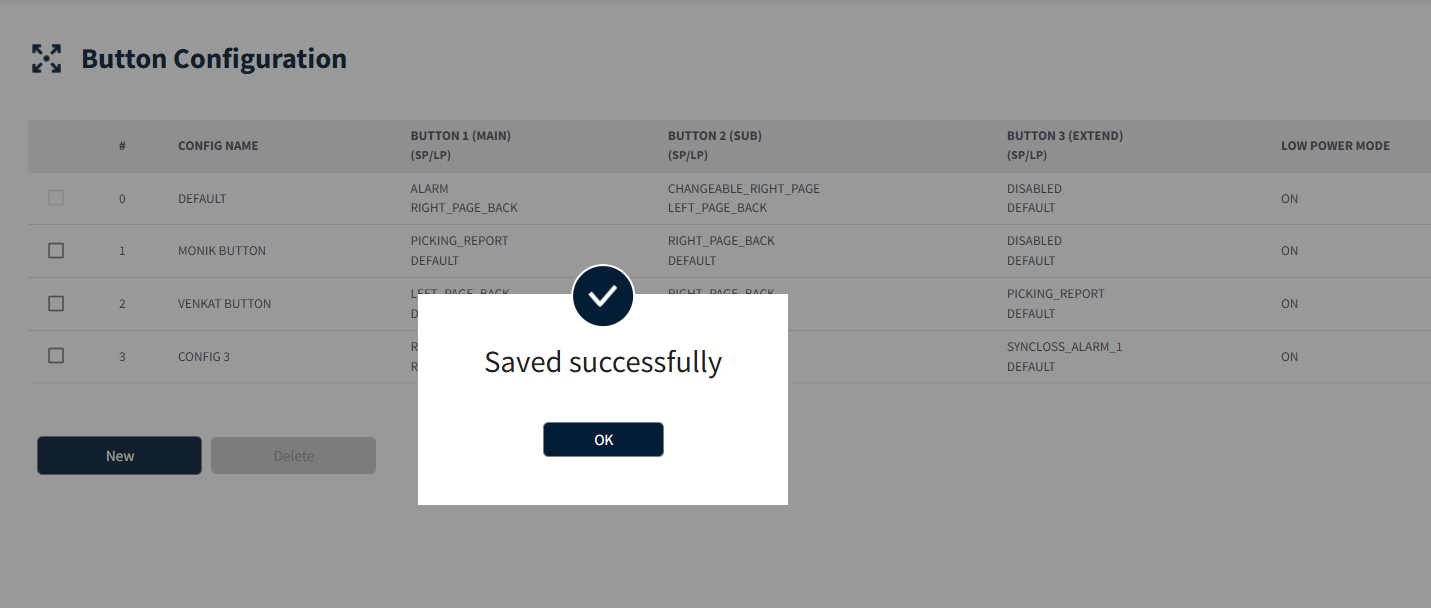
- Once confirmed, the edited button configuration will be updated in the Button Configuration list, and updated changes will be applied to associated labels.
Delete Button Configuration: Authorized users (customer admin users) only can delete button configurations as needed.
- The default button configuration is not allowed to be deleted.
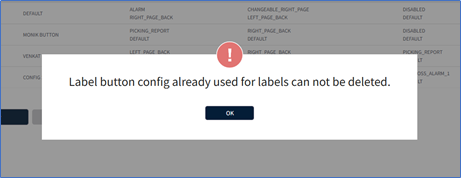
- If a custom button configuration is in use (assigned to any label) then it cannot be deleted.
- If the user tries to delete the assigned button configuration an alert pop-up will be prompted as below.
Steps to delete custom button configuration:
- Select the checkbox next to the button configuration to mark it for deletion.
- Click on the "Delete" button.
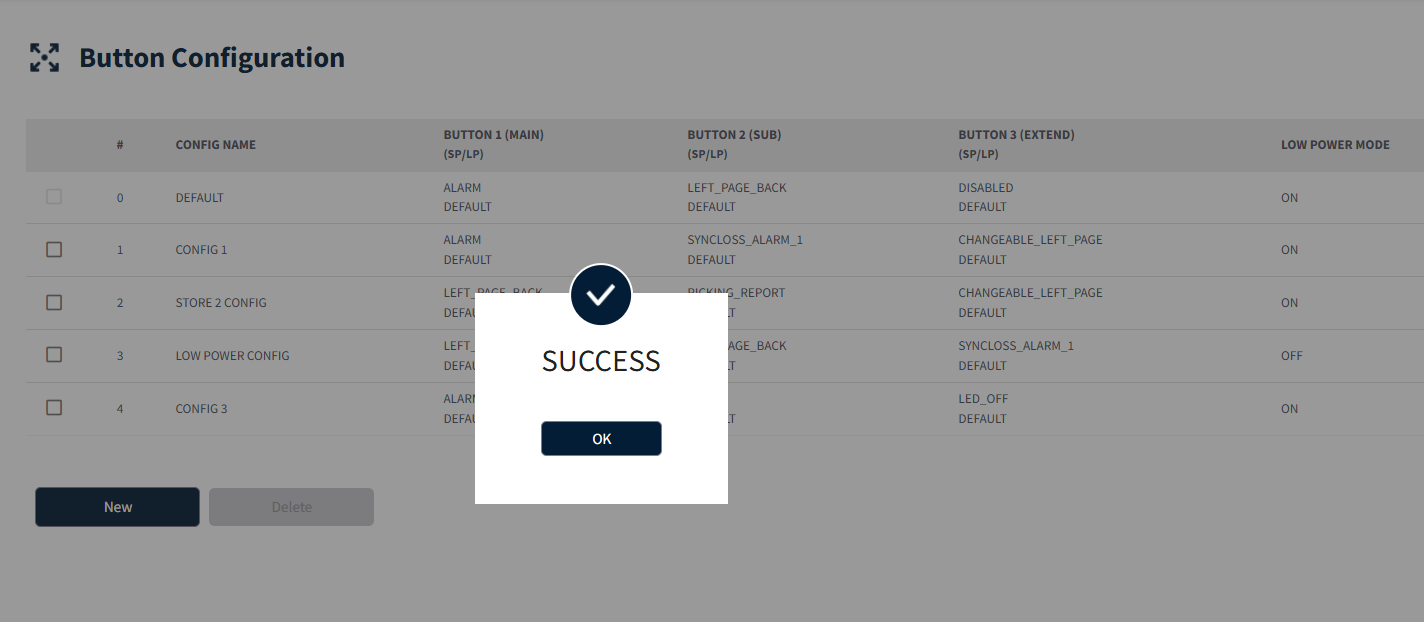
- A confirmation alert pop-up will appear to ensure that the user wants to delete the selected button configuration.
- Click on the "Yes" button to confirm and proceed with the deletion.
2. Webhook enhancements
- Label status
- Label button press
- Product reconciliation
Webhooks is an event-driven communication mechanism that will automatically triggered by specific events and used for real-time notifications and data updates. (Contact SOLUM Admin for the access)
In SaaS, this feature is used to get notifications when the following events are performed.
- Label Status
- Label Button Press
- Product reconciliation.
The user should add the subscription URL and map the events required from the available list. Upon any update on Label status or Label button press automatically the configured subscription URL will be triggered and webhooks logs will be printed.
Note: This feature is only available for level 1 admin users.
Path: Dashboard > Config> Webhooks
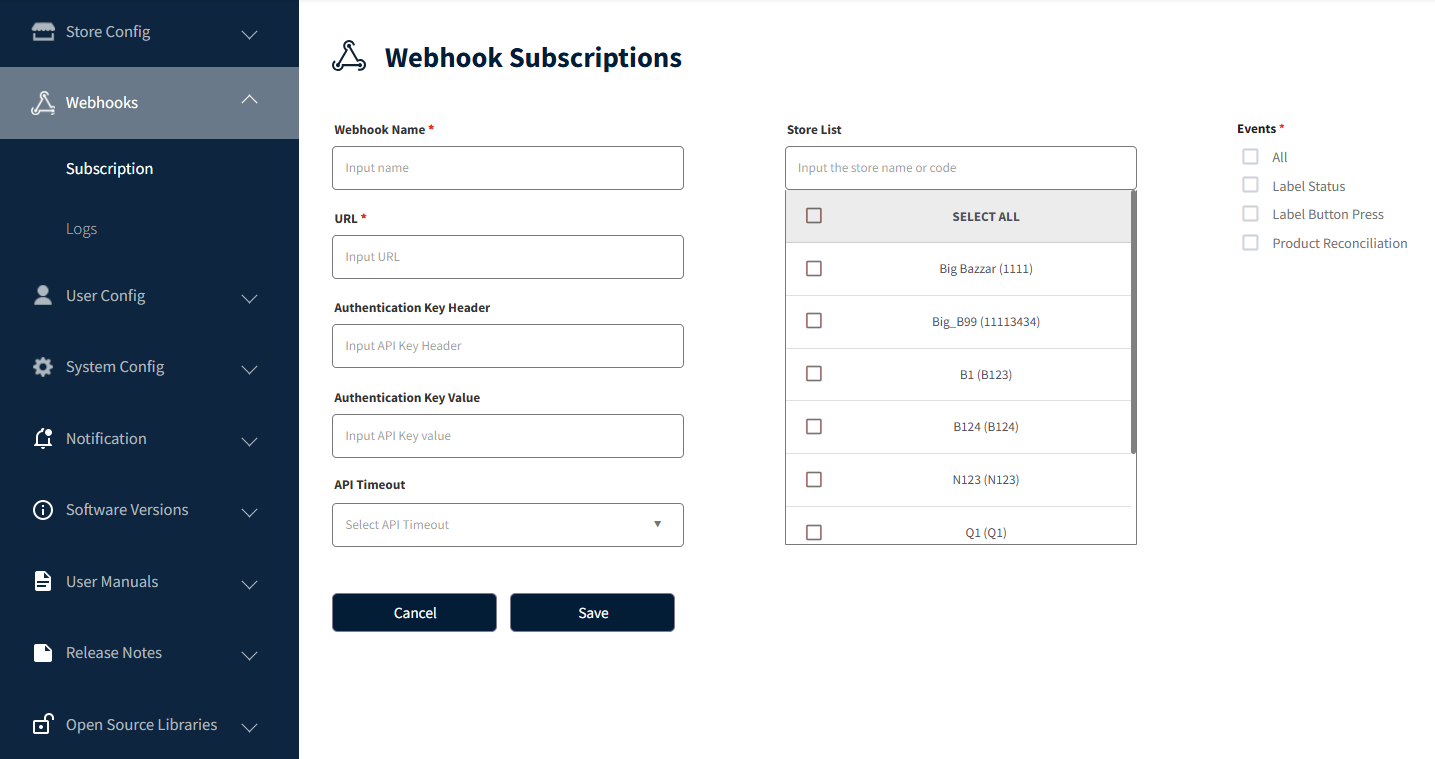
Subscription:
Users can add subscriptions from this page and map the events.
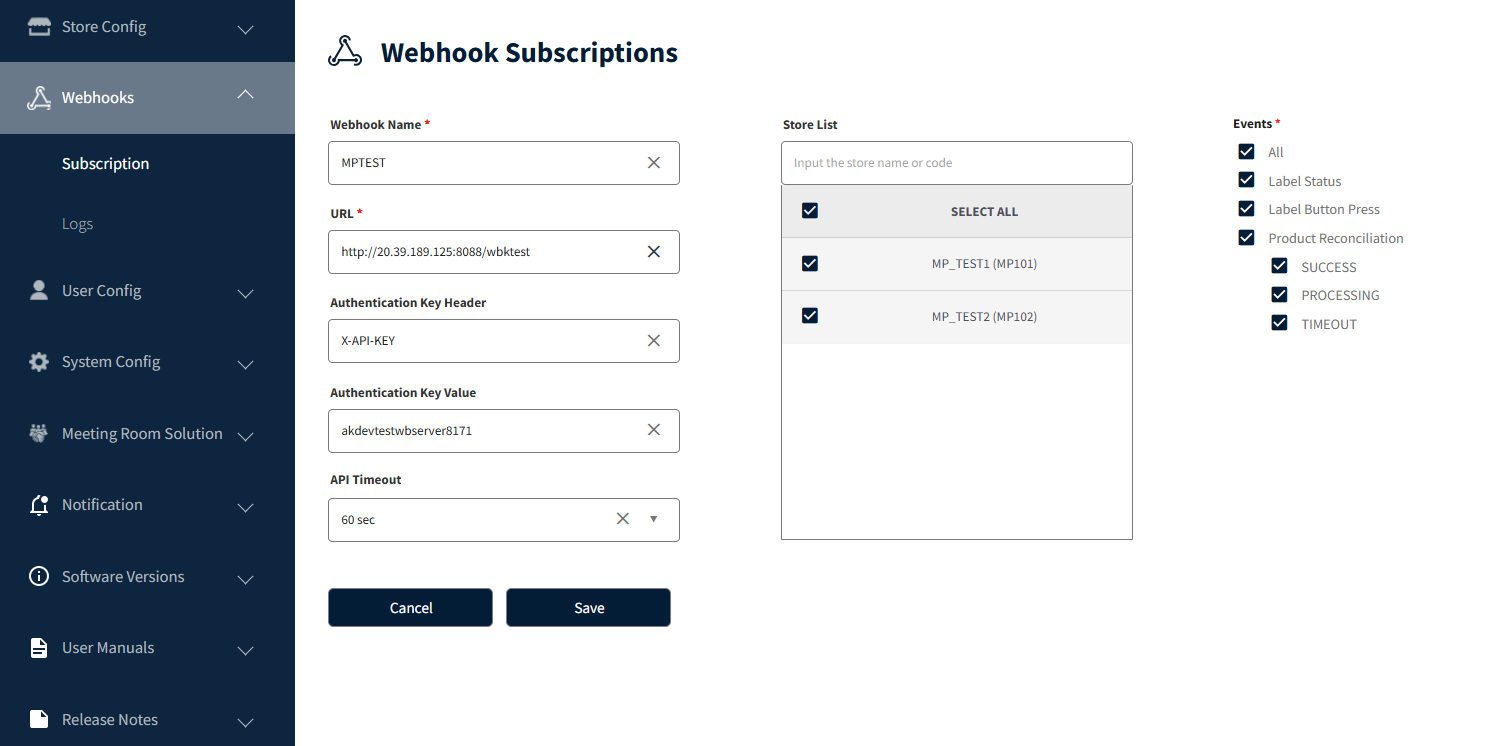
Note: Only one subscription for the customer can be added.
Add Subscription: Steps:
- Input
- Webhook name: Name of the subscription.
- URL: URL that needs to be called and to be printed in logs when events are raised.
- Store: The store to which the subscription is to be applied.
- Authentication Key Header: Authorization header for the provided URL (mandatory in case of authorization given for provided URL) Authentication Key value: Authorization value for the provided Header.
- API timeout: Time Period to wait to get a response from configured API or URL. The default timeout period is 60 sec.
Note:
- In cases where the inputted URL has authorization then the user needs to mandatorily input the Header and value to get response 200 for event logs.
- If the provided header or value is wrong, then logs will result in responses 400 and 401 accordingly.
- If the user does not input the header and value, then logs will result will a response of 400.
- For URLs with no authorization, Header and Value are not mandatory.
- Select the event’s type
- Label status: On the label Image update log will be printed.
- Label Button Press: On the label button press event log will be printed.
- Product Reconciliation:
- For every 30-minute interval, it will check the label status (success, processing, timeout) and product status of the mapped store for the last two and half hours and print the log if there is a change or update in the label and product status.
- Click on the save button to save the configuration.
- The saved subscription will be displayed in the webhook subscription list.
Edit Subscription: The User can edit the existing subscription by clicking on the edit button and after making the changes click on the save button to apply the changes.
Note: If the product reconciliation configuration is updated and saved then it will take 1 hour to apply the latest configuration.
Logs:
Here user can check logs for the Label status and Label button press events w.r.t configured webhook subscriptions once the event is successful and Reconciliation logs for the label and product will display if there is an update and every 30-minute interval by checking the data for the last two and half hour interval.
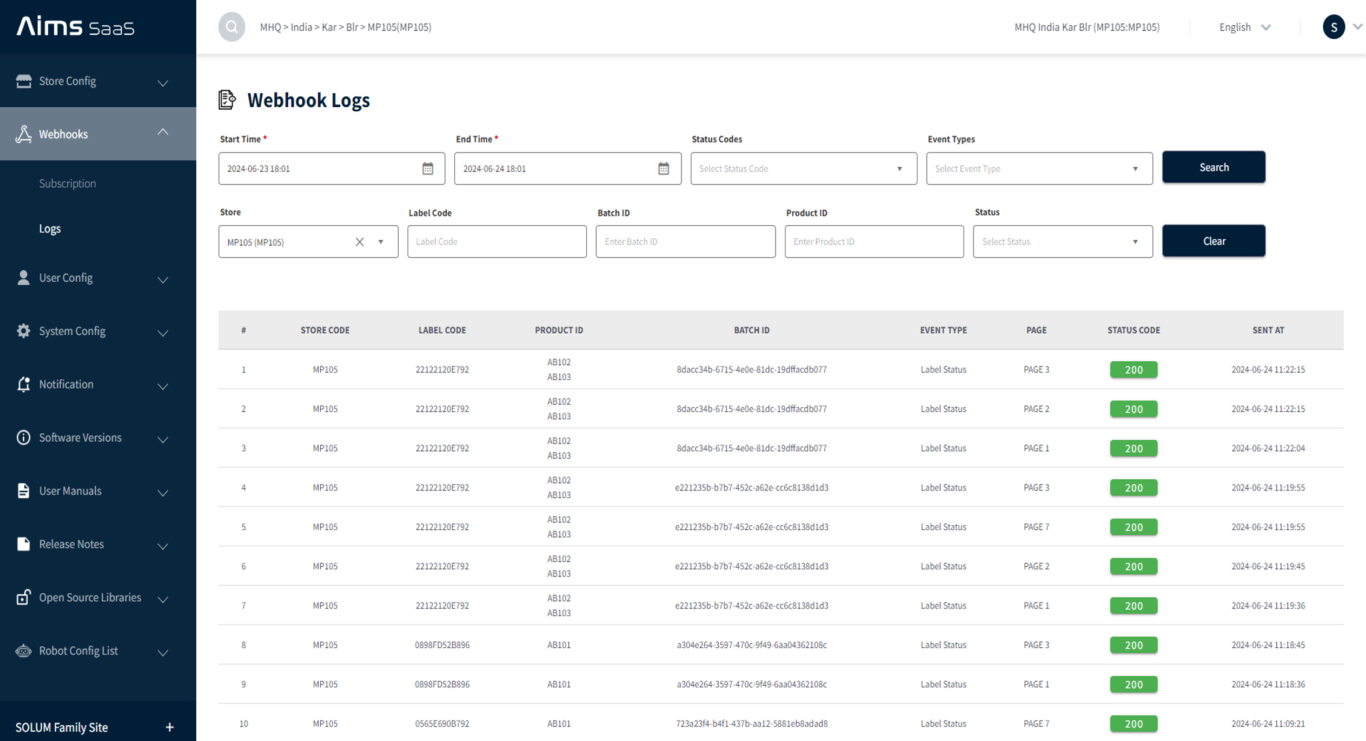
- Label status Events: All label events like – assign, unassign, price update, template update, delete, etc. Logs will print as shown below with event type as Label Status.
- Label button Press: All Label button press events logs will print as shown below with event type as Label button press.
- Product Reconciliation: For every 30th min interval, it will check if the is any update for the label and product status for the last two-and-a-half-hour period and print the logs with the current status.
Whenever the configuration is set for product reconciliation event after saving it will take one hour to apply changes to server.

- API Timeout: Upon API timeout of any particular event w.r.t the configured subscription the log will be printed with code 408 as shown below.
Search Logs:
- Start and End Time: By default, start Time & End Time will be the current minute. Users can change the time period and search to filter the logs.
- Status Code: Input the status code and click on search to filter the results based on the status code.
- Event Type: By default, all events will be selected user can select the individual event type and click on search to filter logs based on the event type.
- Store:
- By default, the current store will be displayed if a user is at the store level and logs will be shown only for that store.
- If the user is at the company level, then this field will be empty i.e. logs will be displayed for all stores within the company.
- Users can select the required store from the list and click on search to filter the results.
- Label code: Search by Label code to filter the results based on label code.
- Batch ID: Search by Batch ID to filter the results based on Batch ID.
- Product ID: Search by Product ID to filter the results based on Product ID.
- Status: Select the status type and click on search to filter the logs based on status.
PAYLOAD
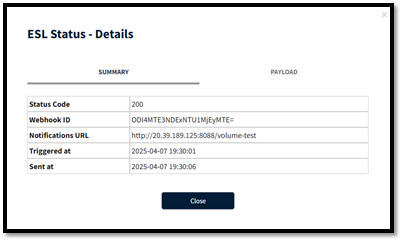
To check the summary and payload of any log, click on the required log it will display the page as shown below.
- Summary – This will display the information of Status Code, Webhook ID, Notification URL, triggered at, Sent at.
- Payload- This will display the information like below w.r.t the event type.
Label status: All events w.r.t label image generation will be logged as label status – Assign, Unassign, image push etc.
Note: When the packet tx sequence fails for a page then in webhook payload for that page it will display status as failed.
Label button press: Only Label button events like ALARM, PICKING REPORT, and SYNCLOSS ALARM will be logged.
Product Reconciliation: For every 30-minute interval, it will check if the is any update for label and product status for the last two and half hour period and print the logs with current status.
- Case 1:
- Label status: Success
- At the 30th-minute interval for any label if the status is updated to success then in webhook logs it will print a reconciliation log with payload as a success for that label.
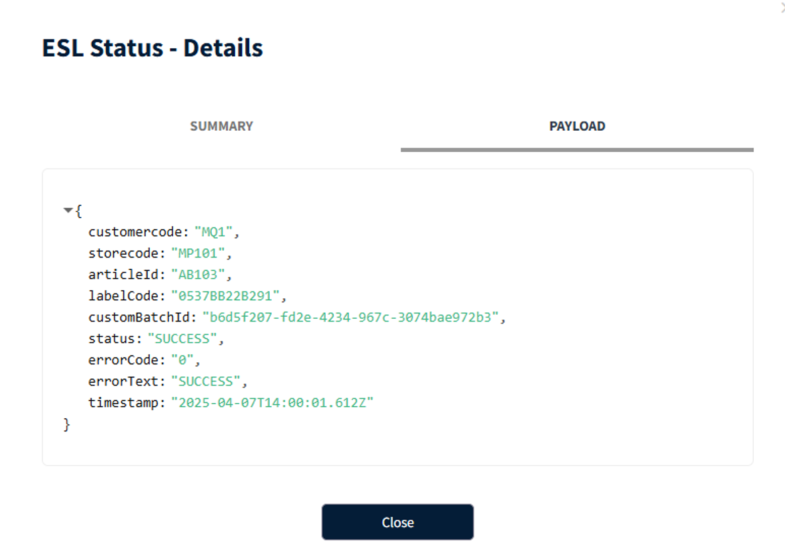
Once the updated label is received with the status as success then for the next iterations that label will be skipped until there is a change in label status for that label again.
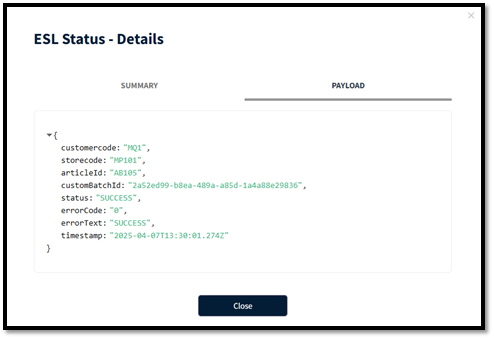
- Case 2:
- Product status: Success
- At the 30th-minute interval for any product if the status is updated to success then in webhook logs it will print the reconciliation log with payload as success.
- This applies to new products and existing product updates.
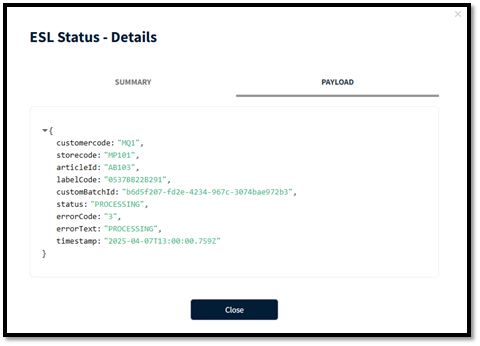
- Case 3:
- Label status: Processing
- At the 30th-minute interval for any label update if the status is in processing then in webhook logs it will print a reconciliation log with payload status as processing.
-
Case 4:
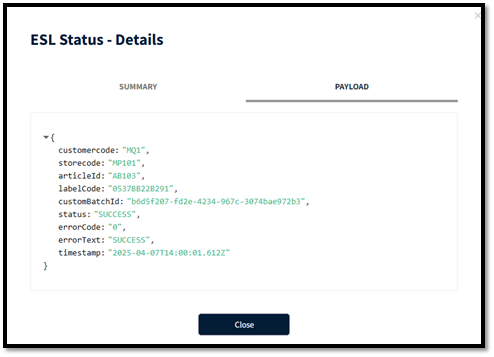
- Label status: Processing ==> Success/Timeout.
Note: For any label, if the status is printed as processing in the reconciliation log then in the next iterations it will check for label status to turn to success or timeout to print the other log for the same label again.
- Processing==> Success:
- On the next iterations if a label status changes from processing to success then in webhook logs it will print the reconciliation log again with payload status as Success.
- Processing ==> Timeout:
- On the next iterations, if the label status changes from processing to timeout then in webhook logs it will print the reconciliation log again with payload status as Timeout.
- For any reason if the label status is displayed as TIMEOUT in the payload, it will display the error text with the message as shown below.
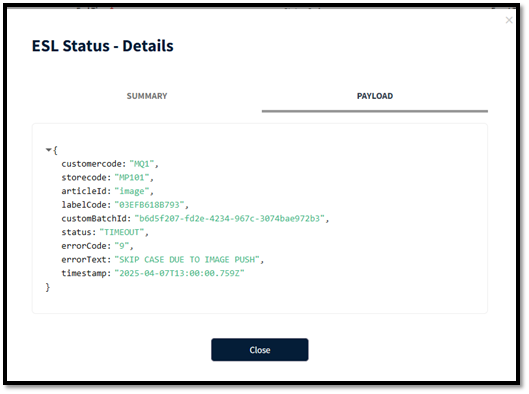
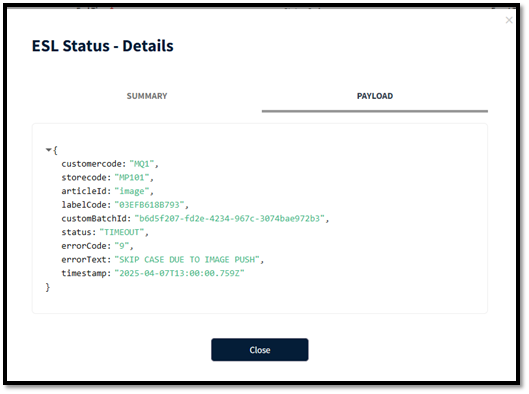
Example Texts:
- TEMPLATE NOT FOUND
- FAILED TO TRANSMIT
- SKIP CASE DUE TO IMAGE PUSH (when Block article update on image push function is enabled)
3. Dithering support for image push & templates
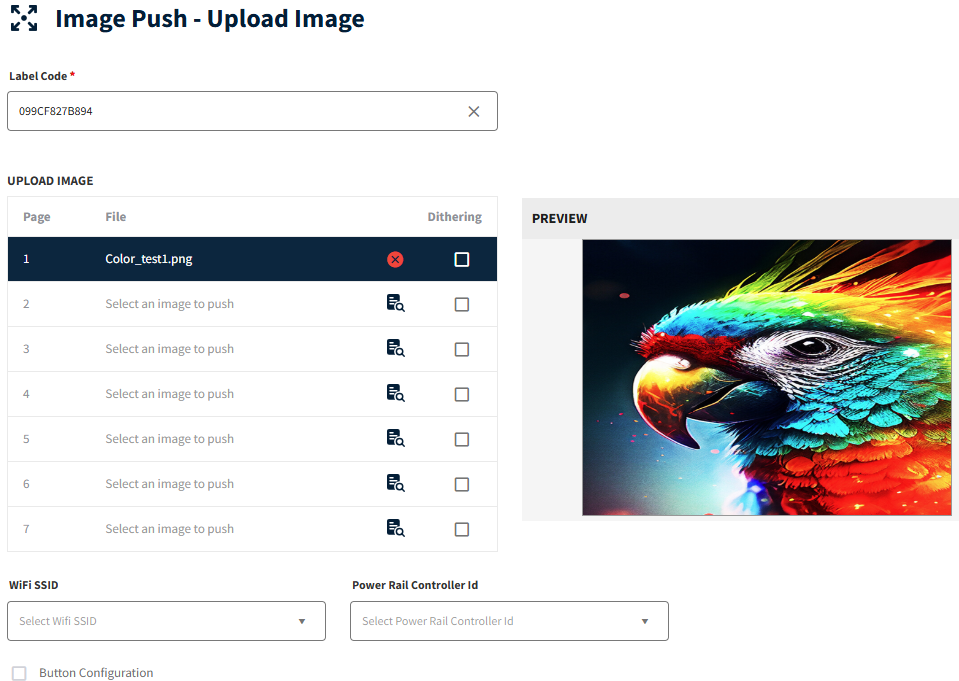
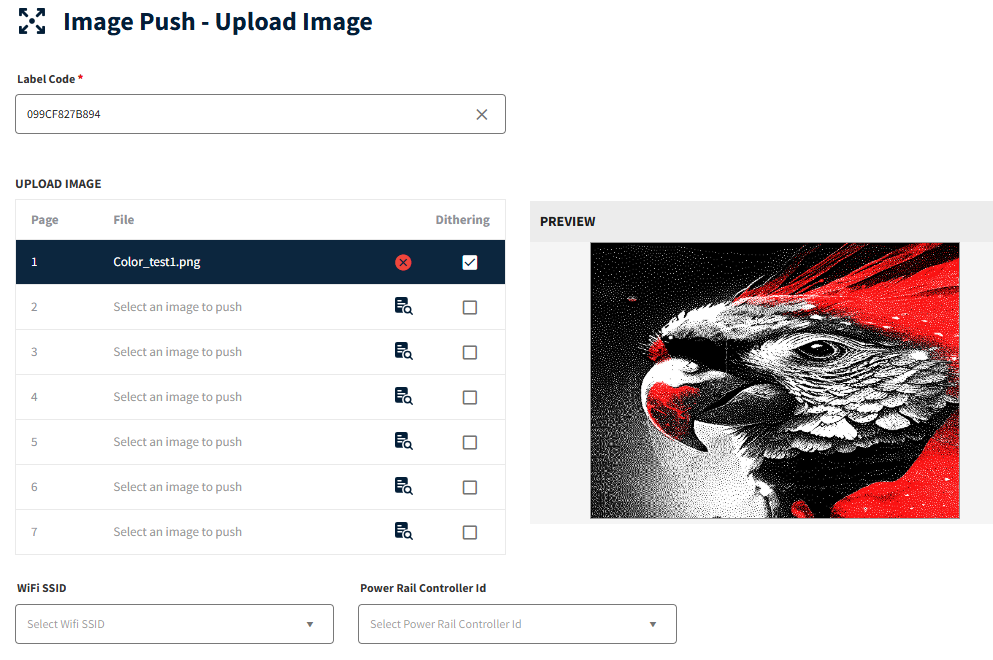
Dithering is an image processing technique used to simulate color depth in images with a limited color palette. When a color falls outside the available palette, dithering approximates it by distributing colored pixels from within the existing palette. This ensures that the image is dithered based on the available layout colors mapped to the label type, maintaining consistency with the designated color scheme.
Dithering
This will apply dithering to images embedded within a template. The dithering will specifically affect the images, while other template elements such as text or shapes remain unaffected. Dithering can be selected during image push or template upload operations.
4. Meeting Room solution
The meeting solution seamlessly integrates with Microsoft Outlook 365, enabling users to securely access and manage their calendar events directly within our SaaS platform. With Microsoft OAuth 2.0 and graph API integration, users can view upcoming meetings and track schedules.
The Customer admin must create meeting rooms using their Microsoft ID to enable calendar integration. Once the room is created, users can start viewing and managing meetings scheduled in that room directly from our SaaS platform.
Since this is a customer-specific feature, Contact SOLUM Admin for access.
After the Solum admin enables it, users will see the Meeting solution section available under the Config
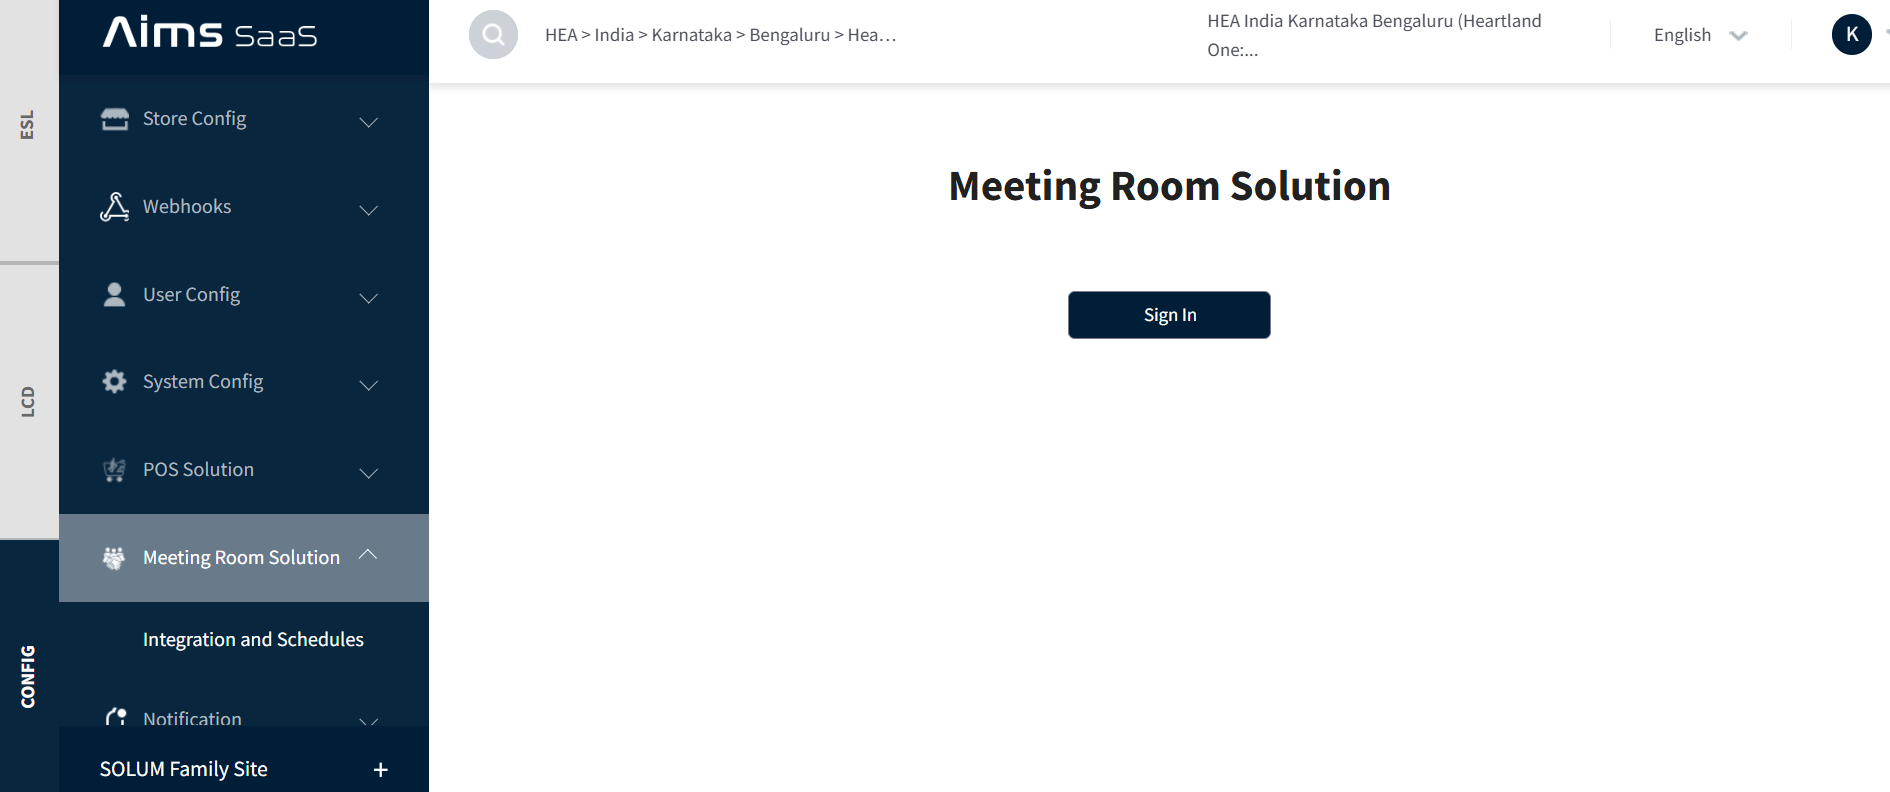
To integrate with Microsoft, navigate to Config > Meeting Solution > Integration and click the Sign In button. A redirection confirmation popup will appear—click OK to proceed. This will redirect to the Microsoft login page to complete the sign-in process securely.
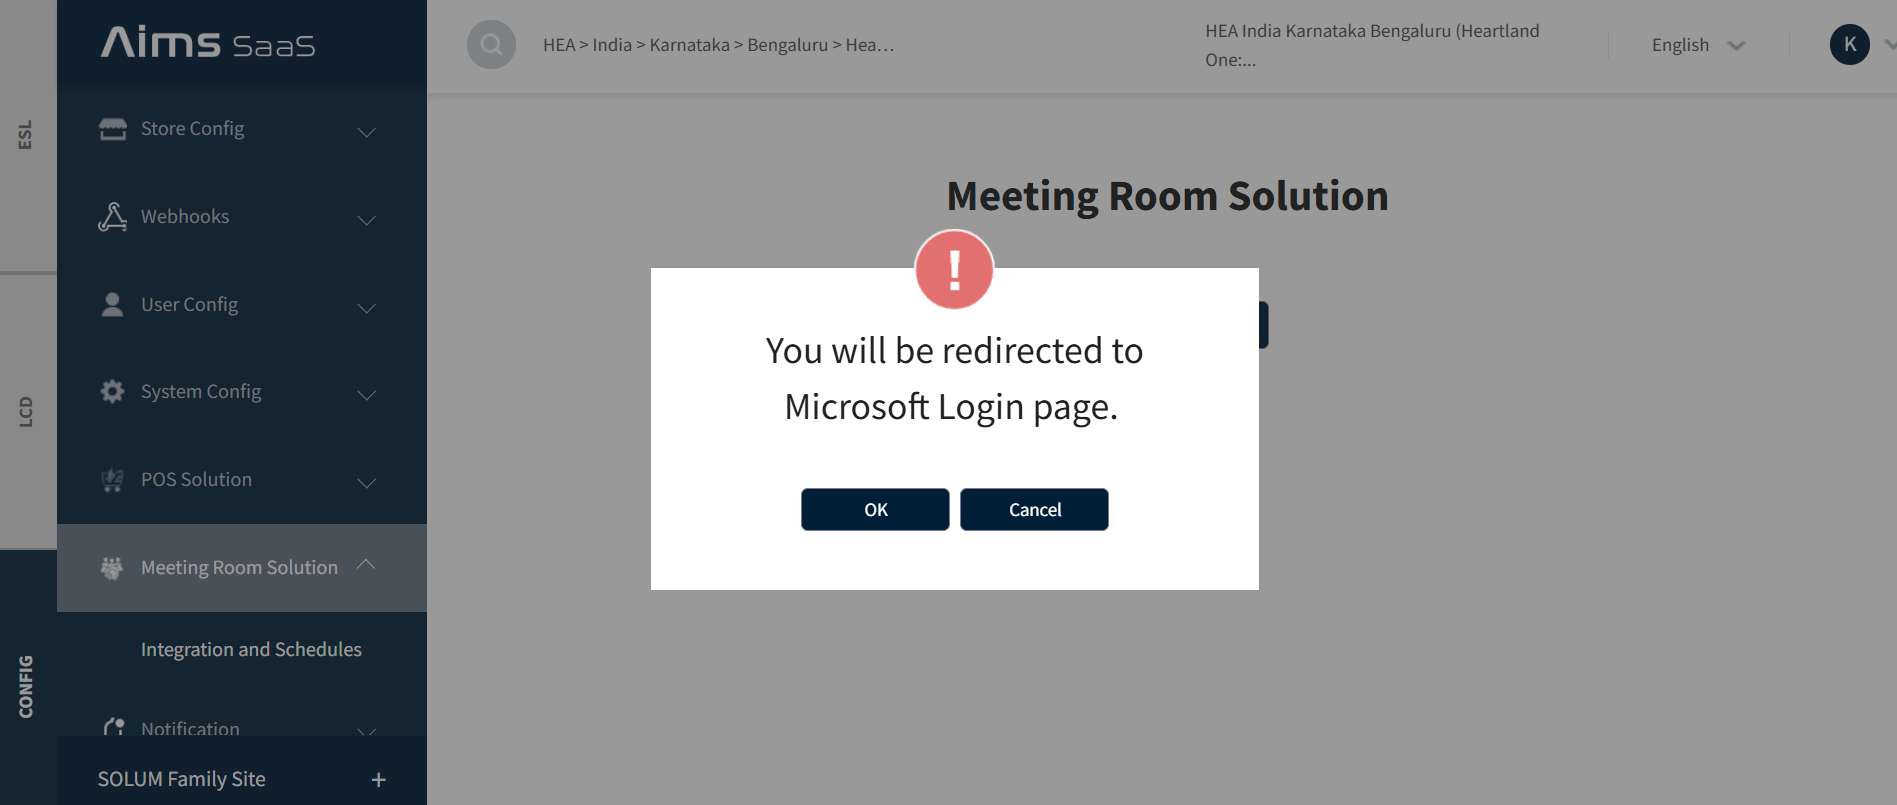
It will redirect to the Microsoft login page. The user has to enter valid admin credentials and click the Sign In button on the Microsoft login page.
Once the login is completed. user will be redirected to the SaaS application, where a pop-up message will appear: "Integration is in progress. Please wait..."
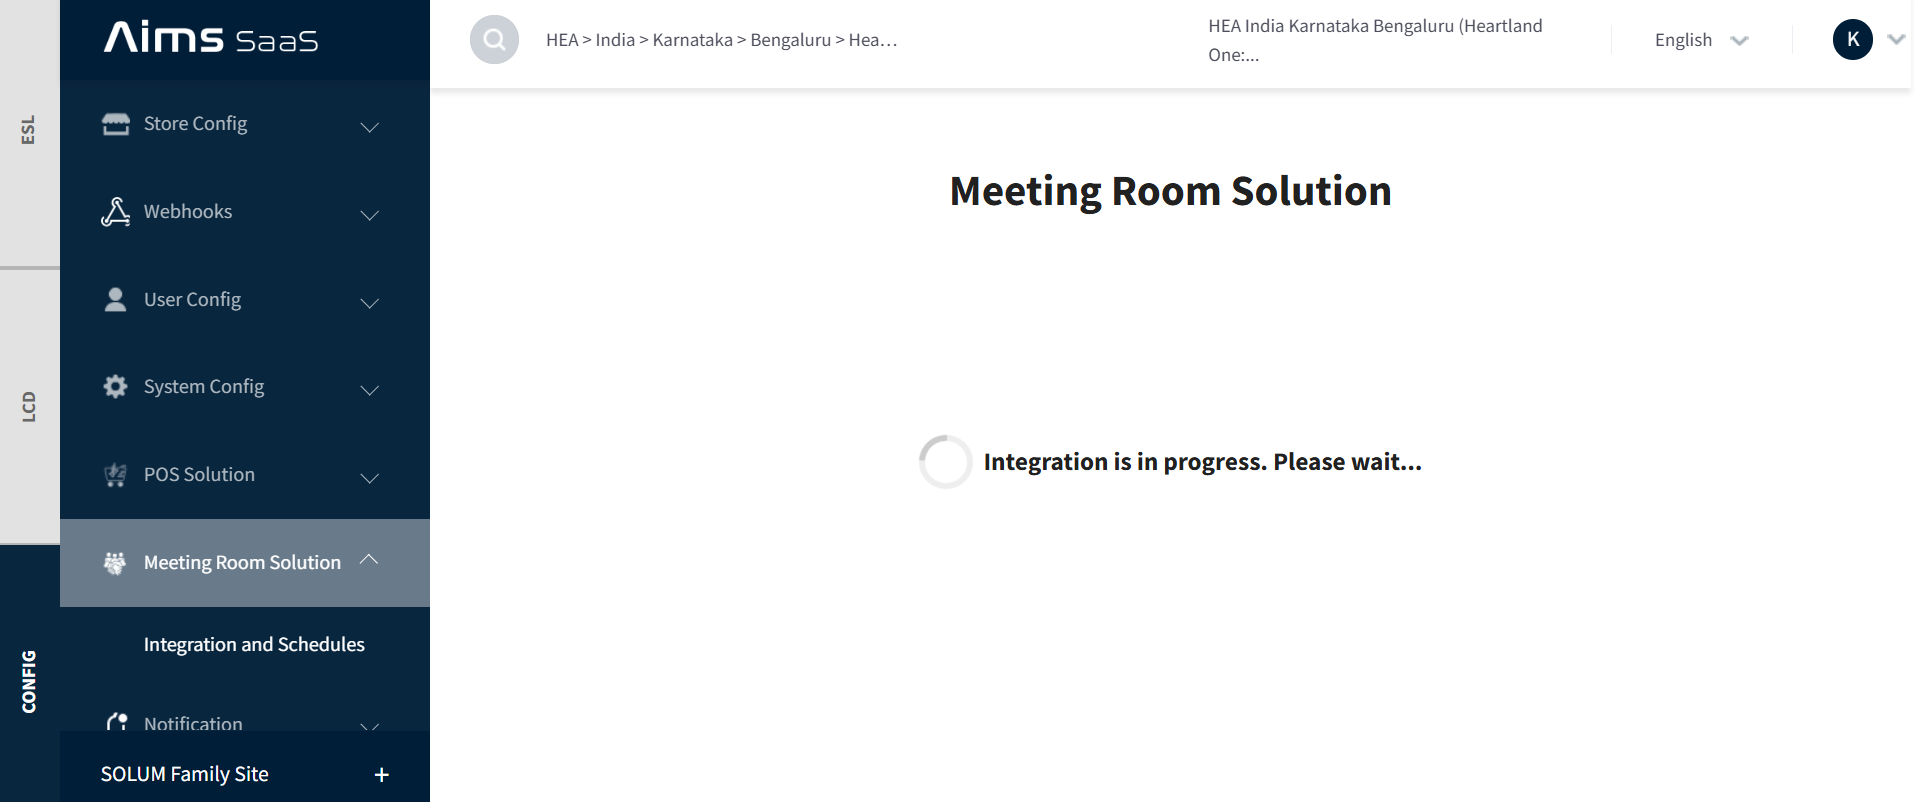
The pop-up will disappear after 30 seconds and redirect the user to the Meeting Solution dashboard page. Here, the user can view the store list and the meeting rooms associated with each store. Initially, no rooms will be mapped to any store
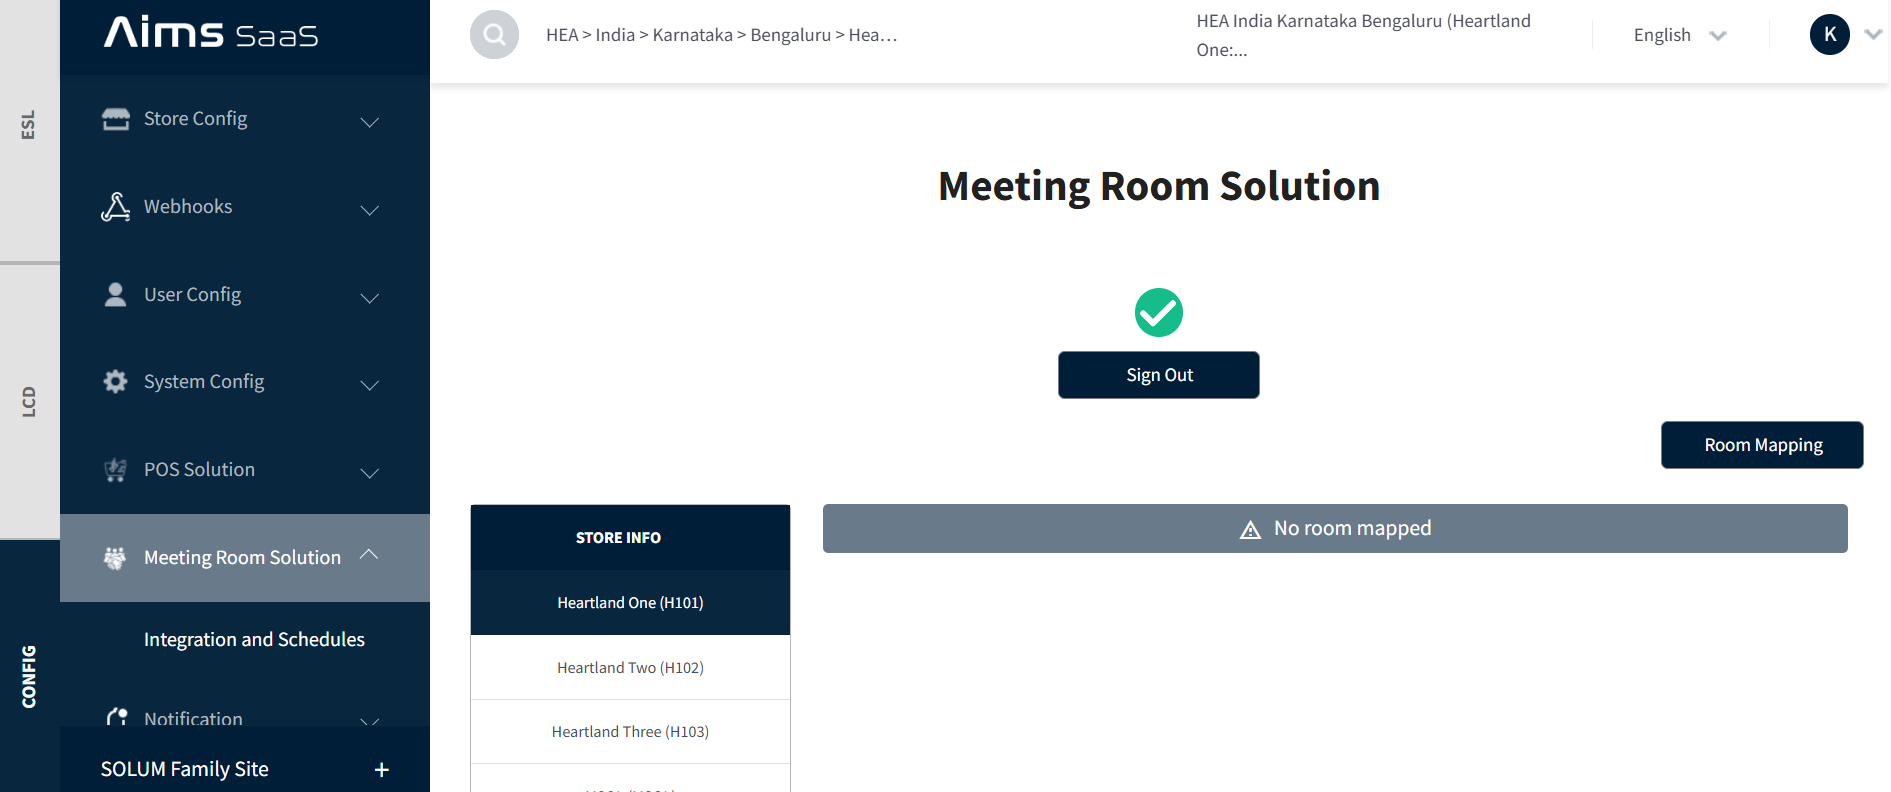
Room Mapping
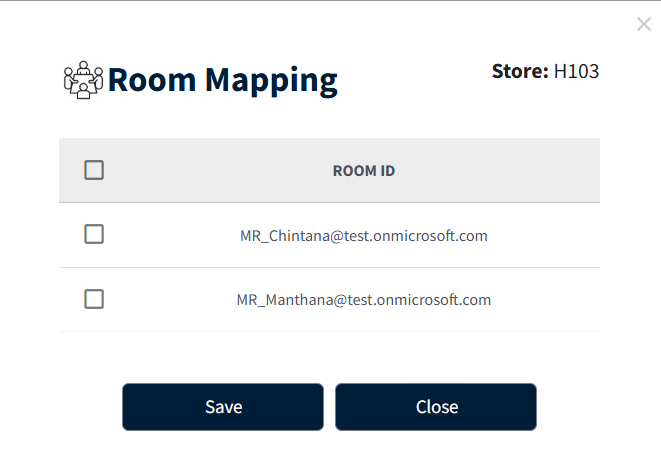
- The user has to click on Room Mapping to map the rooms to the selected store. A Room Mapping pop-up will appear, showing Unmapped and Mapped Rooms. The user has to select the desired room from the Unmapped section and click on the Save button to complete the mapping.
After clicking the Save button, the user will be able to see the mapped room listed under the selected store on the Meeting Solution dashboard.
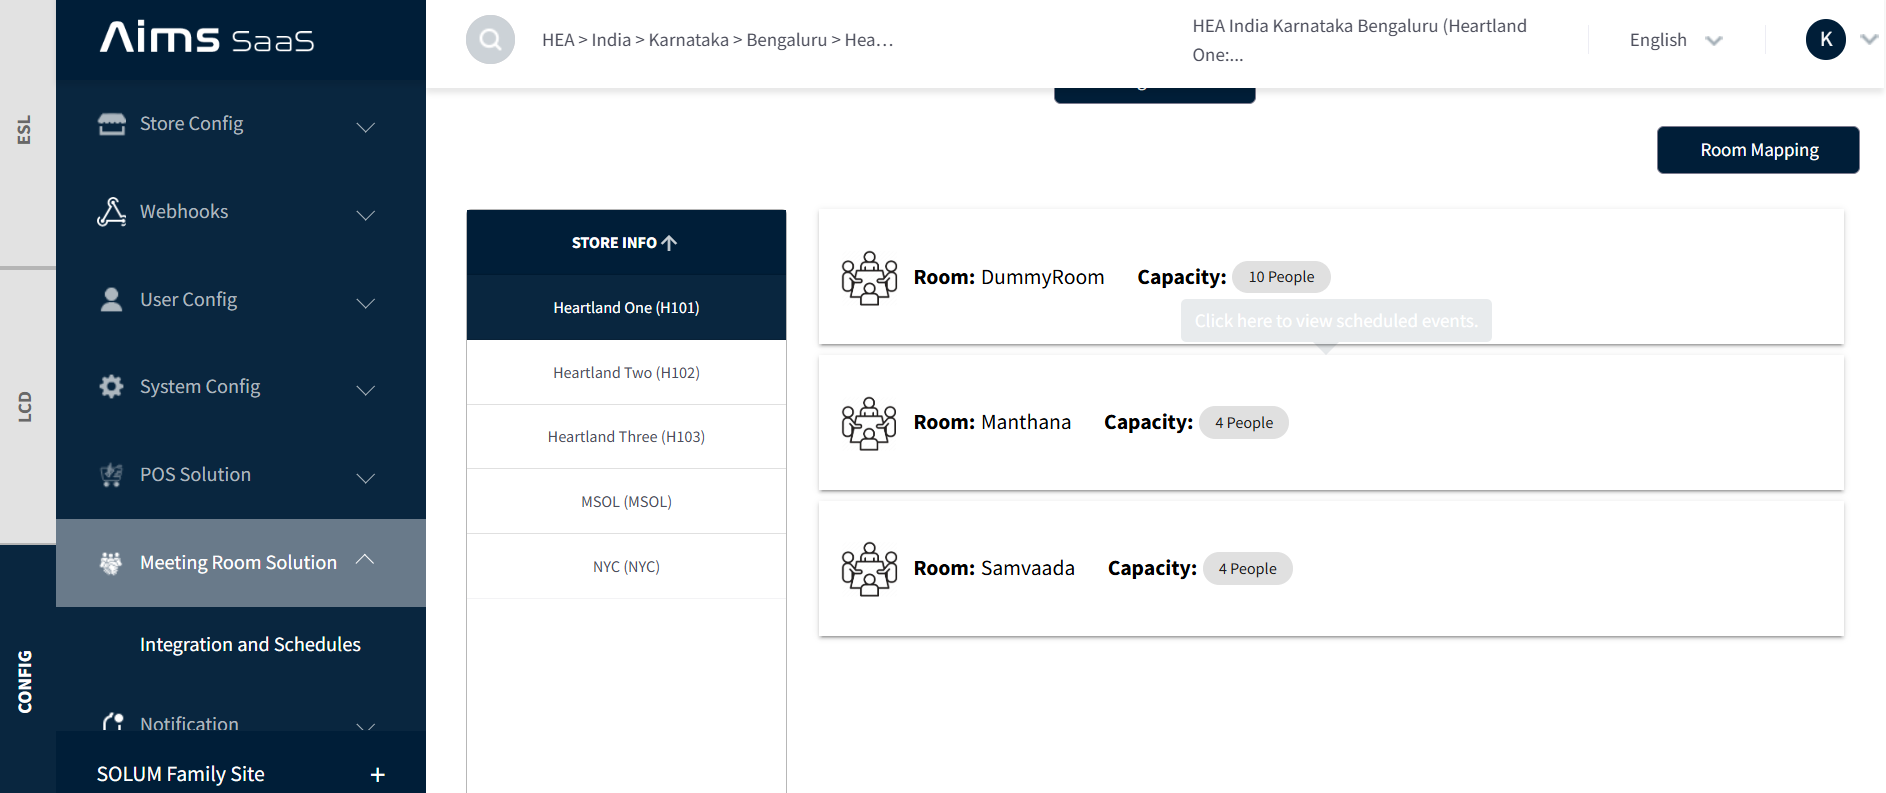
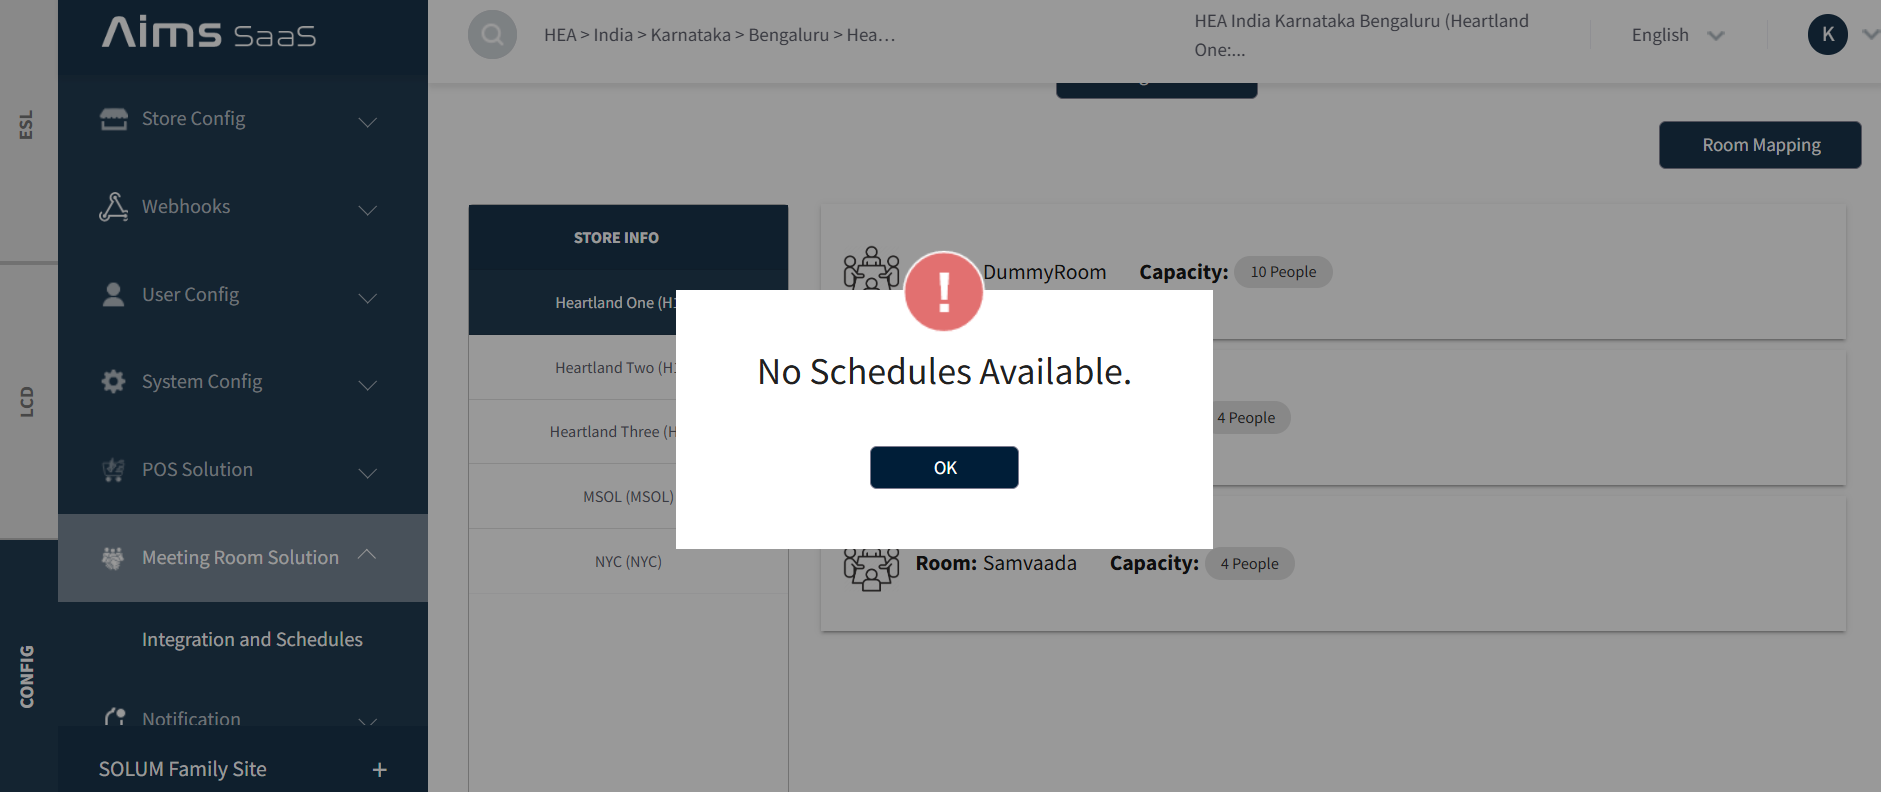
The store will display only the mapped rooms that have upcoming events. If there are no upcoming events, a "No Schedules Available" pop-up will be displayed.
Meeting Scheduling
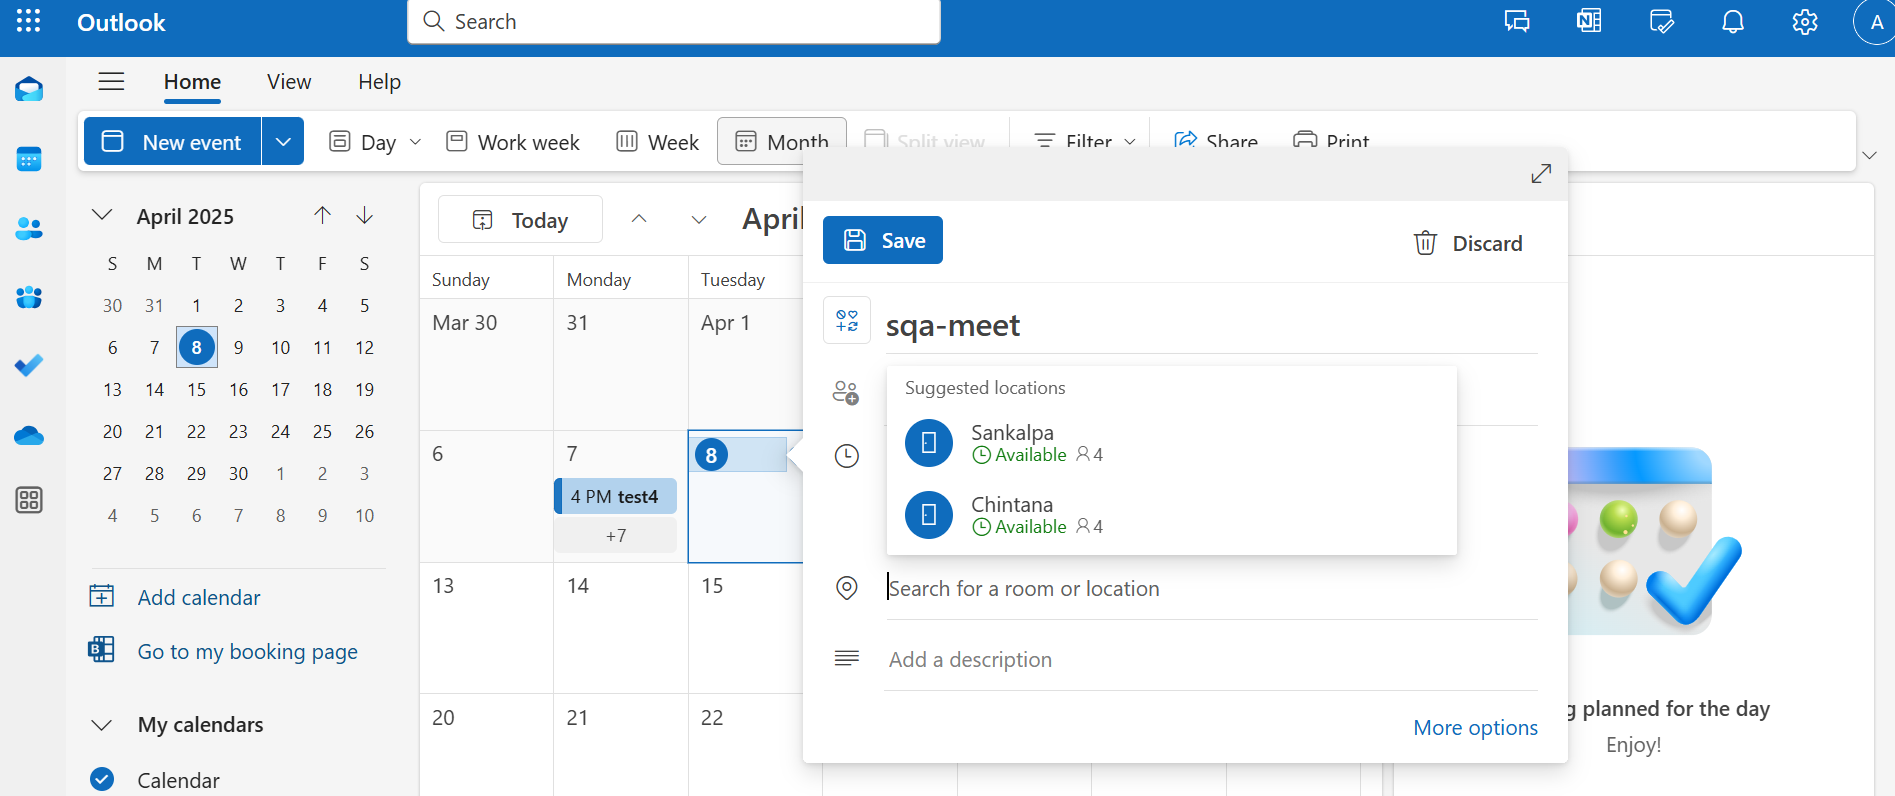
After mapping the rooms to the stores, the user has to sign in to Outlook Calendar to schedule a meeting for the particular room.
Use the following link to access the calendar: https://outlook.office.com/calendar/view/month
-
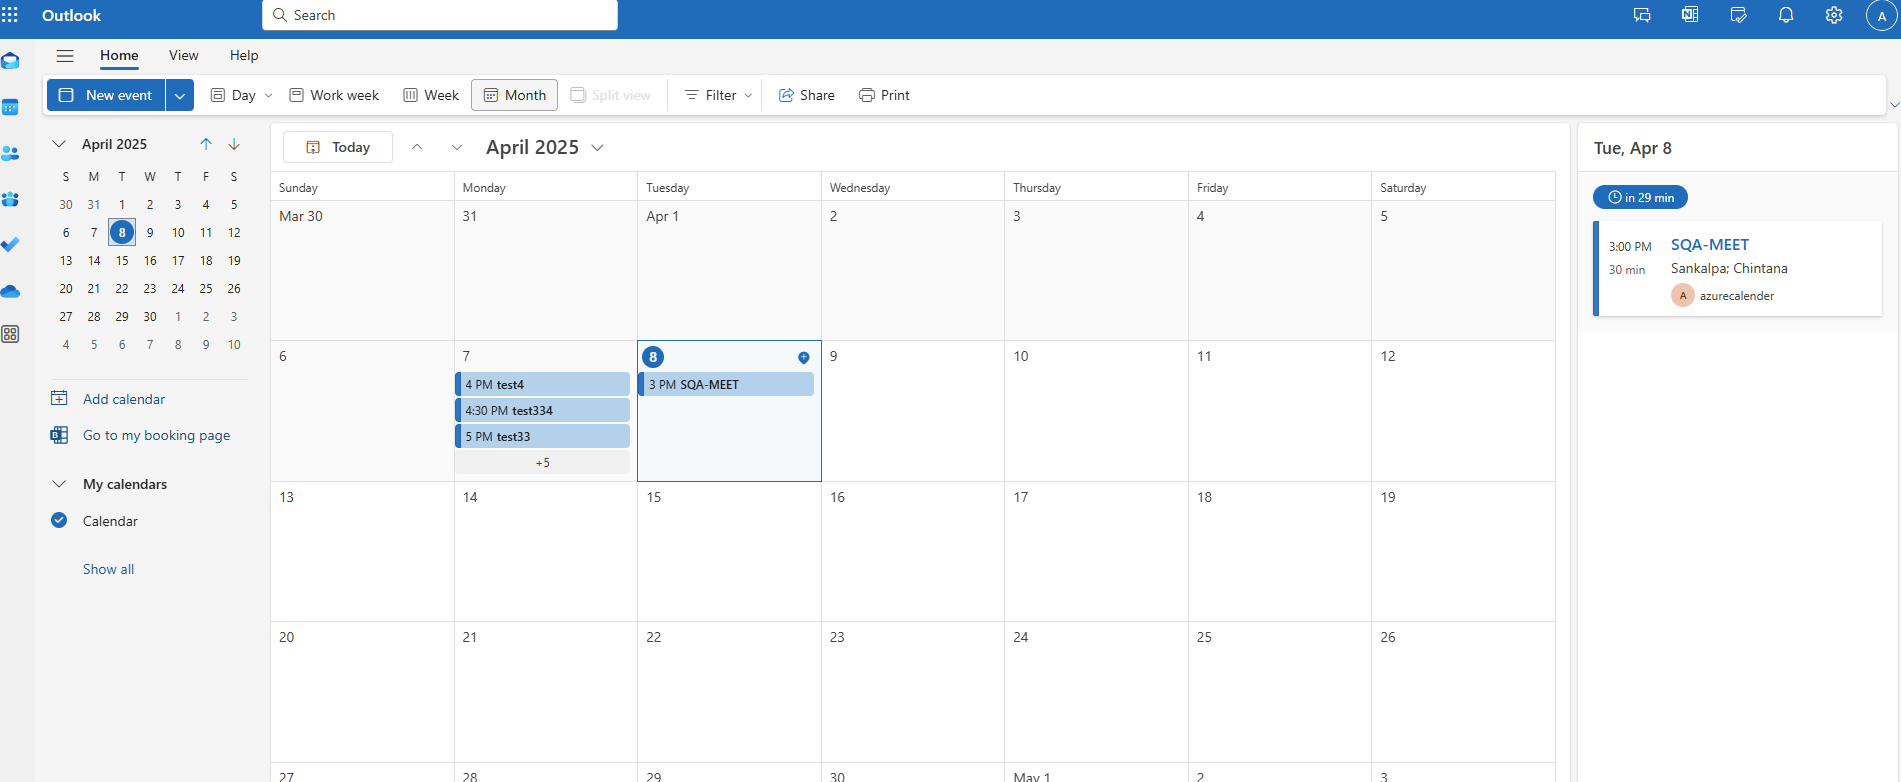
To schedule a meeting, click on the date in the Outlook Calendar. Then, add a title, select the time, and choose the mapped meeting room from the location or room list. Finally, click on the Send button to create the event.
-
After scheduling the meeting, the user can see the scheduled meeting displayed on the right side of the outlook dashboard.
-
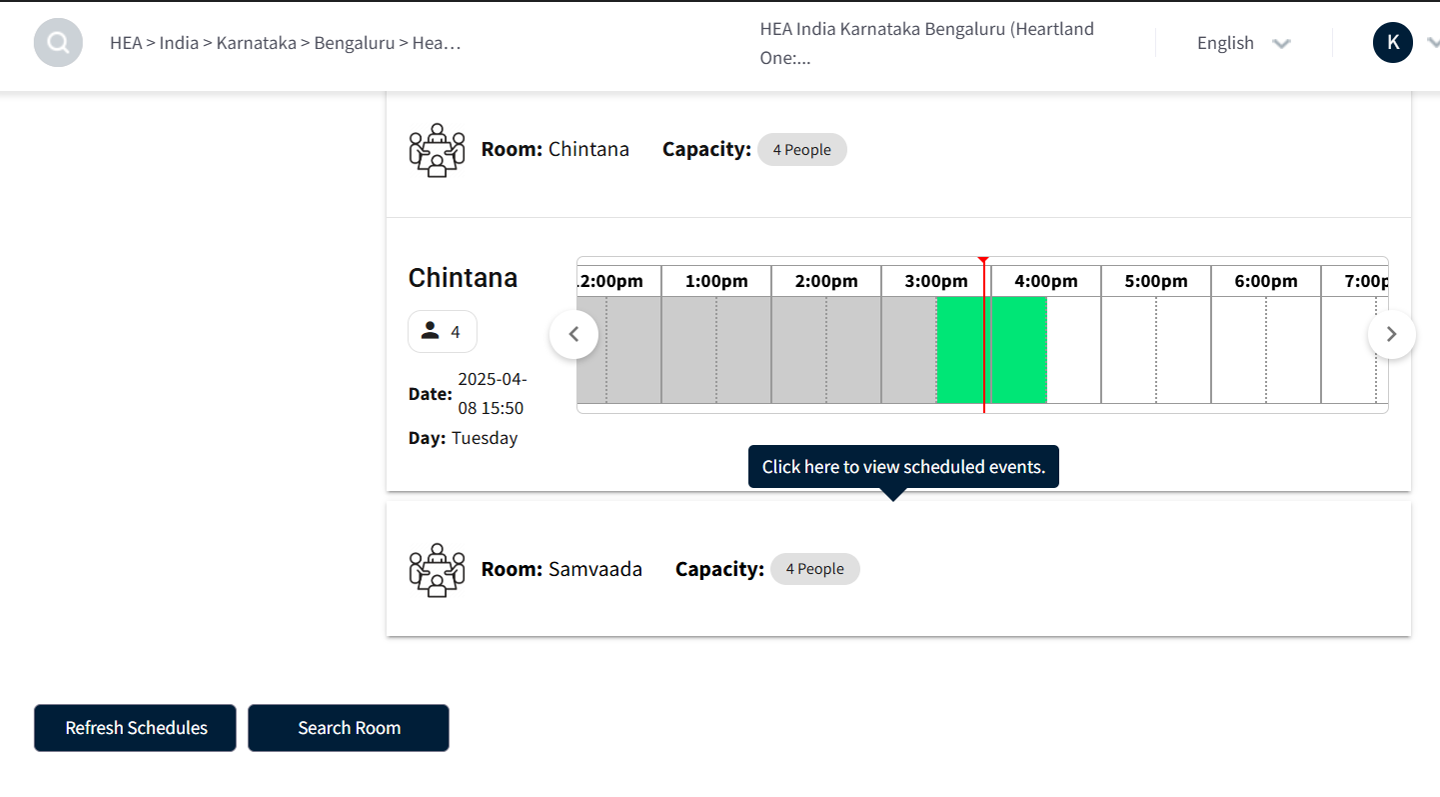
user can see all ongoing and upcoming events for the rooms mapped to the store, displayed on the screen.
-
When the user places the cursor over a grid, it will show the event details along with the organizer’s name.
-
Click the Refresh Schedules button to immediately retrieve the latest events.
-
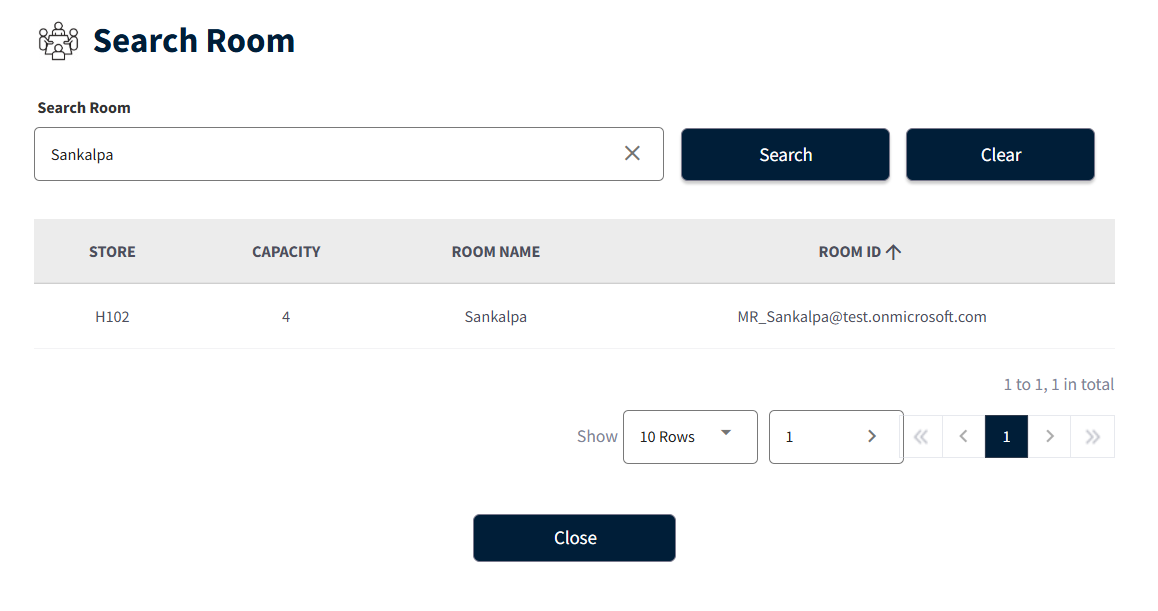
To find which store a room is mapped to, click the Search Room button. A pop-up will appear showing all currently mapped rooms.
-
Users can search for a specific room by entering its name or ID, then click the Search button After clicking, the relevant store information will be displayed.
Assign Operation
- After scheduling the meeting from Outlook, wait for 5 minutes, and then navigate to the Product page. Here, the user can see the updated product list under Meeting Solution > ESL > Product > Product Info. If the user has booked a meeting, they will be able to view the events listed below on the same page.
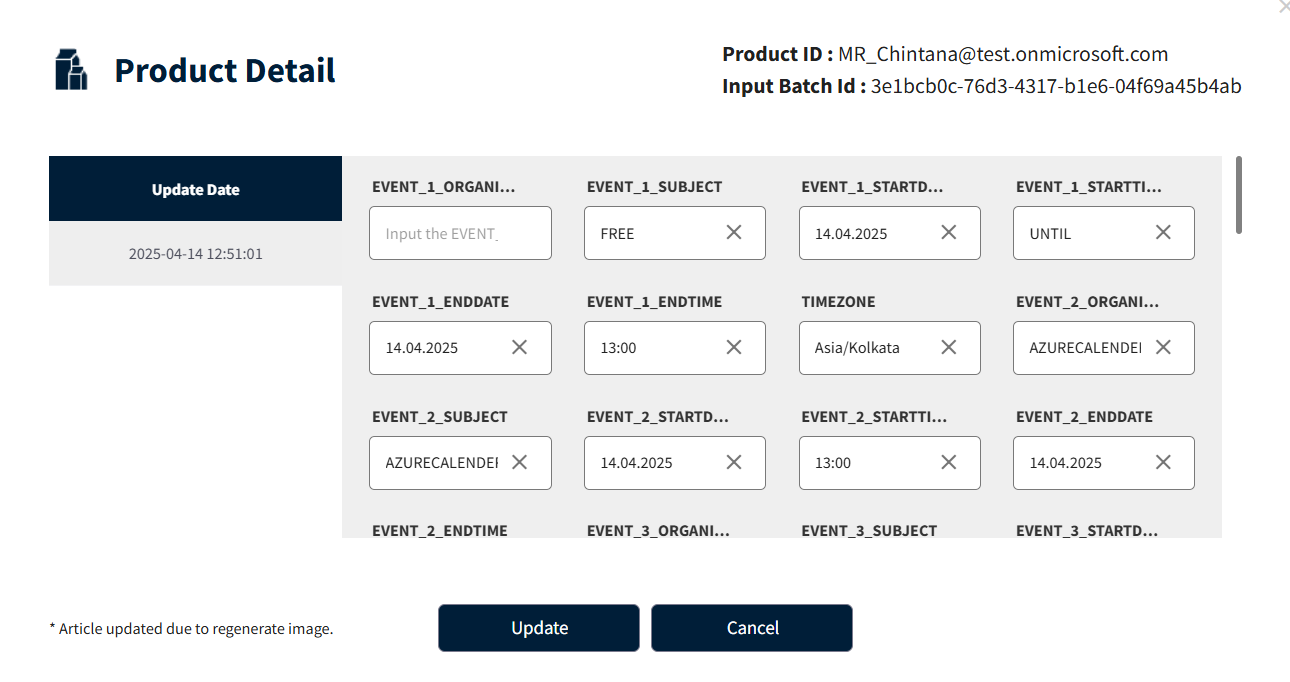
Once the integration is complete, this “article format” becomes the default structure for posting data to the product.
-
With the help of the updated Product ID, the user can perform the assign operation for the particular room label. This operation is the same as the normal assigning process that the user follows.
-
Once the assign operation is completed, the label for that room will be updated and displayed on the screen. It will look similar to the example shown below.
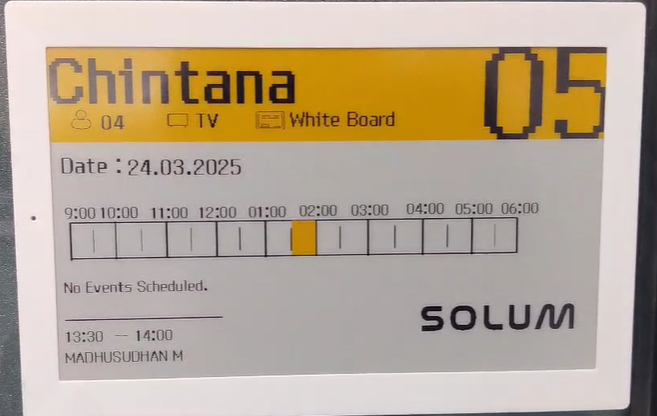
- Rooms must be created in the customer's Microsoft 365 account (e.g., onmicrosoft.com) by the customer.
- It may take up to 24 hours for the rooms to sync across all Microsoft Azure services.
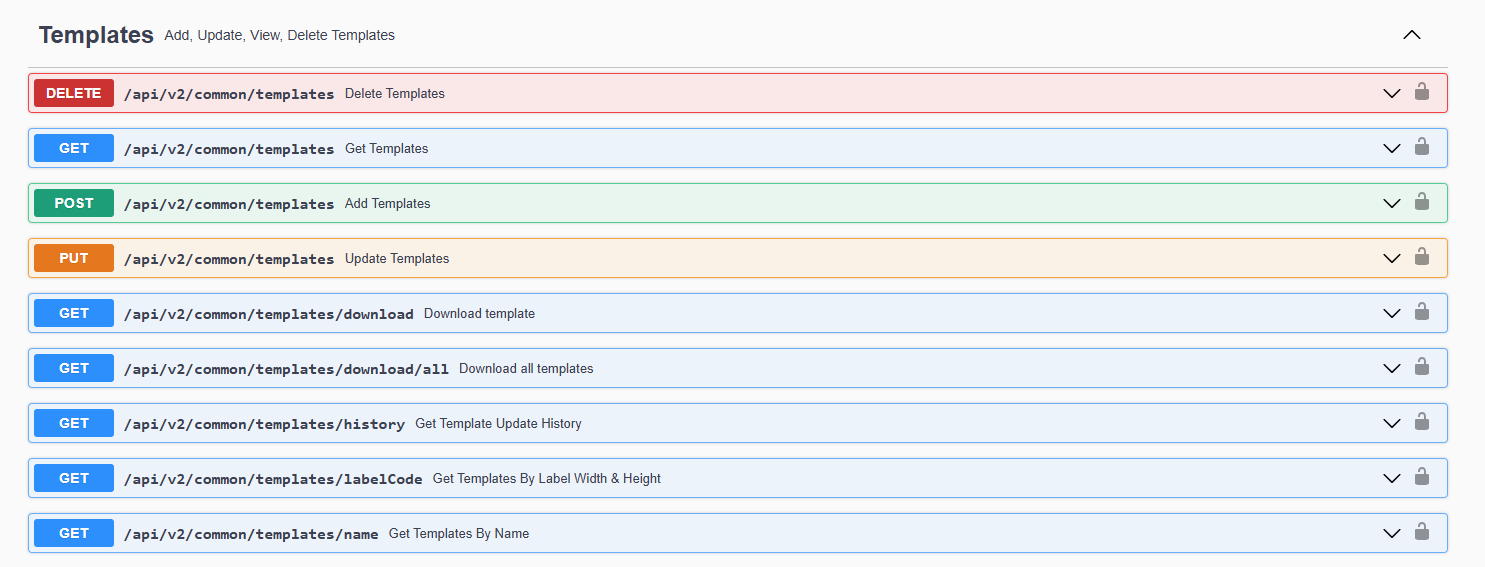
Template APIs added back to swagger
6. JavaScript functions support for product data transformation and template mapping
The "JavaScript Snippets" feature is available only to Super Admins. However, customers can access and map the "JavaScript Snippets Function" if this option is enabled at the customer level.
To enable it at the customer level Go to SAA → Customer → Functions and enable “JS Code Snippets”.
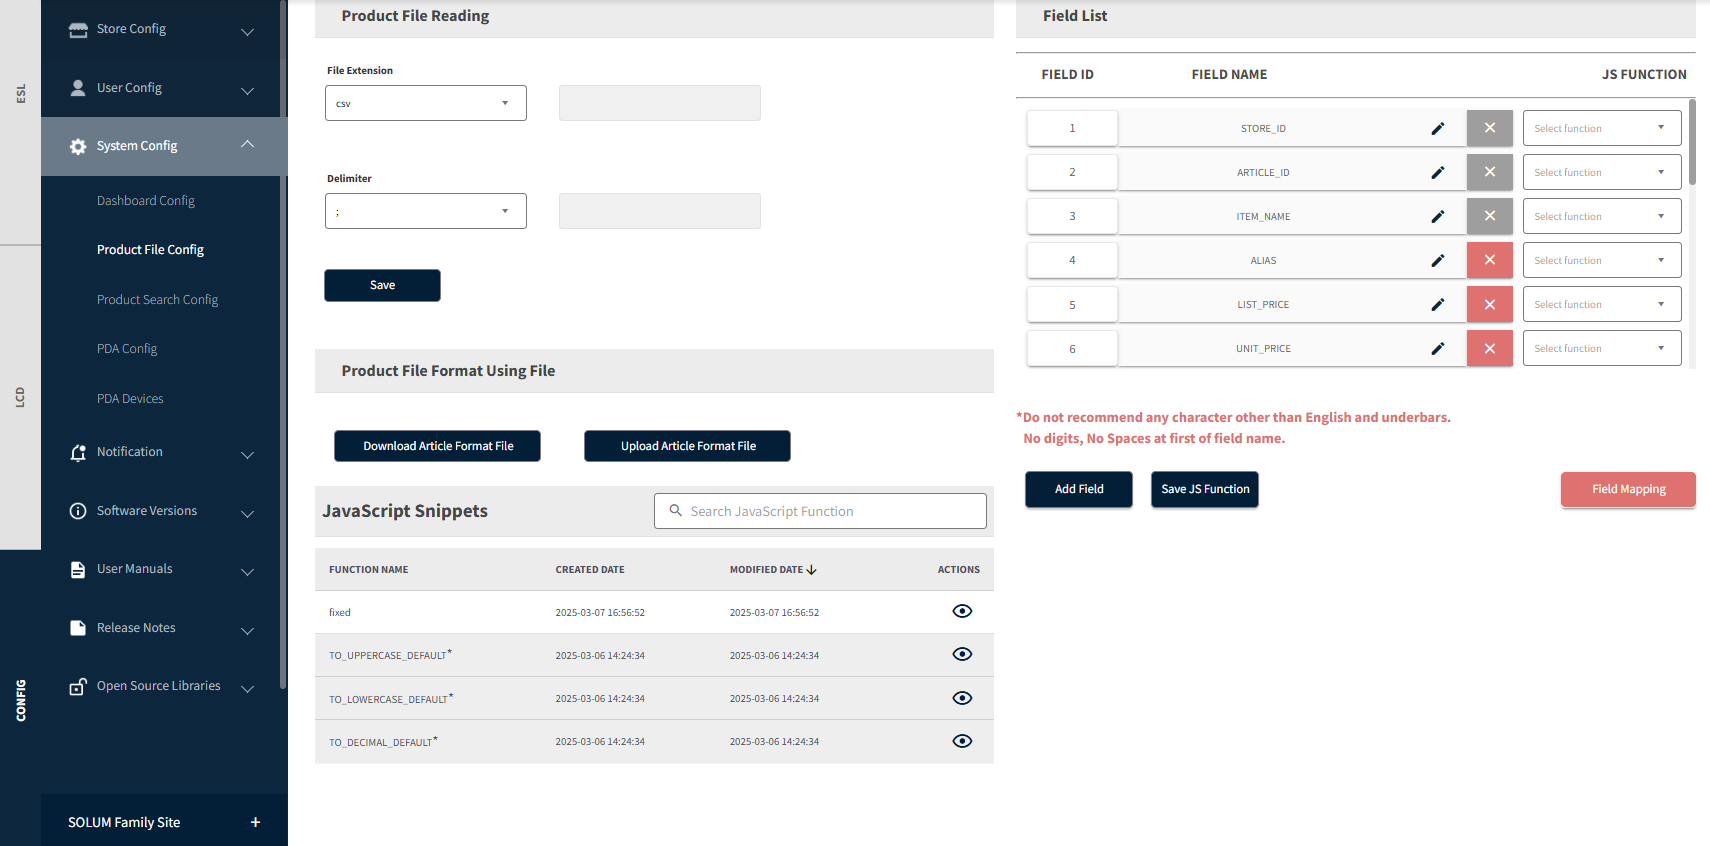
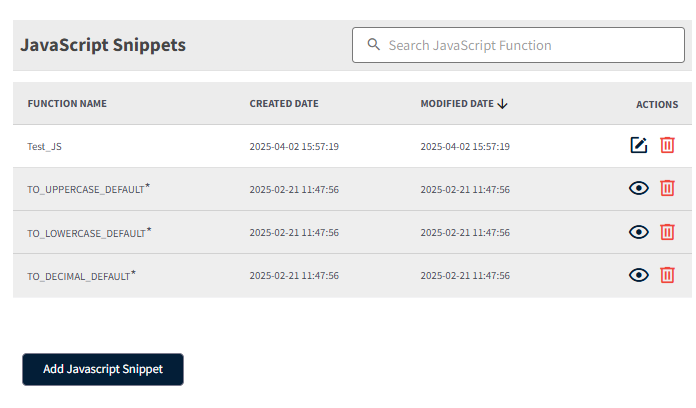
After enabling the JS Code Snippet from the Super Admin, the Super Admin will see the JS Code Snippet function in the Product File Config page. Default JavaScript Snippets functions will be added to the JavaScript Snippets functions list. Super admin can delete the default functions but cannot be editable.
Config==> System Config ==>Product File Config
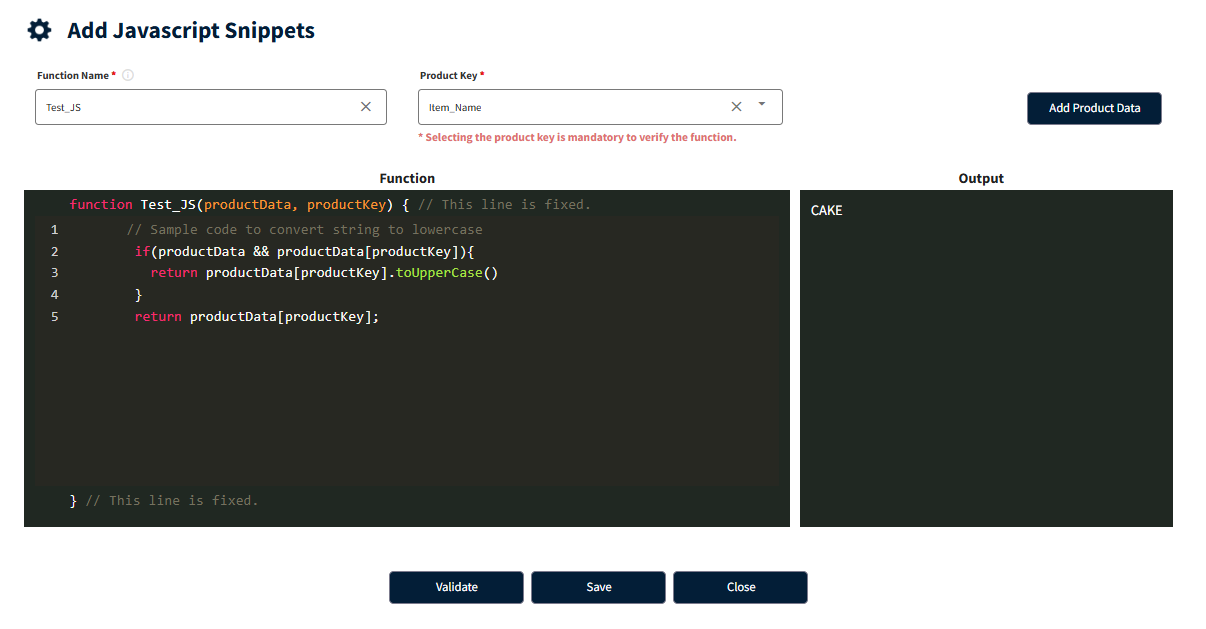
Adding new JavaScript function:
- To perform product data transformation, first need to add JavaScript functions.
- Initially, to check the output, we can validate the function using the Validate button (this will not save the function).
- Once the function is finalized, clicking the Save button will save the function.
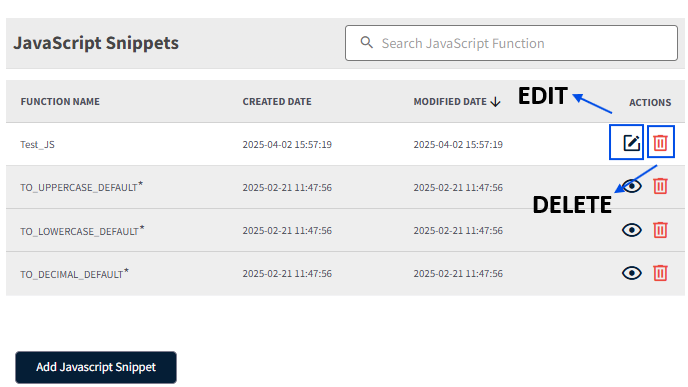
- JavaScript functions can be edit and delete from the Super Admin end.
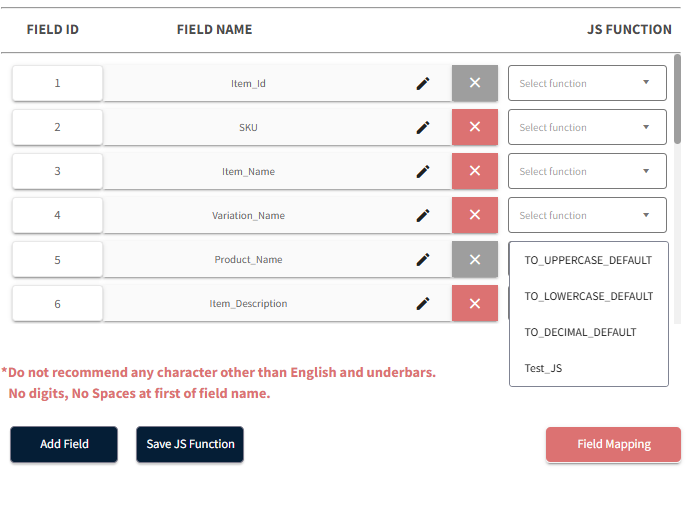
- Once the JavaScript functions are added, we can use them to transform the product data. Before that, we need to map the JavaScript functions to specific product data keys as shown below.
- Select the JavaScript function from the dropdown of the JS Function and click on the Save button.
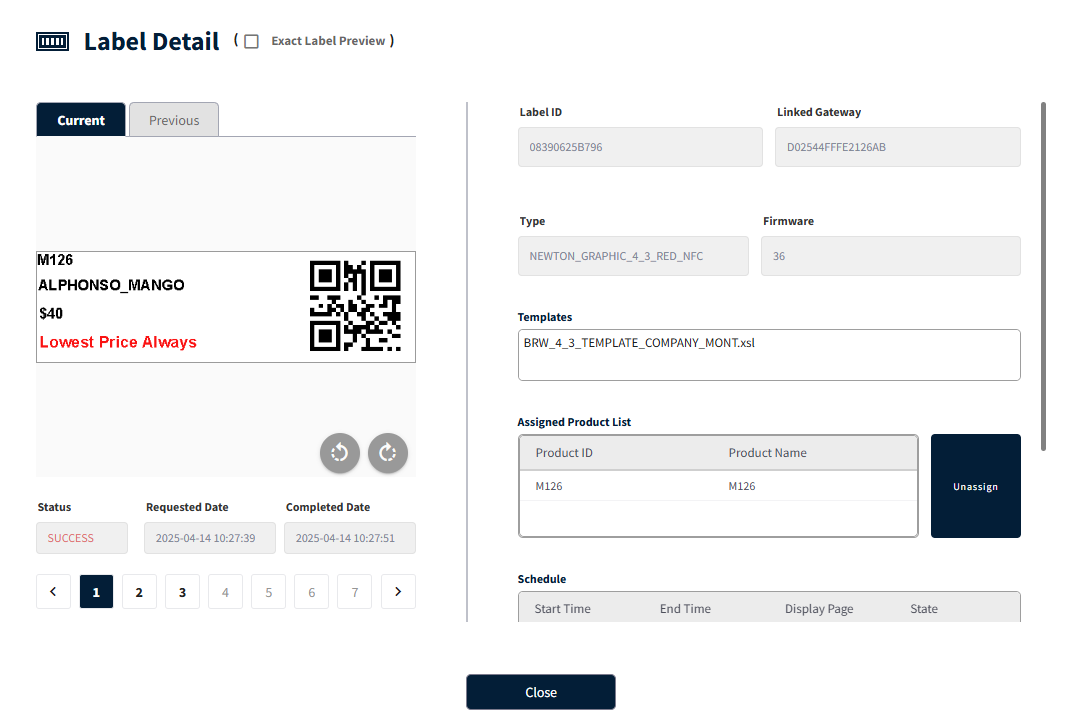
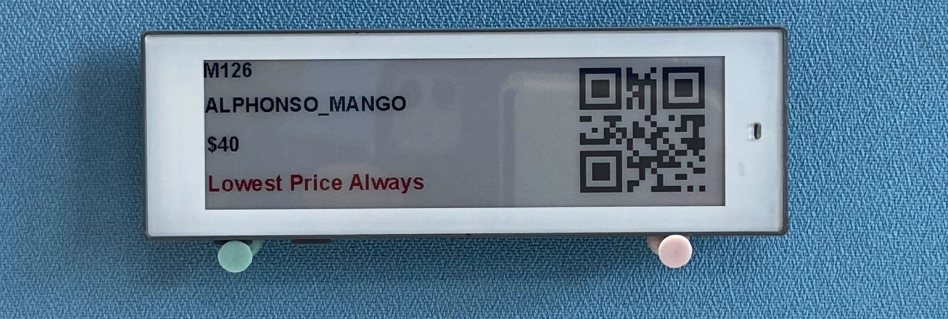
Example: Using a JS Function to Transform Product Data If the original product data is:
Product data: {
  Article name: "alphonso mango"
}
After updating the Article, the ARTICLE event will be triggered, and the transformed product data will be:
Product data: {
  Article name: "ALPHONSO_MANGO"
}
This transformation happens by applying a JavaScript function that converts Article name to Uppercase before saving or processing the data.
NOTE:
Using a JS Function: While validating or saving the JavaScript function, at least one product data key must be mapped to ensure proper validation before saving the function.
If a JavaScript function is mapped to any product data key, that function cannot be deleted.
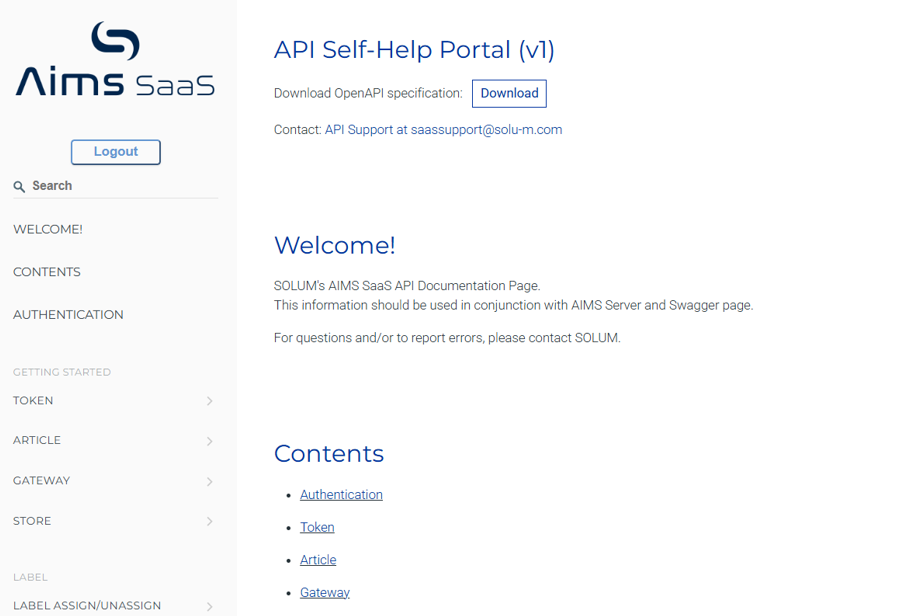
7. Added new link for web API docs in Solum family site
API web documentation is used to understand how an API works. It shows methods like GET/POST/PUT, what parameters to pass, and responses.
PATH: Under SOLUM Family Sites, click on API Web Docs, which will open in a separate tab.
8. Performance improvements
- Overview page
- Store list page
- Gateways with its status across stores
9. Product History Changes
Product history will be maintained only for products linked to labels. For non-linked products, the server will retain only the latest update without maintaining a full history.
10 Label Info API Enhancements
Label Info API: GET /api/v2/common/labels will now include battery level (batteryLevel) and signal strength (dataChannelRssi) values, along with their corresponding status indicators such as Good, Bad, or Excellent.
11 Label Model Summary
Label model-wise counts will be displayed for each customer and store, making it easier to identify the types and quantities of labels being used.