The Label Info page focuses on the detailed information to each individual label.
Overview
The Labels page provides detailed insights into every label assigned to the company and stores, alongside options for updating and configuring label properties.
Navigate Dashboard > ESL > Label > Label info where you can find the Label list table.
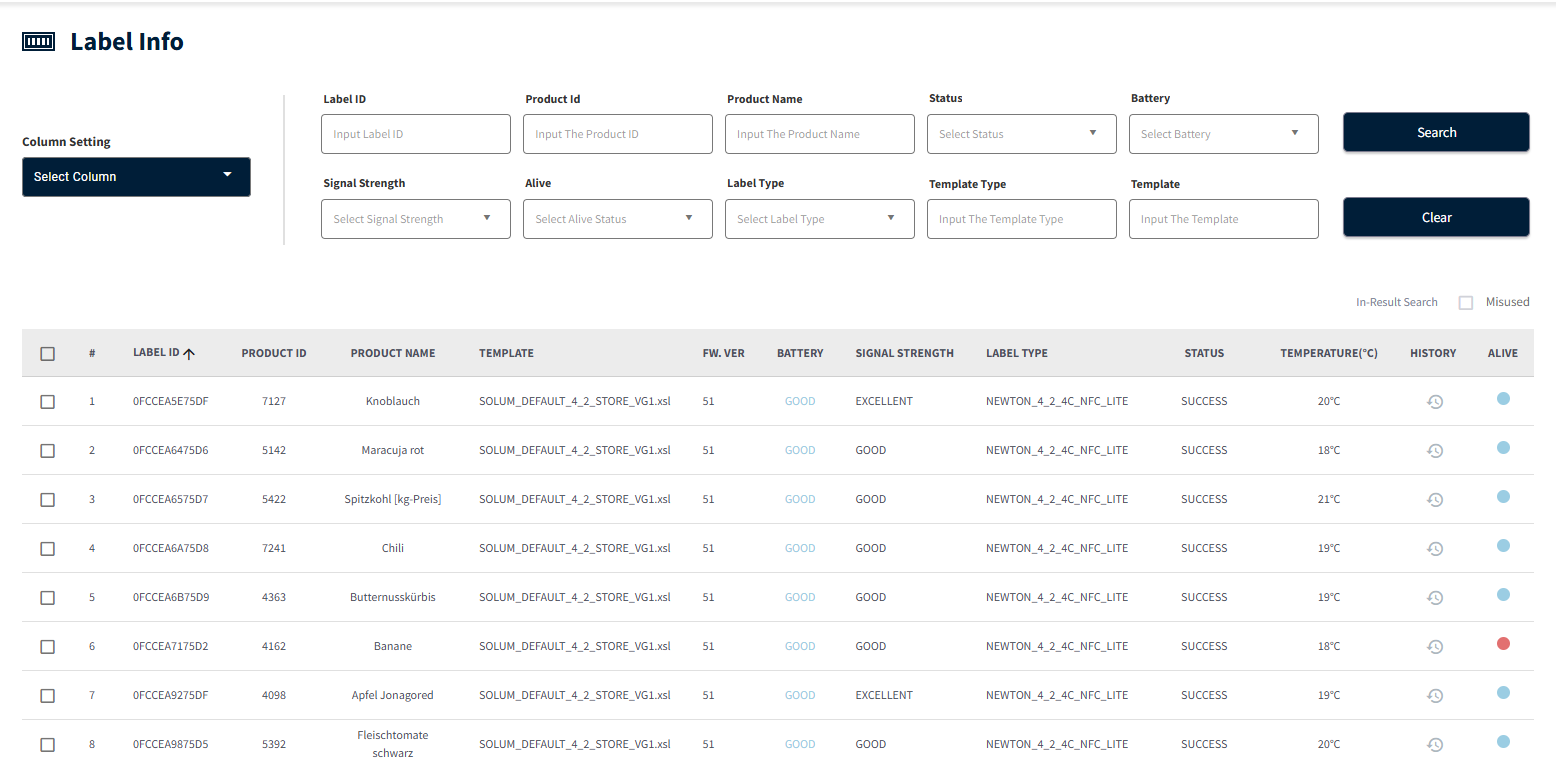
You can quickly filter the information in the Label List table using the search option above it.
Filters can be applied based on Label ID, Product ID, Product Name, Status, Battery, Signal Strength, Alive, Label Type, Template Type, and Template.
Click the Clear button to remove the selected filters.

Label List
The Label List section contains comprehensive details about each label and its current status:
Label_ID A unique 12-digit alphanumeric value identifies the label. Necessary for assigning products to labels.
Product ID A unique identifier is assigned by the customer to link a product with a label.
Product_name The name or description of the product is linked to the label.
Template_name The template name is assigned to the label. Multiple templates will be listed if used on different pages.
Displays the firmware version currently installed on the label.
If IC firmware is also installed, hovering the mouse pointer over the Firmware Version displays a tooltip containing the IC firmware version details.
The battery status is indicated using a hexadecimal code (00–FF). These codes represent system-defined battery conditions.
- LOW :Any code that starts with '0' is considered as low e.g.:
00, 0F
- GOOD :Any code that does not start with '0' is considered as GOOD e.g.:
1F to FF
Signal strength shows the wireless signal currently categorized.
- EXCELLENT (≥ -60 dBm)
- GOOD (-89 dBm to -60 dBm)
- LOW (≤ -89 dBm)
Label type Describes the label model, size, display color, and features.
Status indicates its current operational state during an action or update.
SUCCESS: The label operation has been completed successfully without any issues.PROCESSING: The label operation is currently in progress and has not yet been completed.TIMEOUT:The label operation could not be completed within the expected timeframe, indicating a potential issue or delay that requires further investigation.
Shows the label’s current temperature in degrees Celsius.
History provides a detailed record of all past operations performed on a label, offering users clear visibility into its activity log.
When clicked on , the label's operation history will display as a popup modal.
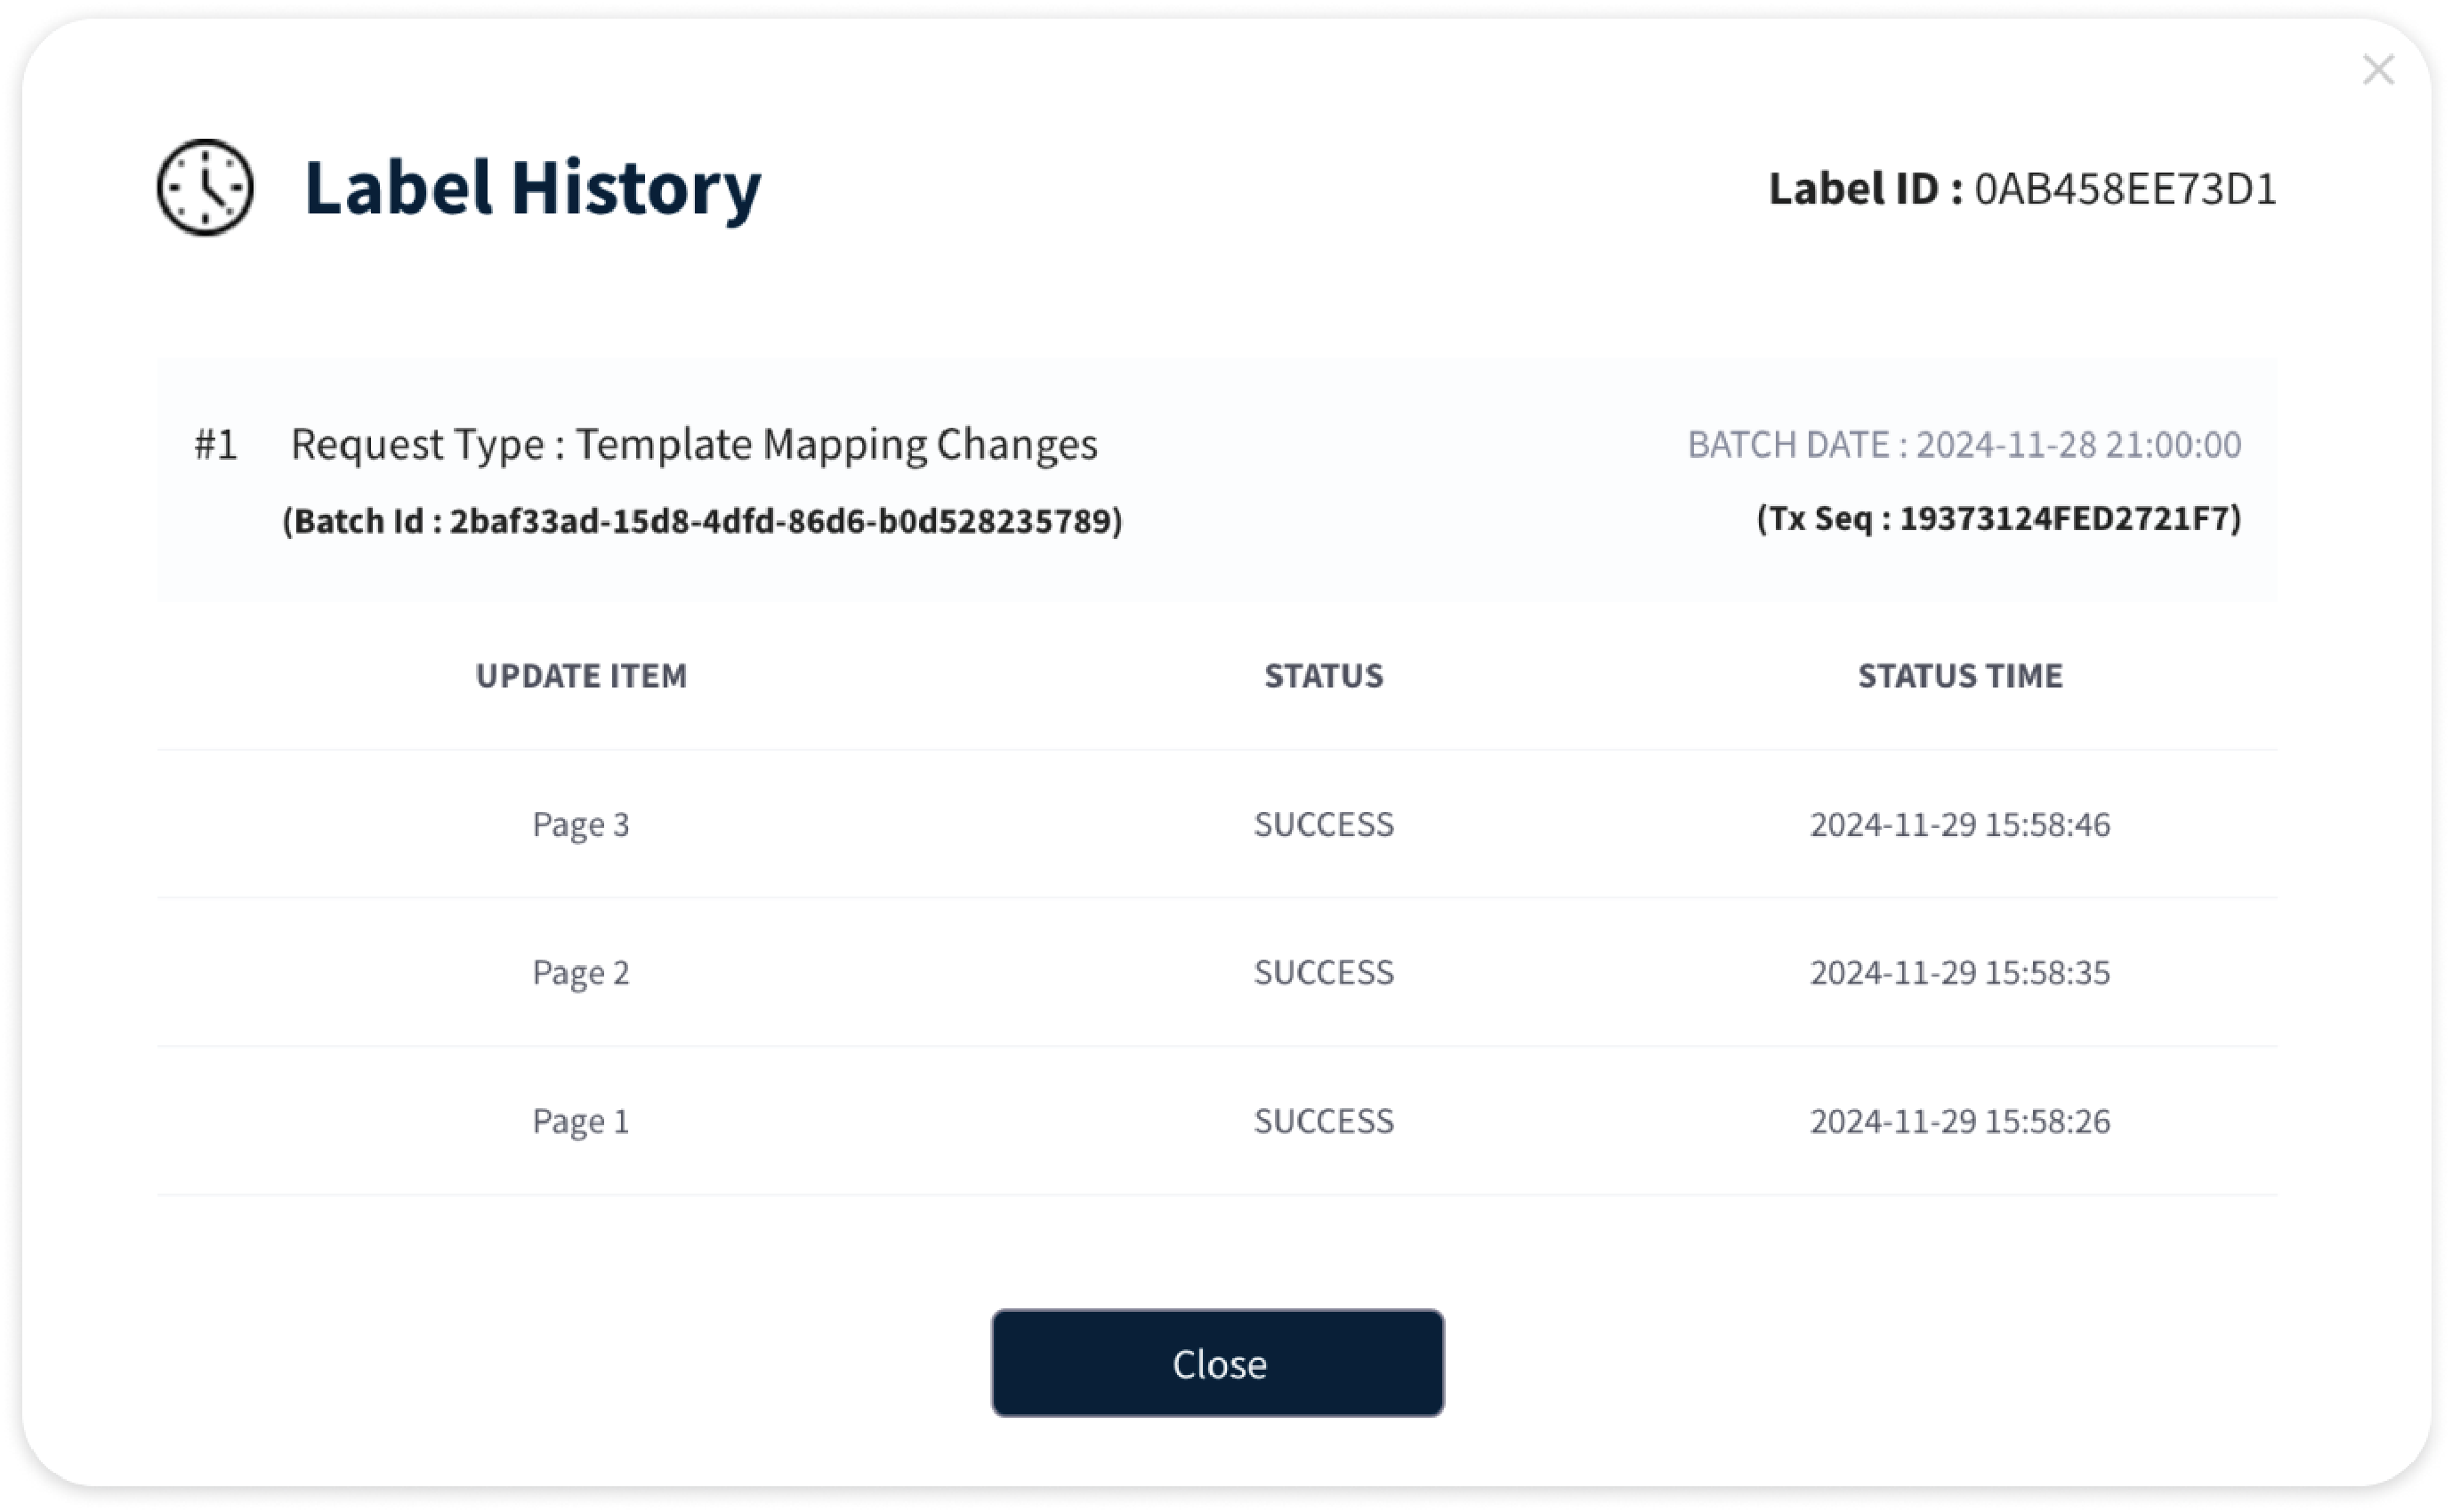
Batch ID: Identifier for the group of operations.Transaction Sequence: The sequence number of the operation within the batch.Status: The outcome of the operation (e.g., SUCCESS, PROCESSING, TIMEOUT).Status Time: The timestamp of when the status was recorded.
Alive indicates label's current connection state within the system.
ONLINE : The label is actively connected and communicating with the system.OFFLINE : The label is not currently connected or responsive, possibly due to a connection issue or power-related problem.
Clicking on the Alive Status opens the Label Status Report History popup, which provides a comprehensive log of the label's recent activity and status details, including:
- Update item: The item refers to the Label Status Alive Report.
- Report time: The exact time the label sent its last status report.
- From Gateway: The gateway that communicated with the label.
- Battery: The label's current battery status (e.g., GOOD, LOW).
- Signal Strength: The strength of the label's communication signal, helping diagnose connection issues.
- TX SEQ: The sequence number of the last transmitted signal, indicating successful communication progression.
Label Details
Click the Label ID in the table to find additional details about that label. A Label Details pop-up will display with additional information.
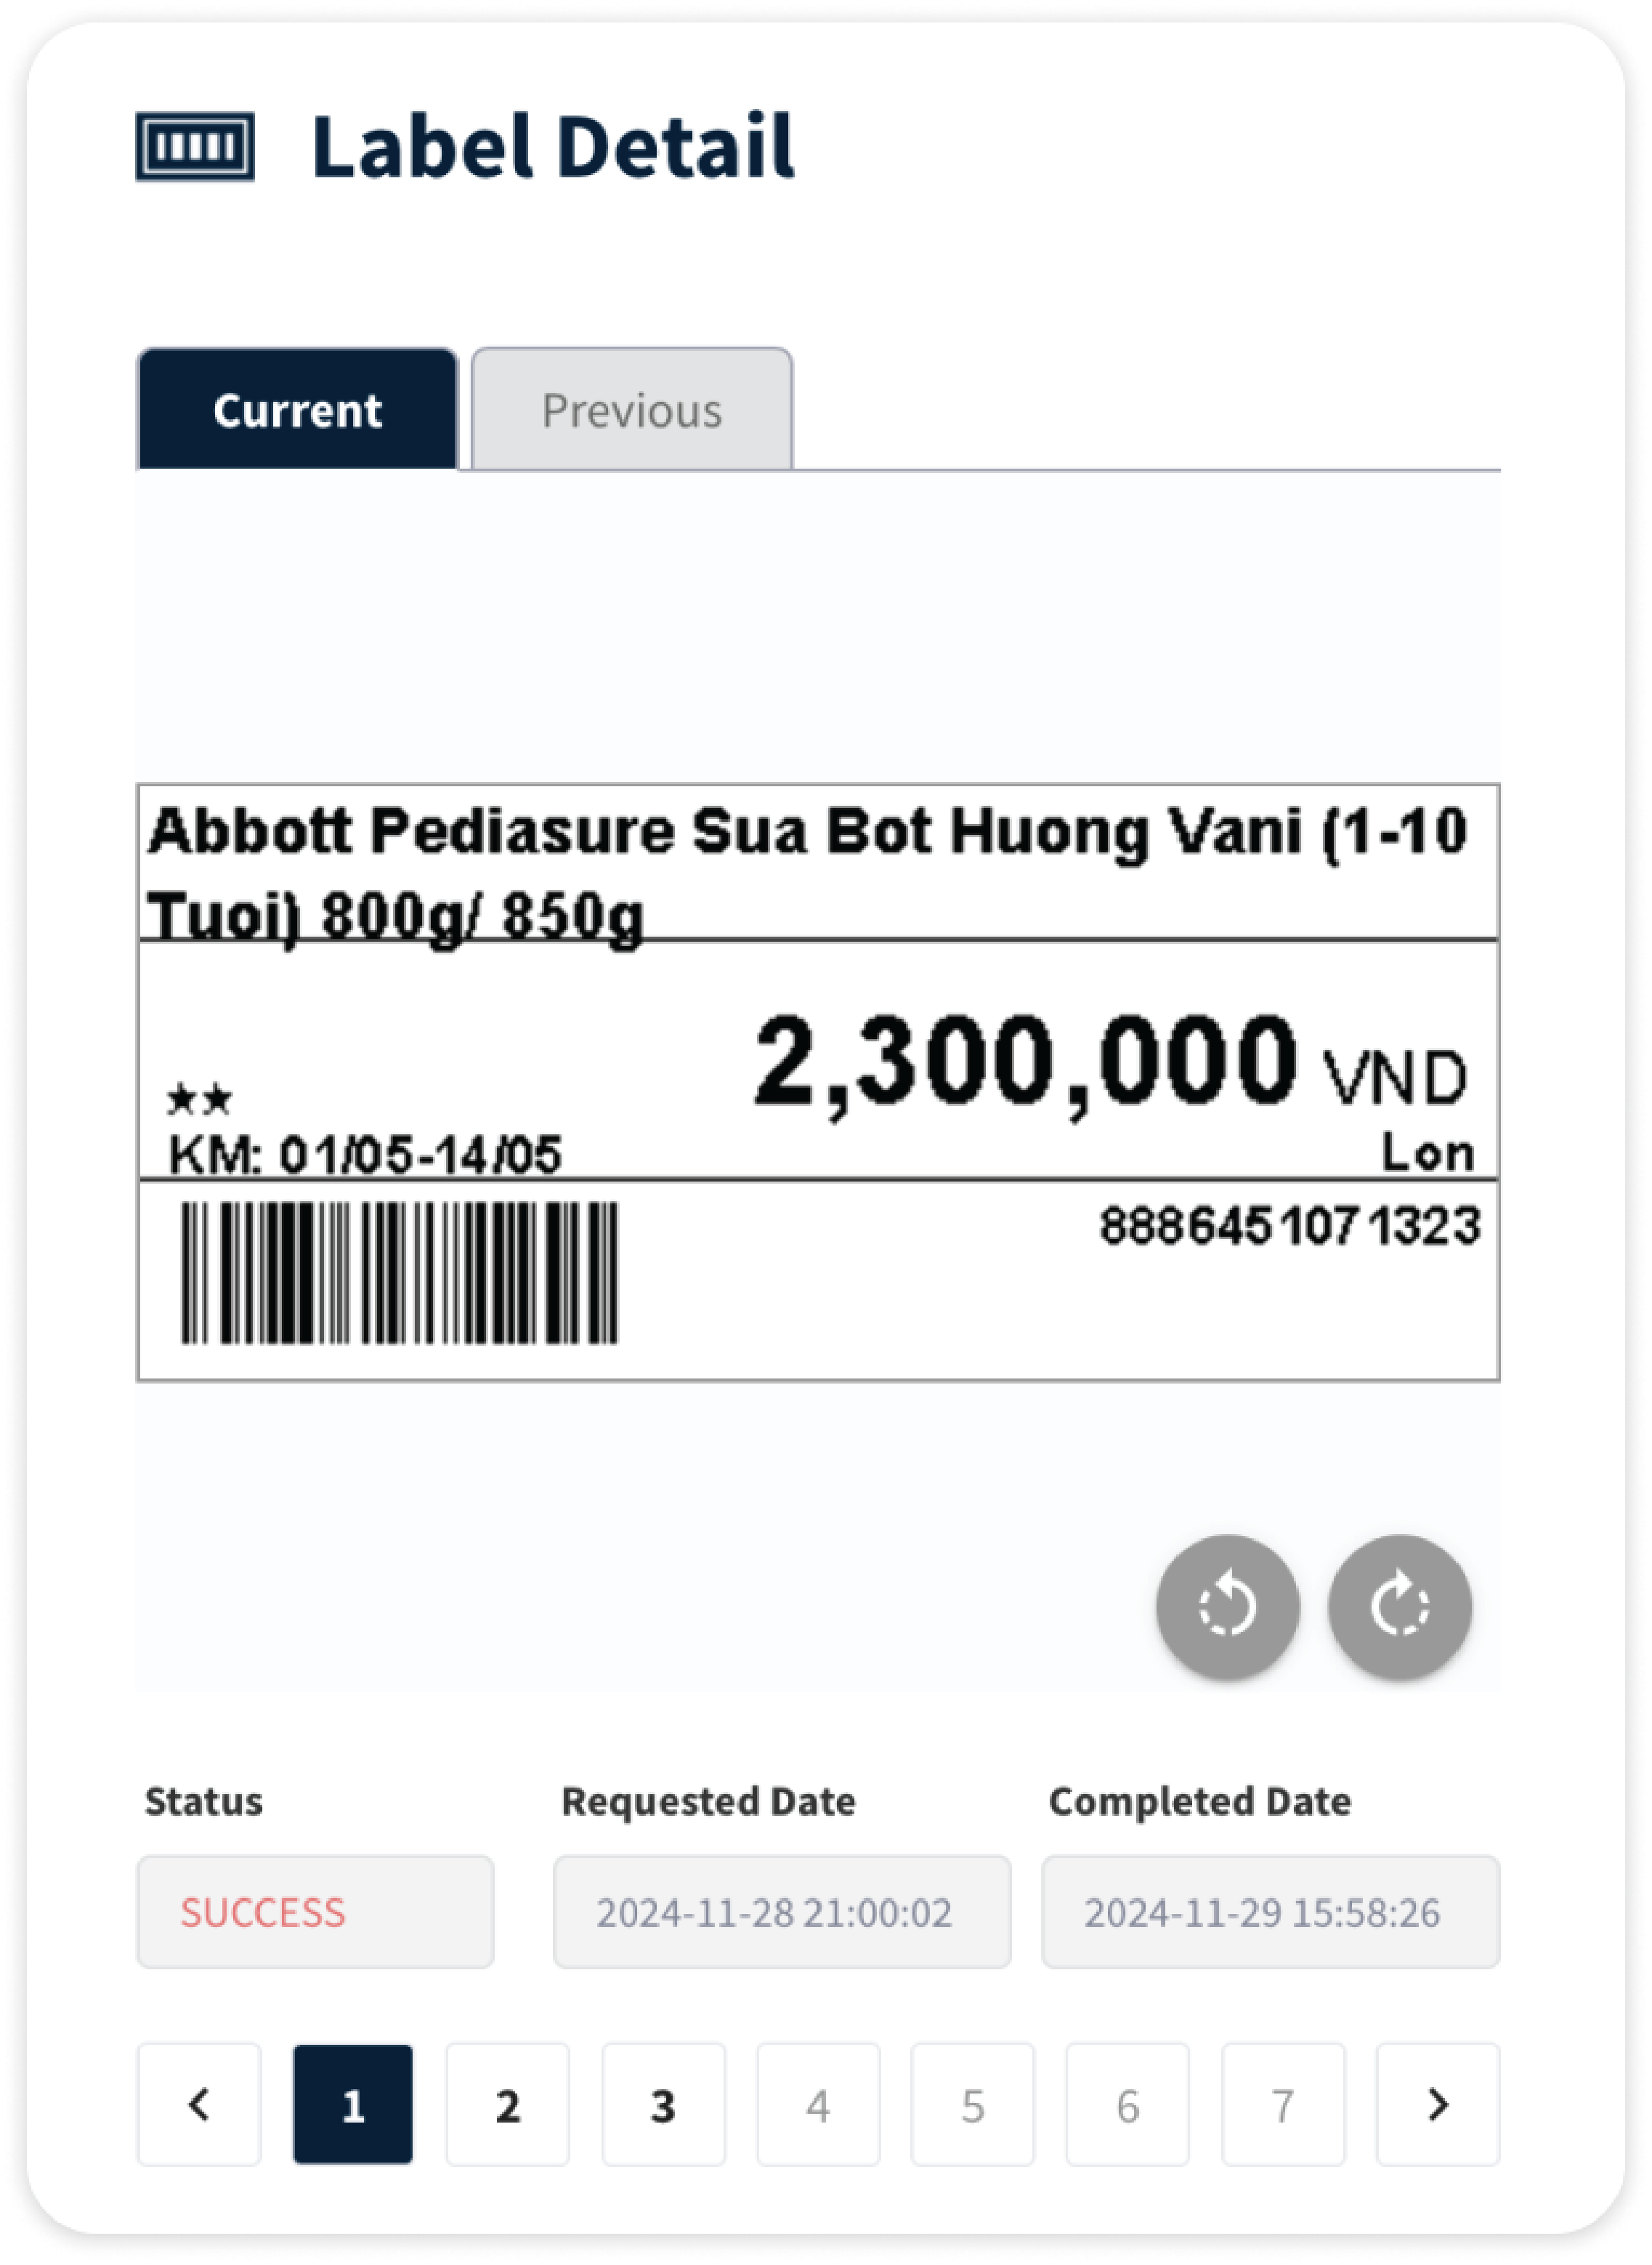
Displays the image currently shown on the label when in SUCCESS status, or the image the label is in the process of displaying
when in PROCESSING or TIMEOUT status.The image can be rotated in 90° increments for better viewing.
Shows the last image generated for the label. The image can be rotated in 90° increments for better viewing.
Indicates the current update status of the label. Possible values:
SUCCESS
PROCESSING
TIMEOUT
The timestamp indicates when the request is raised.
The timestamp indicates when the raised request is successfully completed.
Page count will be displayed based on template and max number of pages provided for compnay (max=7).
For normal labels, allows page selection to view different pages of a multi-page label.
For dual-sided labels, the FRONT and BACK sides can be viewed by selecting the respective tabs. The first page represents the Front, and the second page represents the Back of the label.
Enable the checkbox for precise label previewing. Users can compare the exact preview on the dashboard with the real label to ensure accuracy.
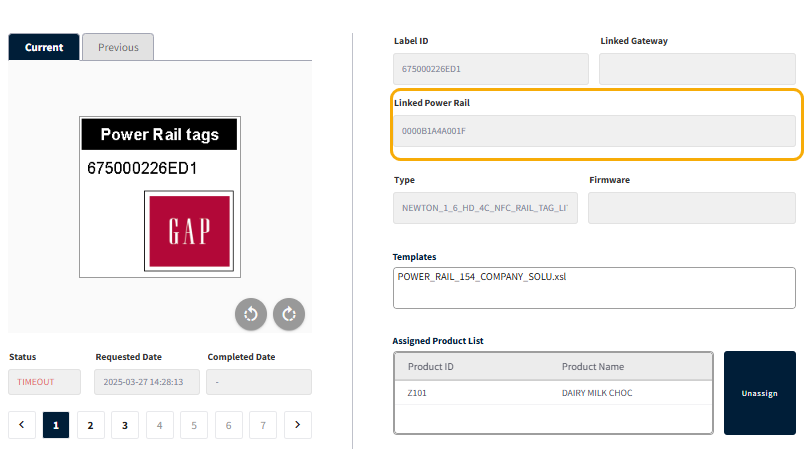
Label ID is the unique 12-digit alphanumeric value that identifies the label and required to assign a product to a label.
The label ID can be found on the back of the label and/or on the display when in default image out-of-box.
Gateway MAC ID that is associated with the label.
This field will only be displayed for power rail tags. When power rail tags are connected to power rails,
the corresponding connected power rail controller ID will be shown.
Label description that notes the label model, size, display color, and features.
Label firmware version number.
The name of the template assigned to the label will be shown. If multiple templates are used across different pages, all template
names will be listed. The template name will be empty if the Image Push operation is used.
Displays the Product ID and Product Name assigned to the label. If multiple products are linked to the label, all product
will be listed.
Click the Unassign button to begin the unassign process for the label.
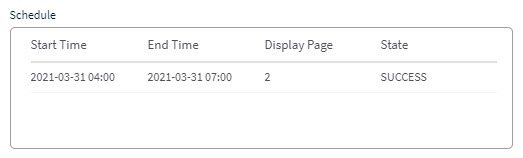
Any schedule data for the label will be listed with Start Time, End Time, Display Page, and State.
you can check the schedule information and the delivery status for the schedule on it.
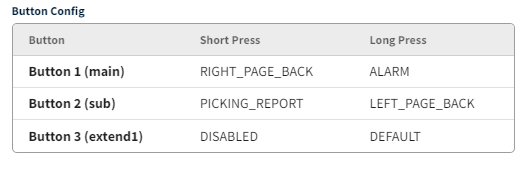
This section displays the information of current button configuration associated with the label.
Label Functions
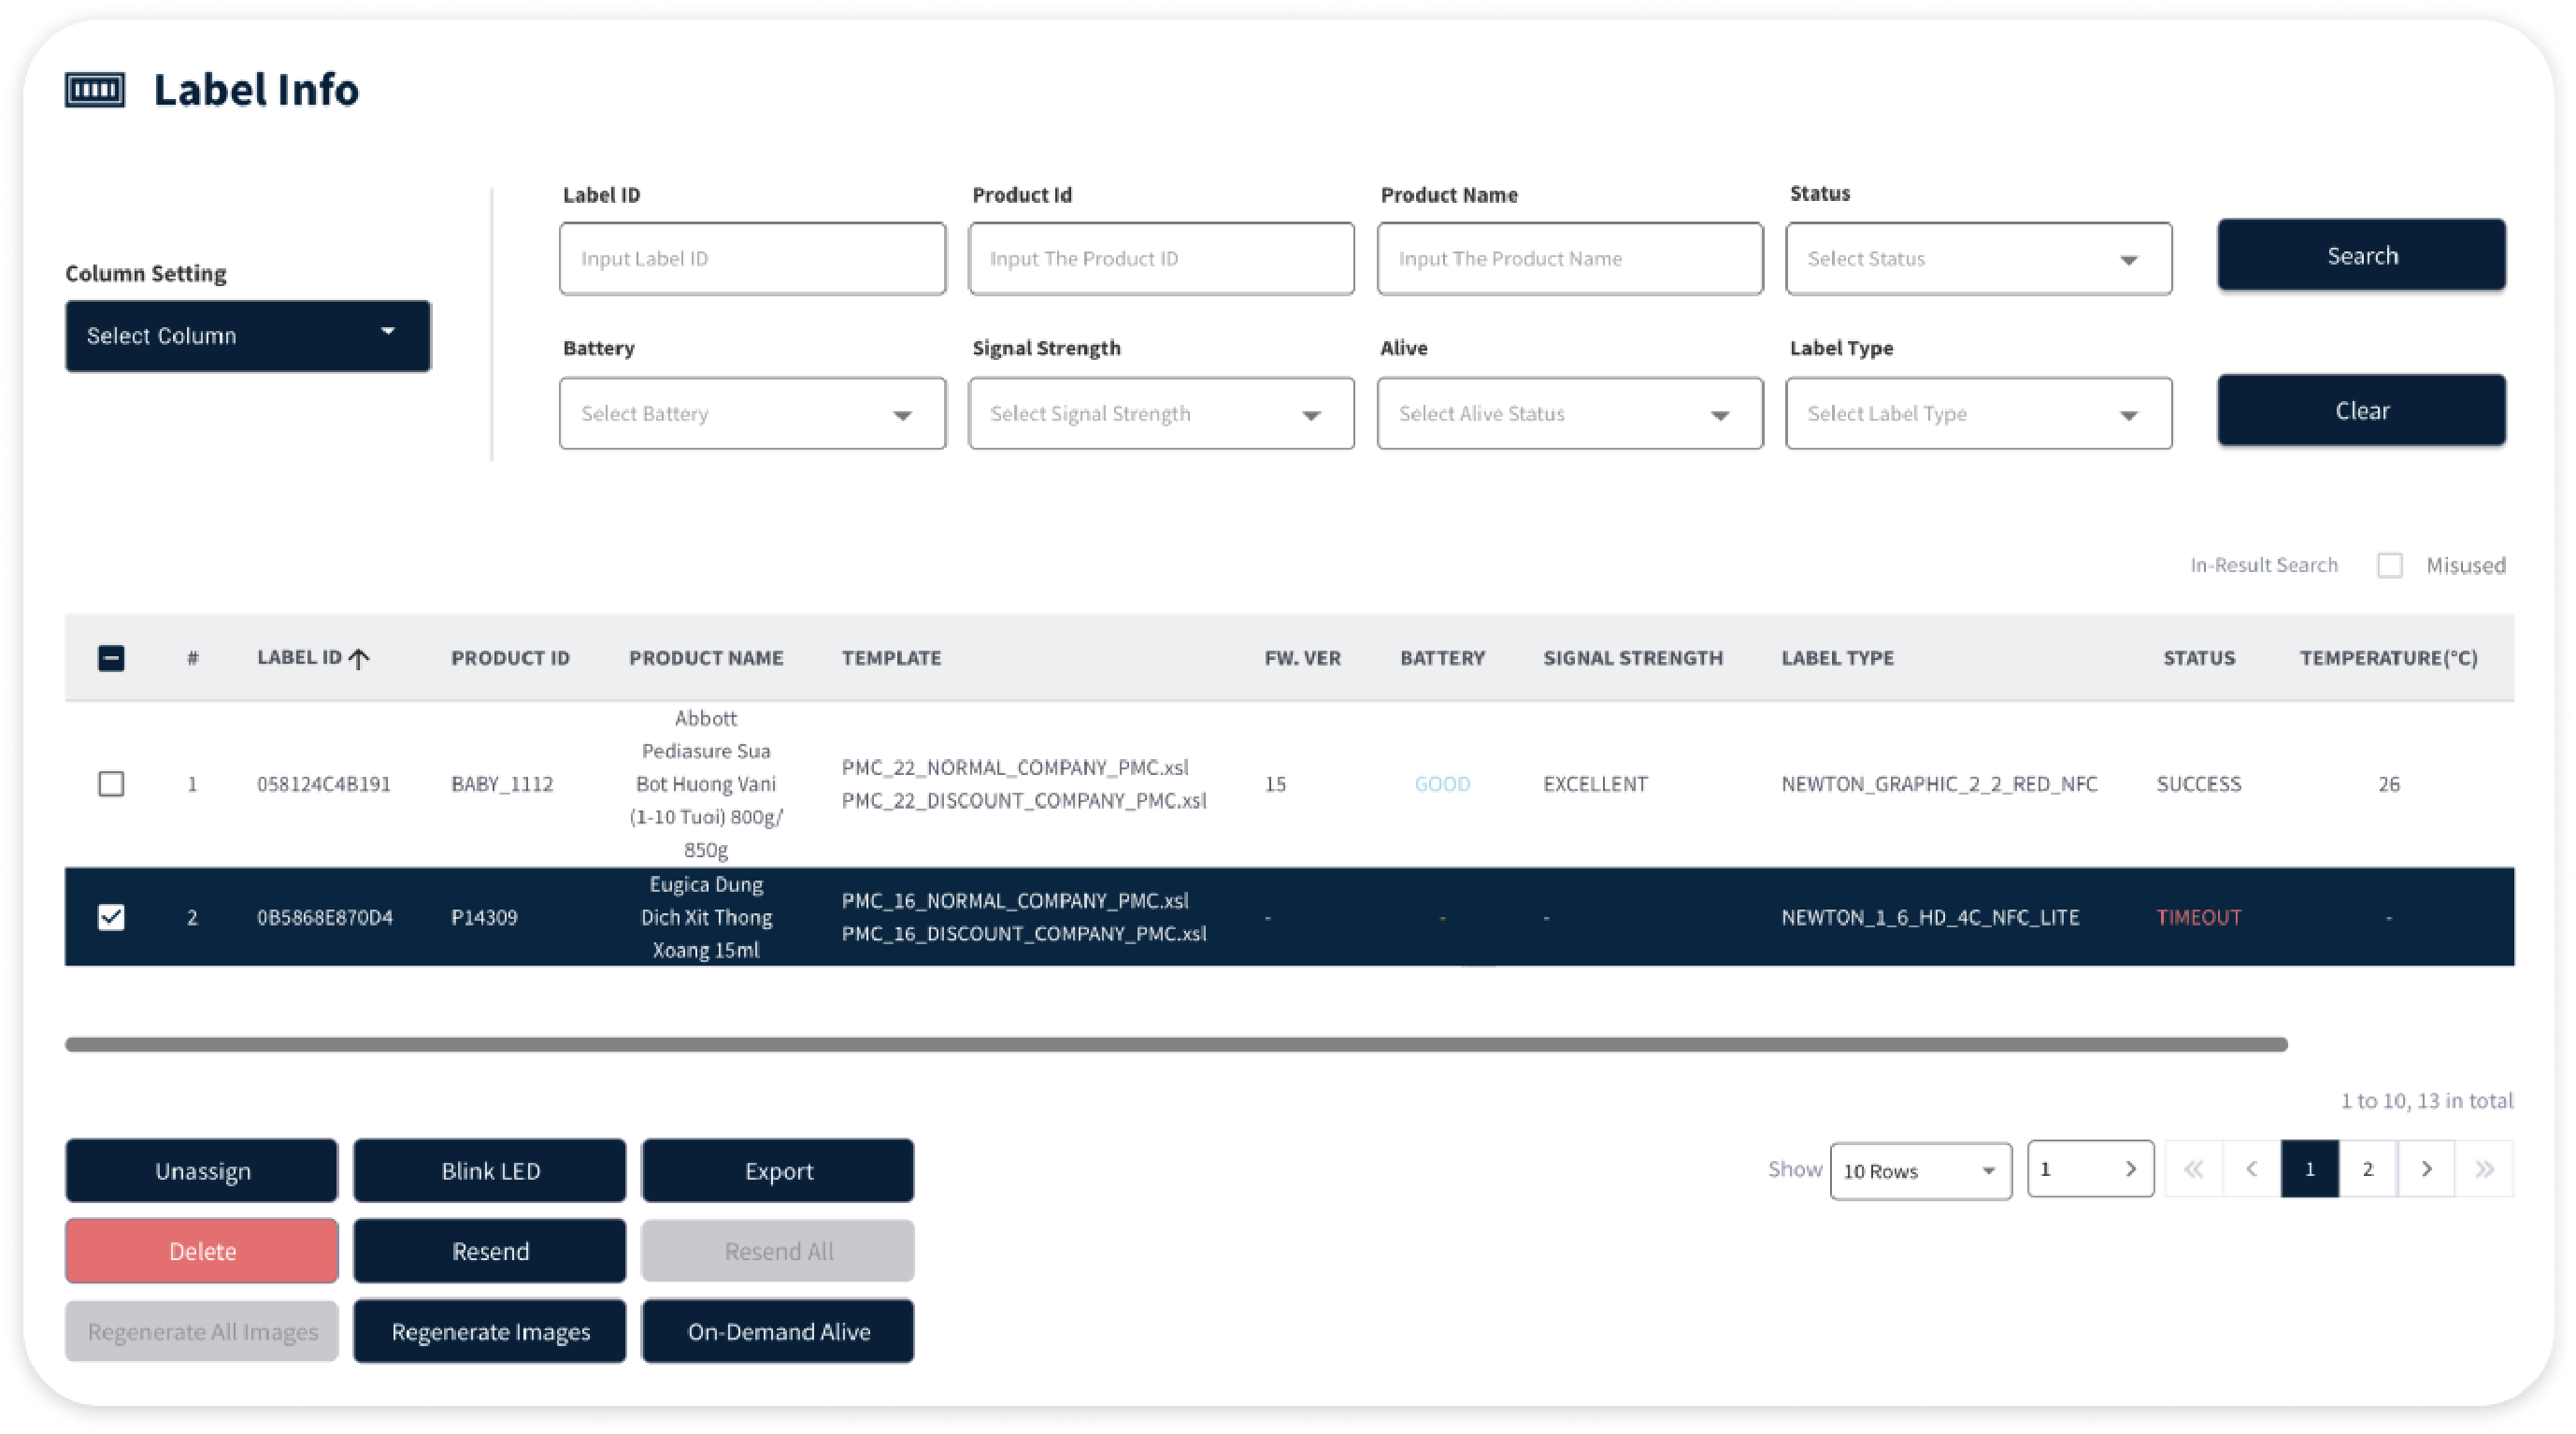
When a specific label is selected (by ticking the checkbox), several action buttons at the bottom of the Label Info page will be enabled.
Unassign
This function allows users to remove a label's association with a specific product , reverting it to its default state.
1
Select one or more labels by clicking the checkbox.
2
Click Unassign to initiate the process.
Blink LED
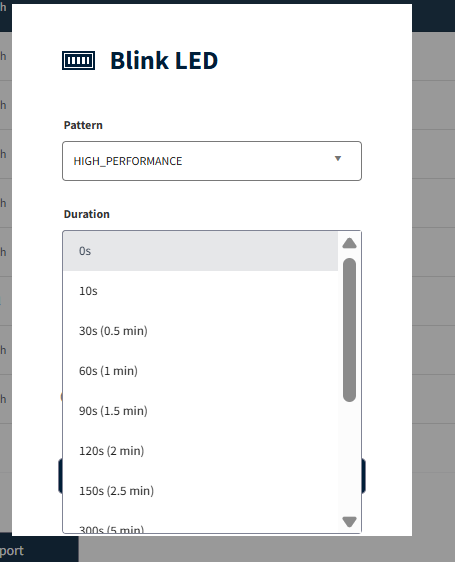
The Blink LED feature allows users to trigger the LED on selected labels for a specified duration.
This enhancement introduces two new duration options and improves the readability of the duration selection by displaying the equivalent time in minutes.
Navigate to ESL → Label.
- Select one or more labels.
- Click Blink LED.
- The Blink LED dialog opens.
Features
Added two new Blink LED duration options:
- 90s (1.5 min)
- 150s (2.5 min)
Duration options of 30 seconds and above now display their equivalent time in minutes for better readability.
The displayed duration is user-friendly while the original duration value is used for processing.
How to Use
- Navigate to ESL → Label.
- Select the required label(s).
- Click Blink LED.
- Select the desired duration from the Duration drop-down list.
- Click Apply to start the LED blinking.
Export
Allows users to export label data in Excel format for further analysis or record-keeping.
- Select one or more labels by clicking the checkbox.
- Input your email address to receive the download link.
- If the list is filtered, only the filtered labels will be included in the exported file.
- Click on direct export will download complete label list.
Delete
Permanently removes label data from the system.
This action purges all label data without sending a clear image command to the label itself.
Important: Unlike unassign, this action does not require confirmation. Proceed with caution
Resend
Resend the image to the selected labels. This can be used to re-initiate the process with existing configuration..
1
Select one or more labels by clicking the checkbox.
2
Click Resend to begin the operation.
Resend All
This can be done for only Timeout or ALL labels, option needs to be selected. This feature requires admin privileges and must be
enabled for lower-level users.
This action is typically restricted to admin-level users but can be enabled for others via configuration.
Regenerate Images
This function allows users to generate updated images for selected labels and their linked counterparts, ensuring all associated labels are refreshed with the latest information.
1
Select one or more labels by clicking the checkbox.
2
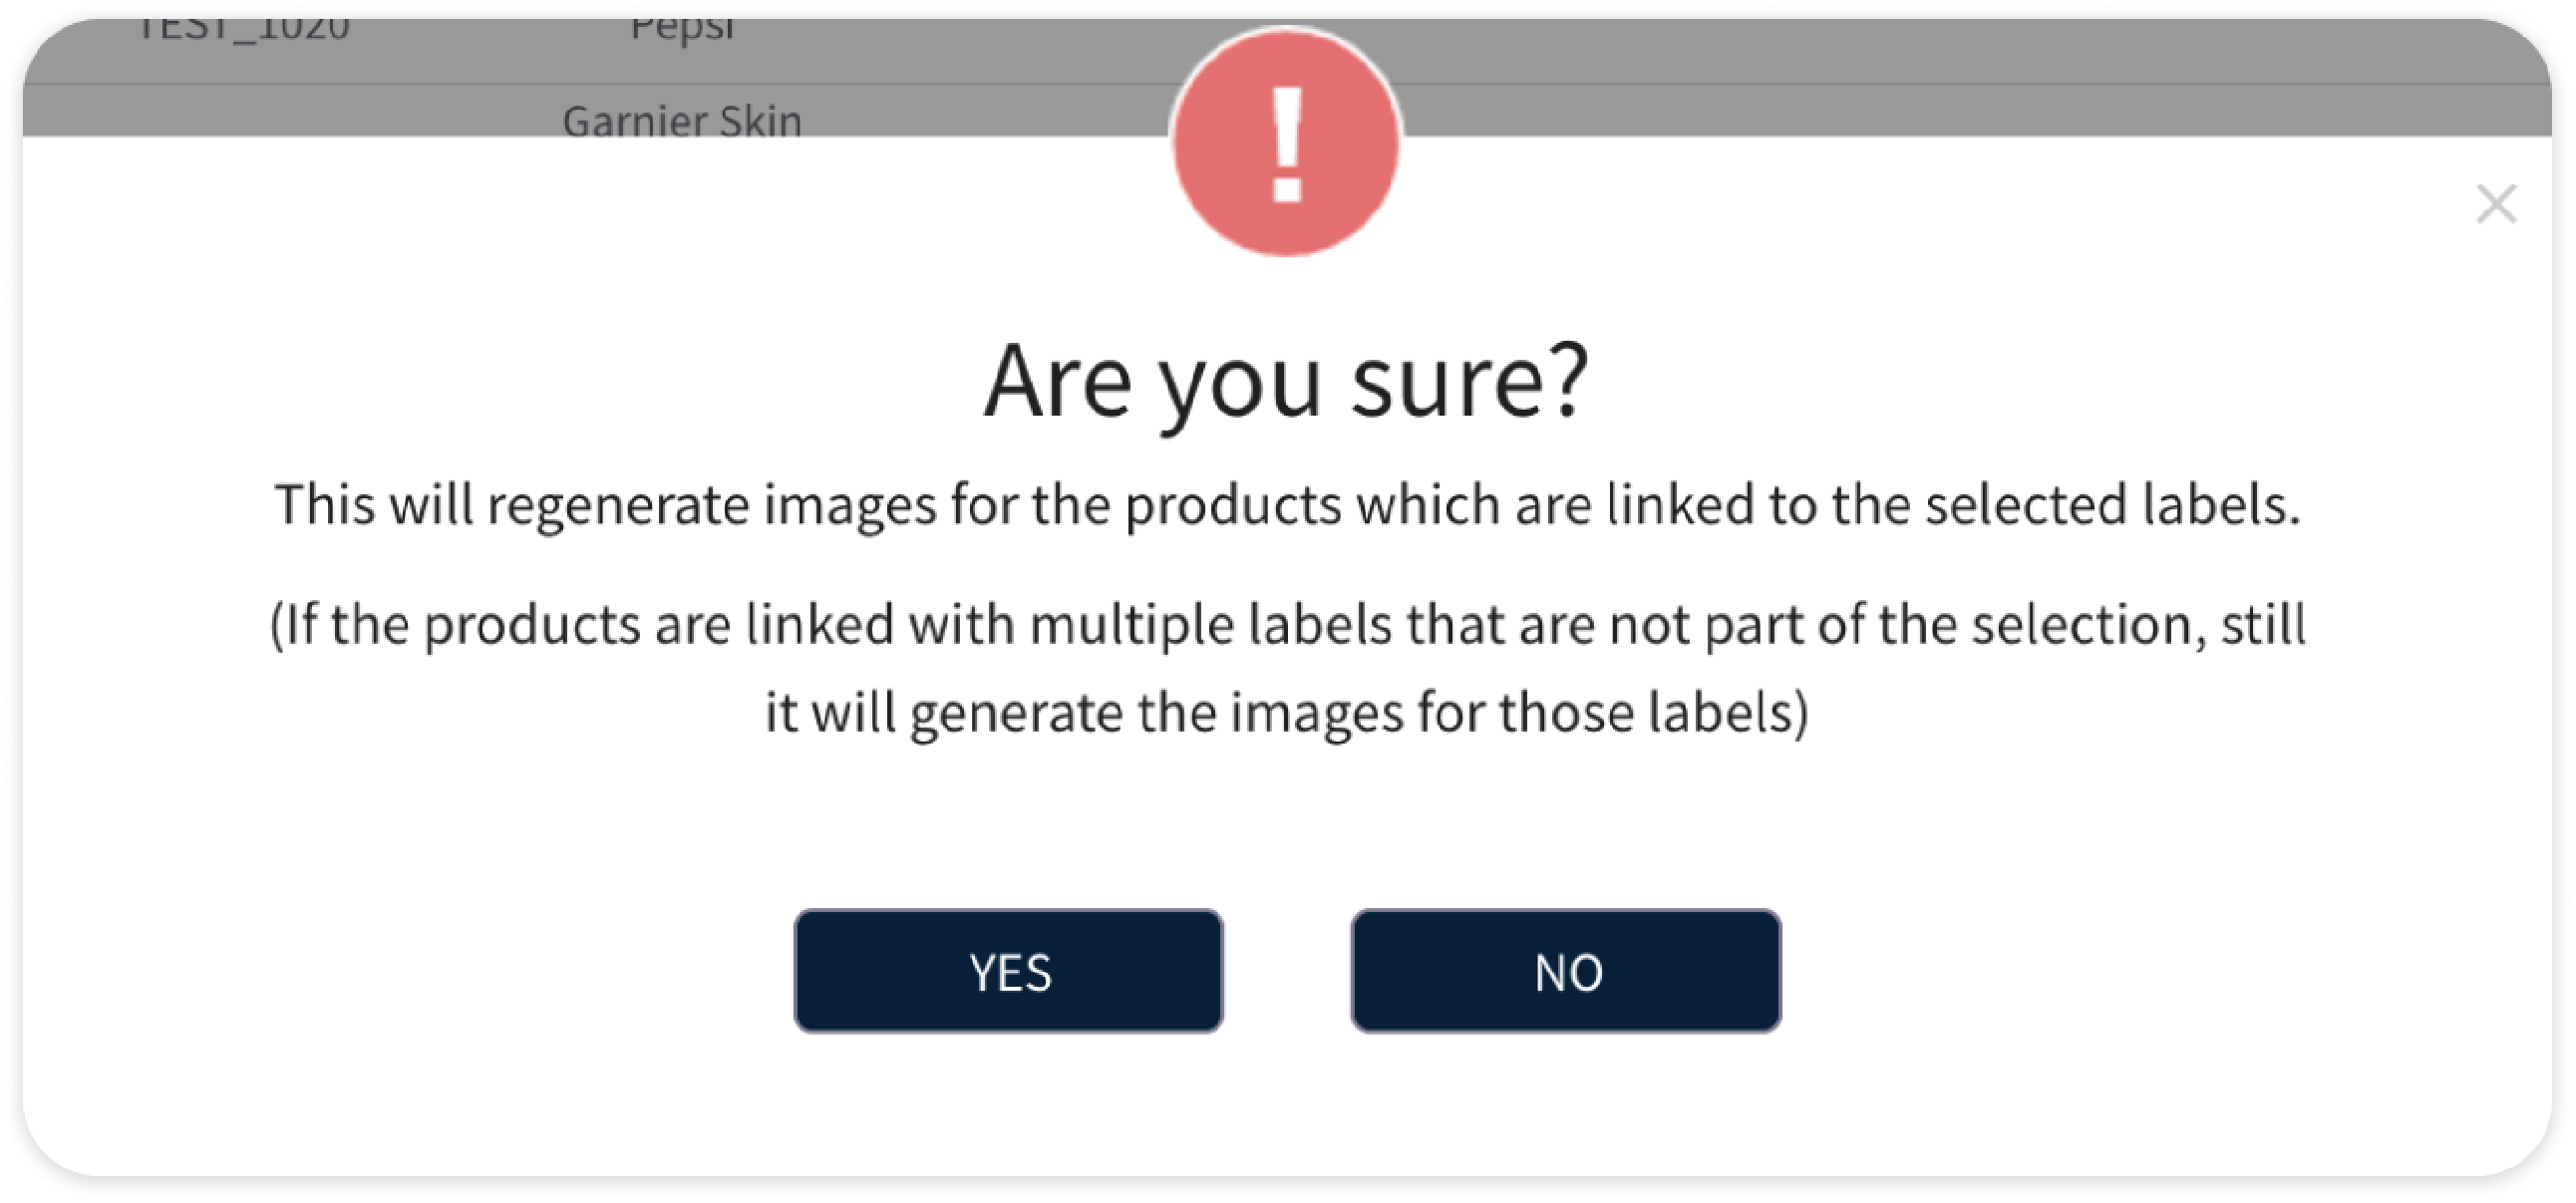
When selecting a result, click Regenerate Images button to start the process.
This will regenerate images for the selected label as well as other labels linked to the same product.
3
Click Yes: Regenerates images for all linked labels, even if they were not part of the initial selection.
If the products are linked with multiple labels that are not part of the selection, still it will generate the images for those labels
4
Click No to cancel the operation without making any changes.
On-demand Alive
Assigned labels typically send an alive report to the gateway every 6 hours.
- If a label goes offline (due to issues like low RF signal or battery), and no alive report is received, the On-Demand Alive option allows you to force the label to send an alive request to the gateway.
- If the gateway receives a Page 1 status on the On-Demand Alive request, the label will reconnect and be marked as Online.
1
Select one or more labels by clicking the checkbox.
2
Click the On-Demand Alive button to initiate the request.
3
A pop-up will appear; confirm the action by clicking Yes to proceed.
Default alive status is received as ALIVE REPORT.
On-demand alive status is received as PAGE 1.
Automatic Aruco Code Generation
If the Vision Camera feature is enabled at both the customer and store levels, the system automatically generates an Aruco code for the page with the highest page
number assigned to each label.
The Aruco code is generated only for the page with the highest page number assigned to the label. This behaviour applies to both the following operations:
- Label Assignment
- Image Push