The Gateway Page manages and monitors all gateways and their labels, ensuring efficient communication and seamless store operations.
Overview
The SOLUM Gateway acts as a wireless access point (AP), facilitating communication with all connected labels. To ensure effective operation, one or more gateways (GWs) must be installed in the same physical location as the labels.
- Newton Standard Gateway: 95’ radius coverage.
- Newton USB Gateway: 80’ radius coverage.
The Gateway Information Page provides tools to register, manage, and monitor all gateways within a store.
Navigate Dashboard > ESL > Gateway > Gateway Info
Gateway list
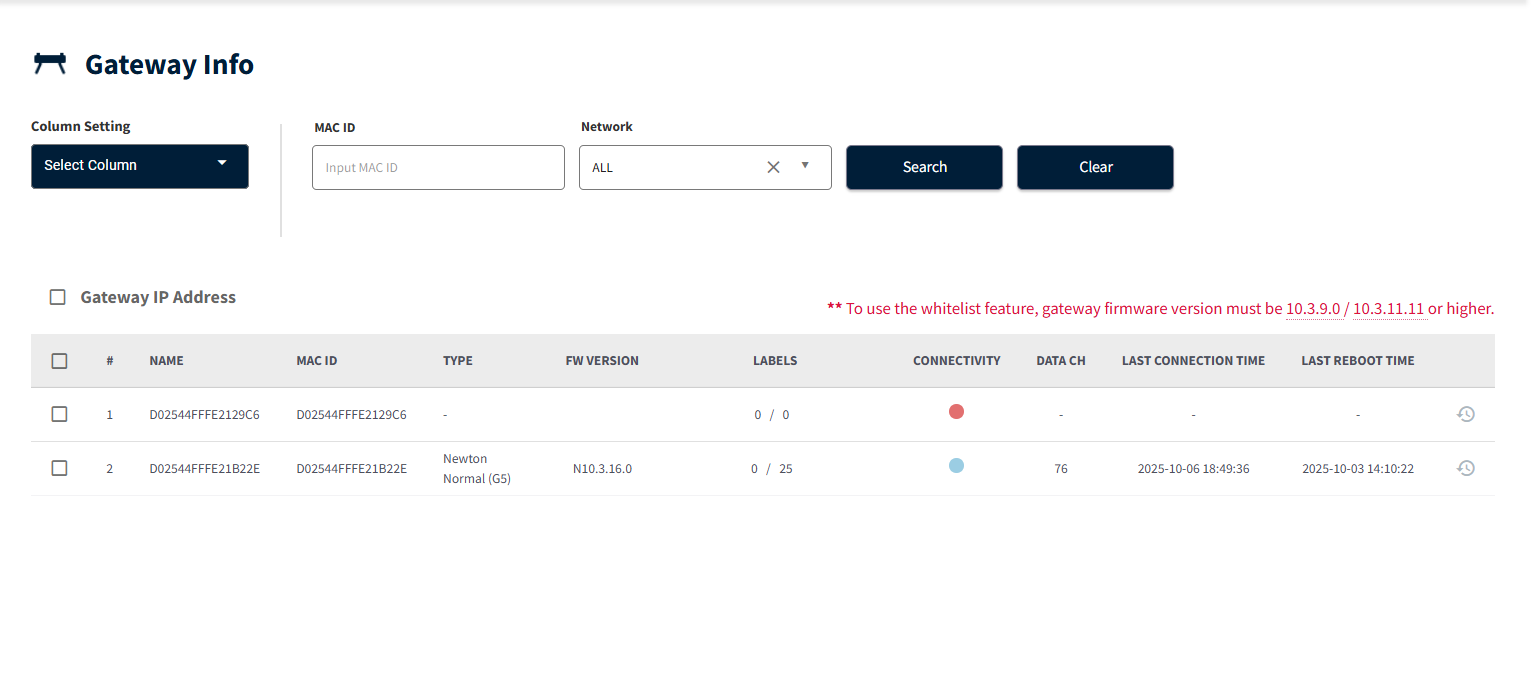
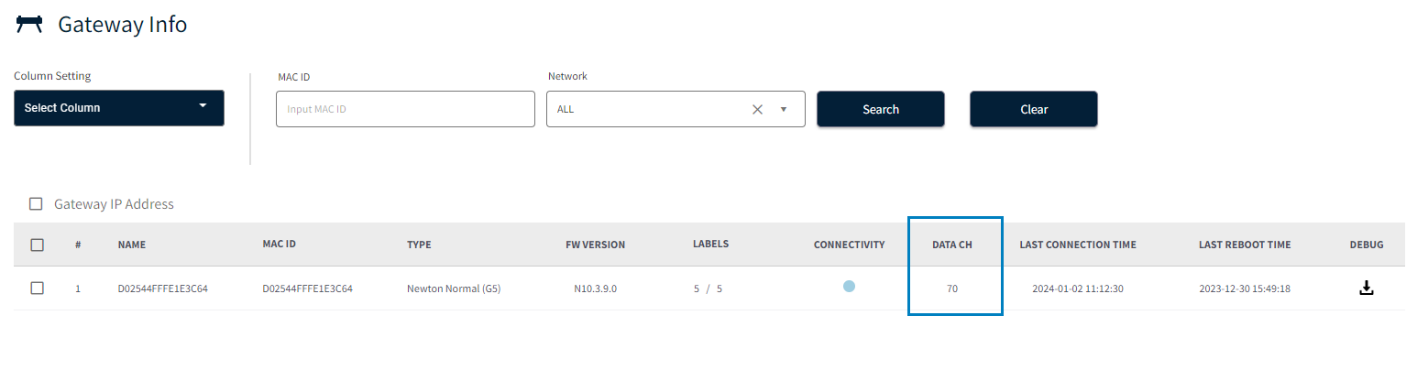
The Gateway list displays vital information of all GWs registered to a store.
| Field name | Description |
|---|
| NAME | The description or identifier for the GW, used to distinguish it within the system. |
| MAC ID | The unique identifier for the GW. The MAC ID is used to register a GW to a store. No validation is performed for the MAC ID during registration. |
| TYPE | Specifies the type of GW :
- Newton Normal : Standard gateway.
- Newton USB : USB-powered gateway for specific use cases. |
| FIRMWARE | Displays the firmware version installed on the GW. To upgrade the firmware, refer to the Firmware Setting page. |
| LABELS | Shows the number of assigned and unassigned labels associated with the GW.
- Assigned Labels: Labels linked to a product and associated with the GW.
- Unassigned Labels: Labels powered on but not linked to a product or GW. |
| CONNECTIVITY | The current connection status of the GW:
- Online : GW is connected and communicating with the server without issues.
- Not Ready : GW is initializing after powering up. If this status persists beyond five minutes, reboot the GW.If unresolved, contact SOLUM for support.
- Disconnected : GW is not communicating with the server. |
| DATA CH | Refers to the Radio Frequency channel used by the GW to communicate updates to the labels.
Proper channel configuration minimizes interference. Recommended channels include 4, 22, 24, 28, 47, 49, 51, 53, 72, 74, 76, 82. |
| LAST CONNECTION TIME | The last recorded timestamp when the GW communicated with the server. |
| LAST REBOOT TIME | Displays the timestamp of the last GW reboot. Useful for troubleshooting and maintenance. |
| DEBUG | Allows users to download GW debug configuration information. Use only as requested by Solum admin. |
Gateway Status
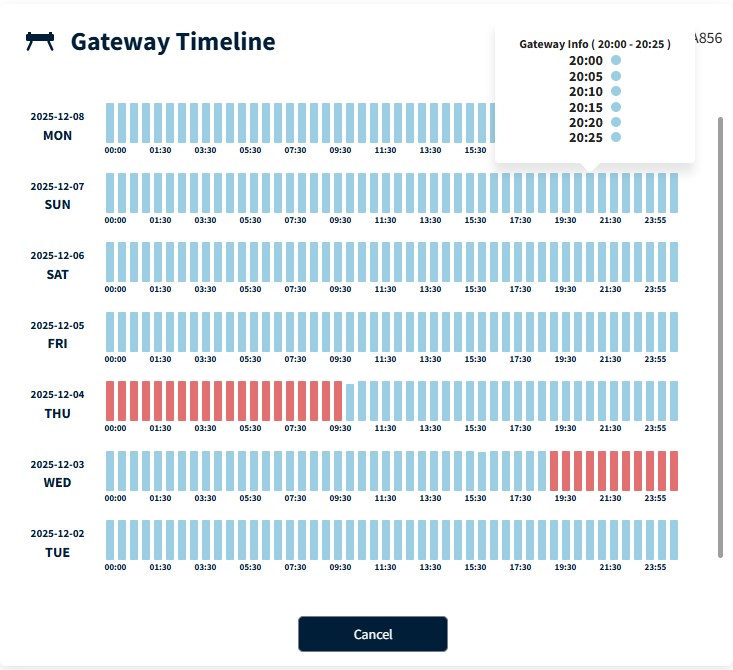
The Gateway Status provides a detailed status of last 7days overview of a gateway's connection status through a visual representation.
On current Gateway list table, click on the History icon , the Gateway Timeline Status's history log will display as a popup modal.
The status displayed as a graphical bar chart, with each bar representing a 30-minute interval.
🁢 Red: offline periods.
🁢 Blue: online periods.
🁢 Gray: shows when the gateway is never connected.
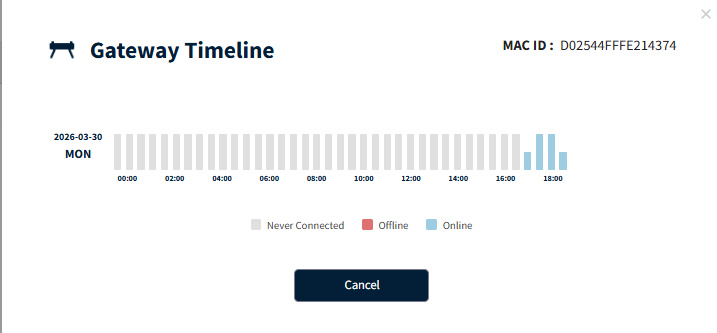
When hovering over a bar, a tooltip will display the status for each 5-minute segment within the 30-minute period, indicated by the bar current color.
The height of each bar corresponds to the data count. If the count is less than 30, the height of the bar decreases proportionally.
Related to Offline Priority, if even one 5-minute segment within a 30-minute interval is offline, the entire bar will be marked Red for easy identification.
Gateway IP Address
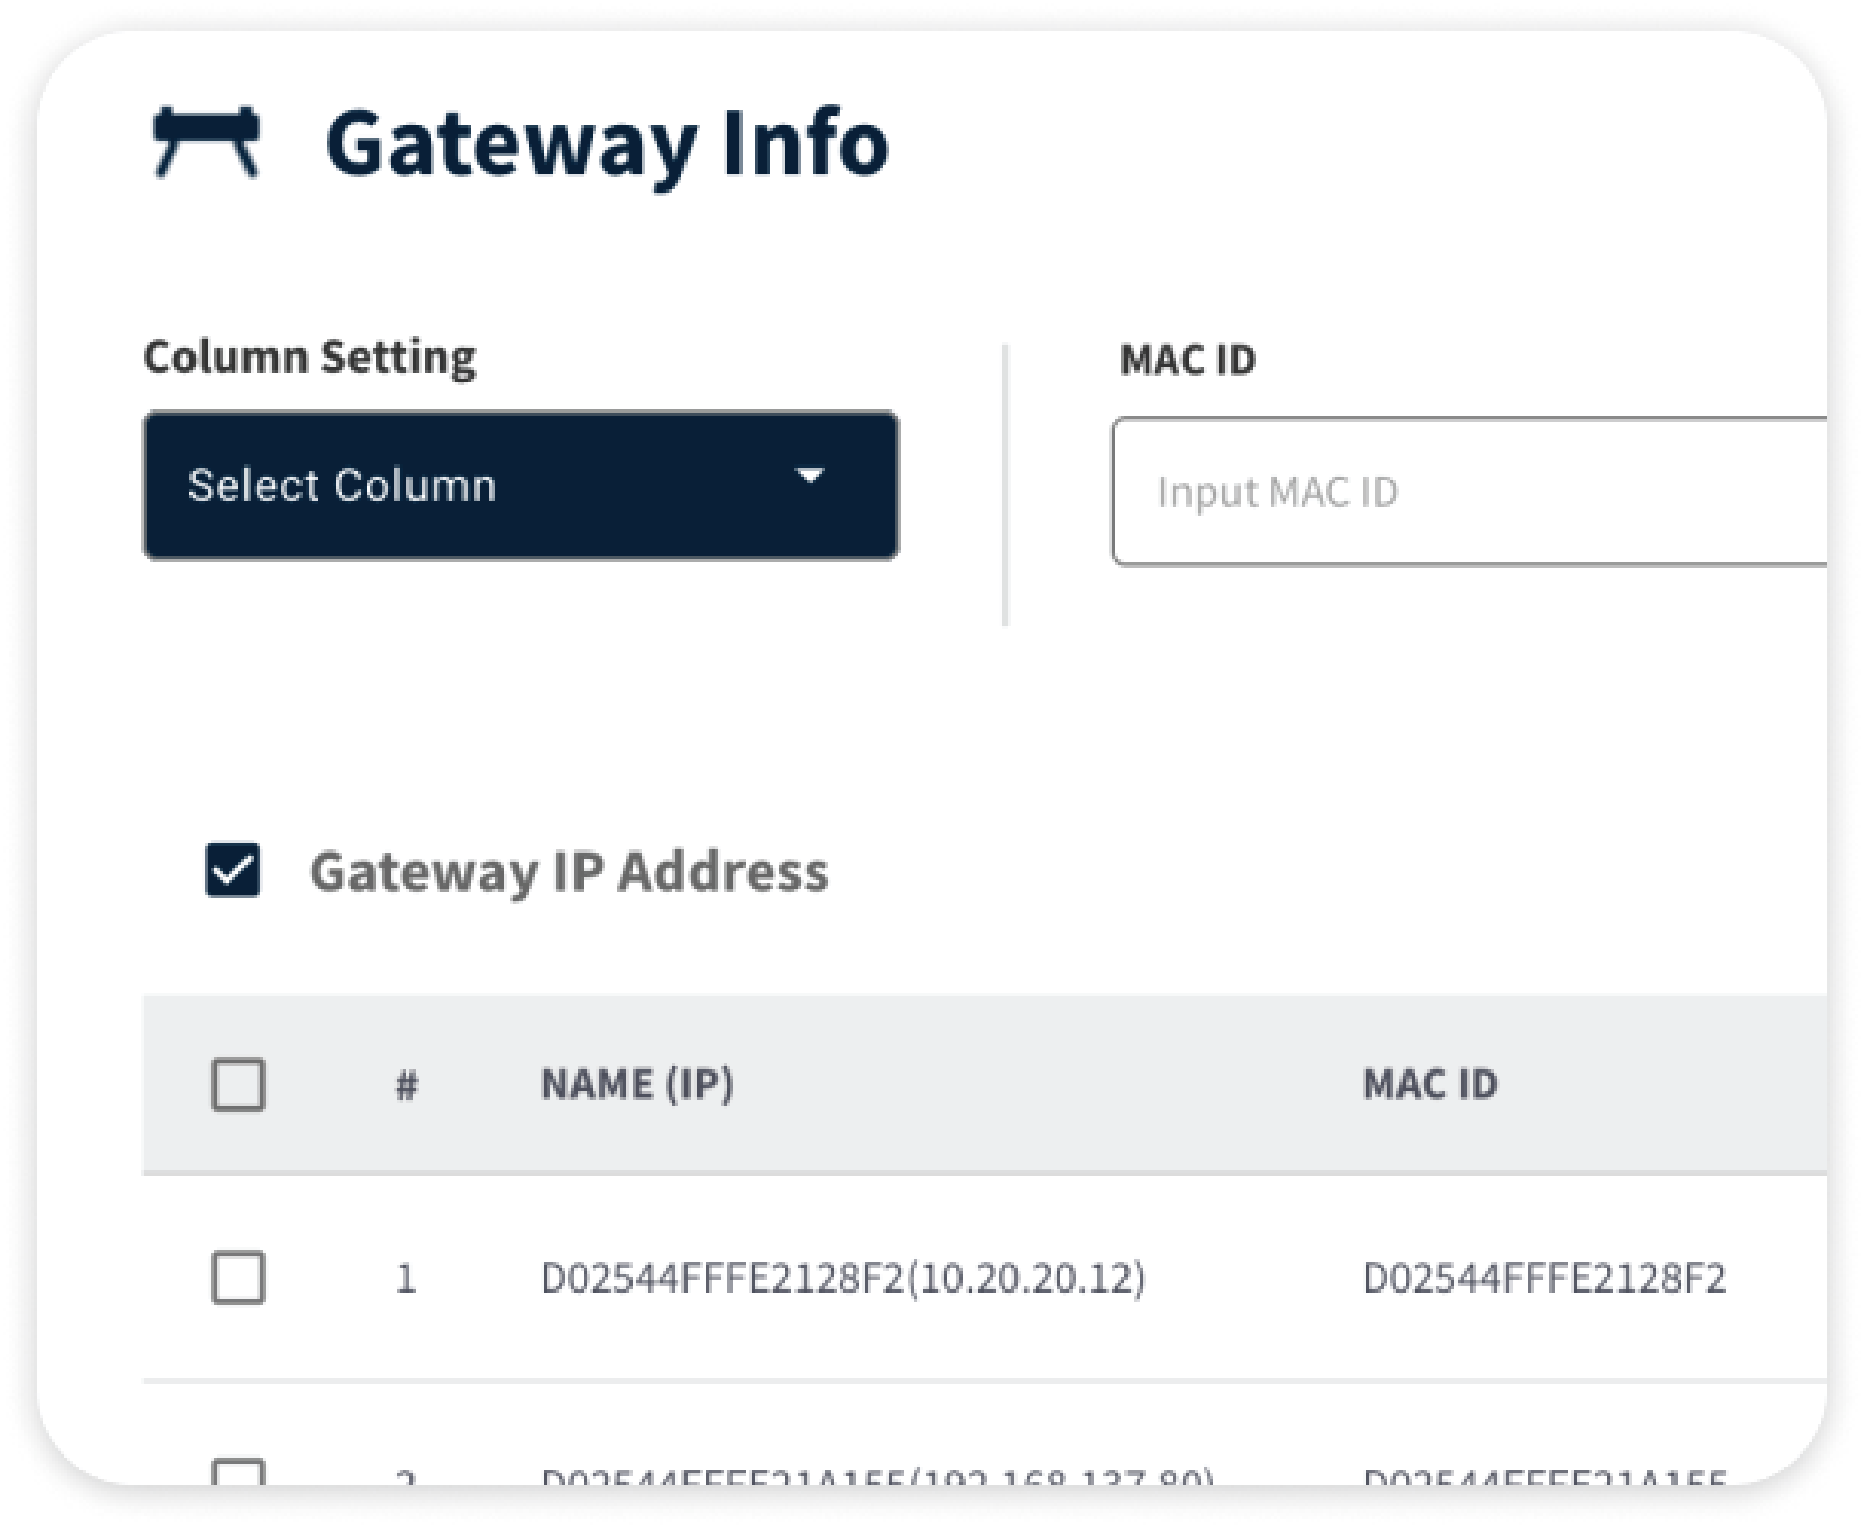
When Gateway IP Address is checked, the IP address will automatically overwrite next to Gateway Name.
User can also find the IP Address by the step below :
1
Click Gateway item to open Gateway detail popup modal.
2
In the Gateway detail, click Show Advanced Setting to expand more info fields.
3
User can find the IP Address field which is disabled field format by default.
Gateway Detail
Once select a Gateway item from the list of Gateways. The Gateway Detail popup modal provides access to detailed configuration settings.
Users can view, update, and manage the settings to ensure the gateway operates optimally. Some settings, marked with asterisks, are critical and may require consultation with Solum before making changes.
Certain fields are editable to allow adjustments as per the system's needs.
The Gateway setting changes will require reboot. The reboot process should be done during downtime to avoid any delays to updates.
Gateway normal setting
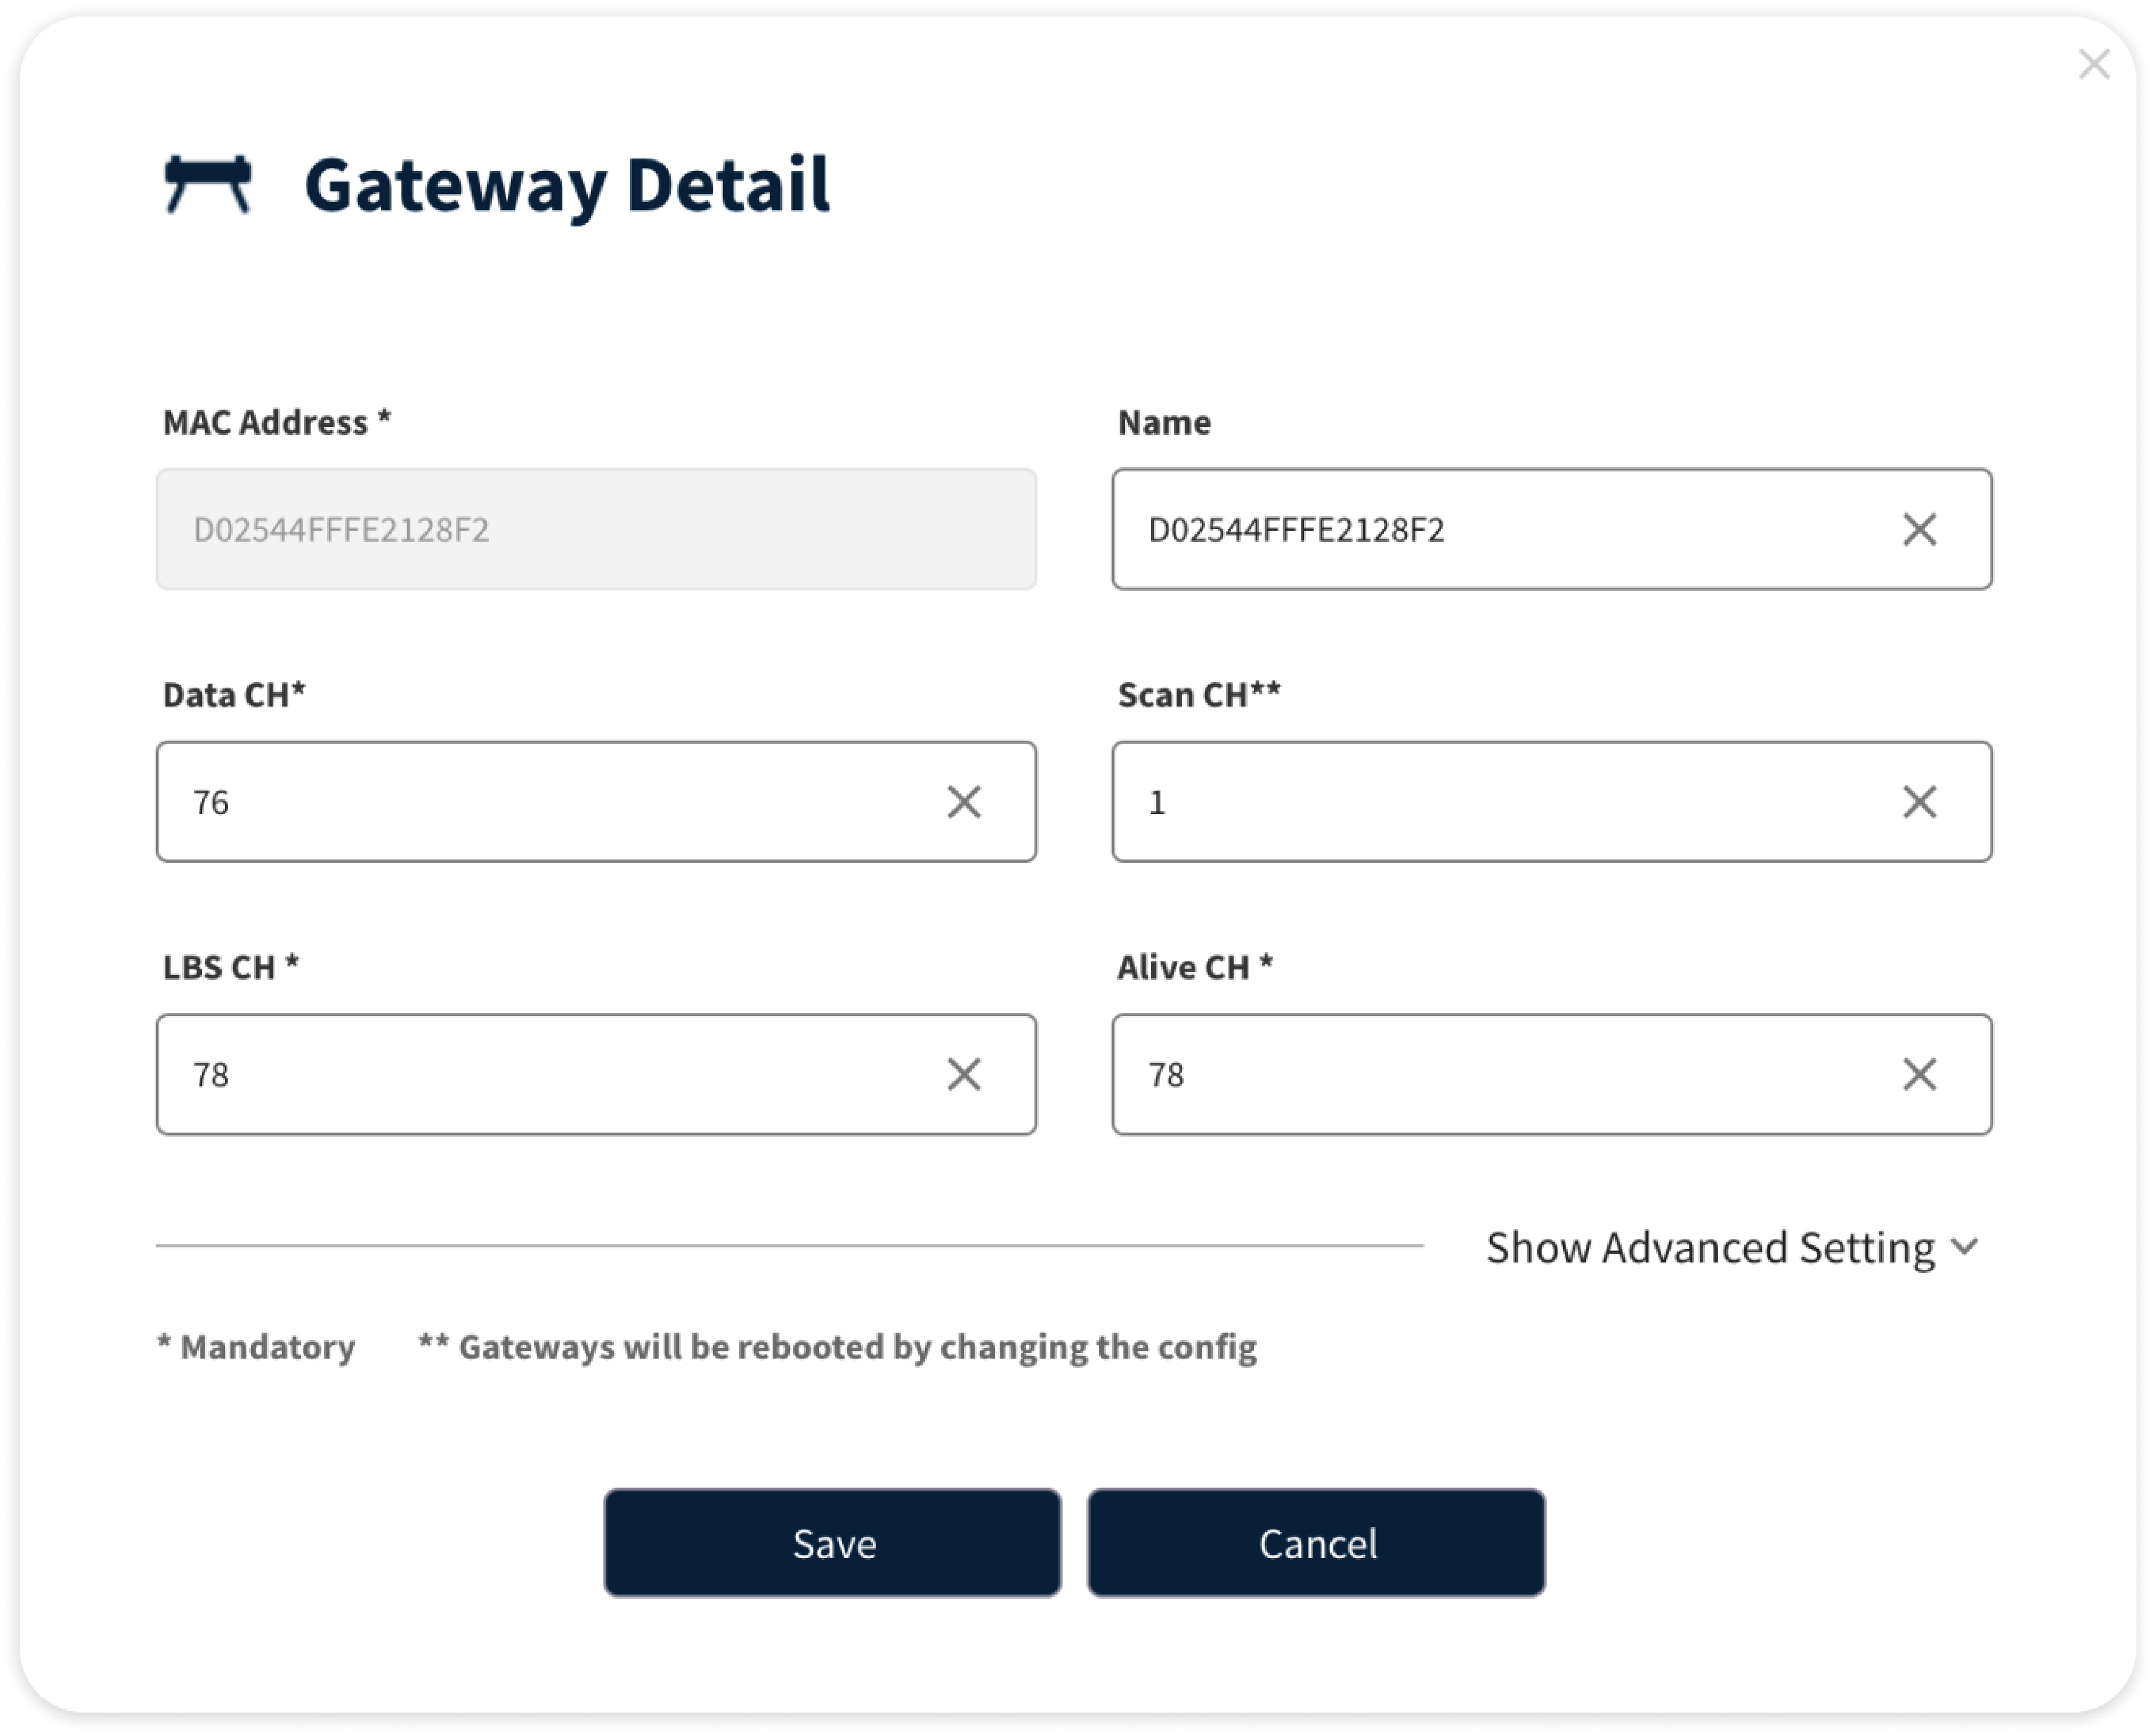
Unique MAC_ID of the Gateway, it's a non-editable field and is used to registred a Gateway to a Store.
Descriptive name for the gateway to help identify it.
The Data Channel is the RF channel used to send updates from a GATEWAY to the label. Avoiding interference with data channels
is vital to the system. Every GATEWAY within the same physical location should have a different data channel setting.
Data channels can be different based on installed locations RF environment, but in most cases, the following channels can
be used with minimum interference.
Recommended channels: [4, 22, 24, 28, 47, 49, 51, 53, 72, 74, 76, 82].
Scan Channel is the Radio Frequency channel used for labels to scan for and associated with a GATEWAY.
This channel should be kept as 1 for all Gateways. Changes to this channel should be made after consulting with SOLUM.
The LBS (Location Based Service) Channel is the RF channel used for LBS operation. This channel should be kept as 78 for
all Gateways. Changes to this channel should be made after consulting with SOLUM.
Alive Channel is the Radio Frequency channel used for labels to send daily heartbeats.
This channel should be kept as 72 for all Gateways. Changes to this channel should be made after consulting with SOLUM.
Gateway advanced setting
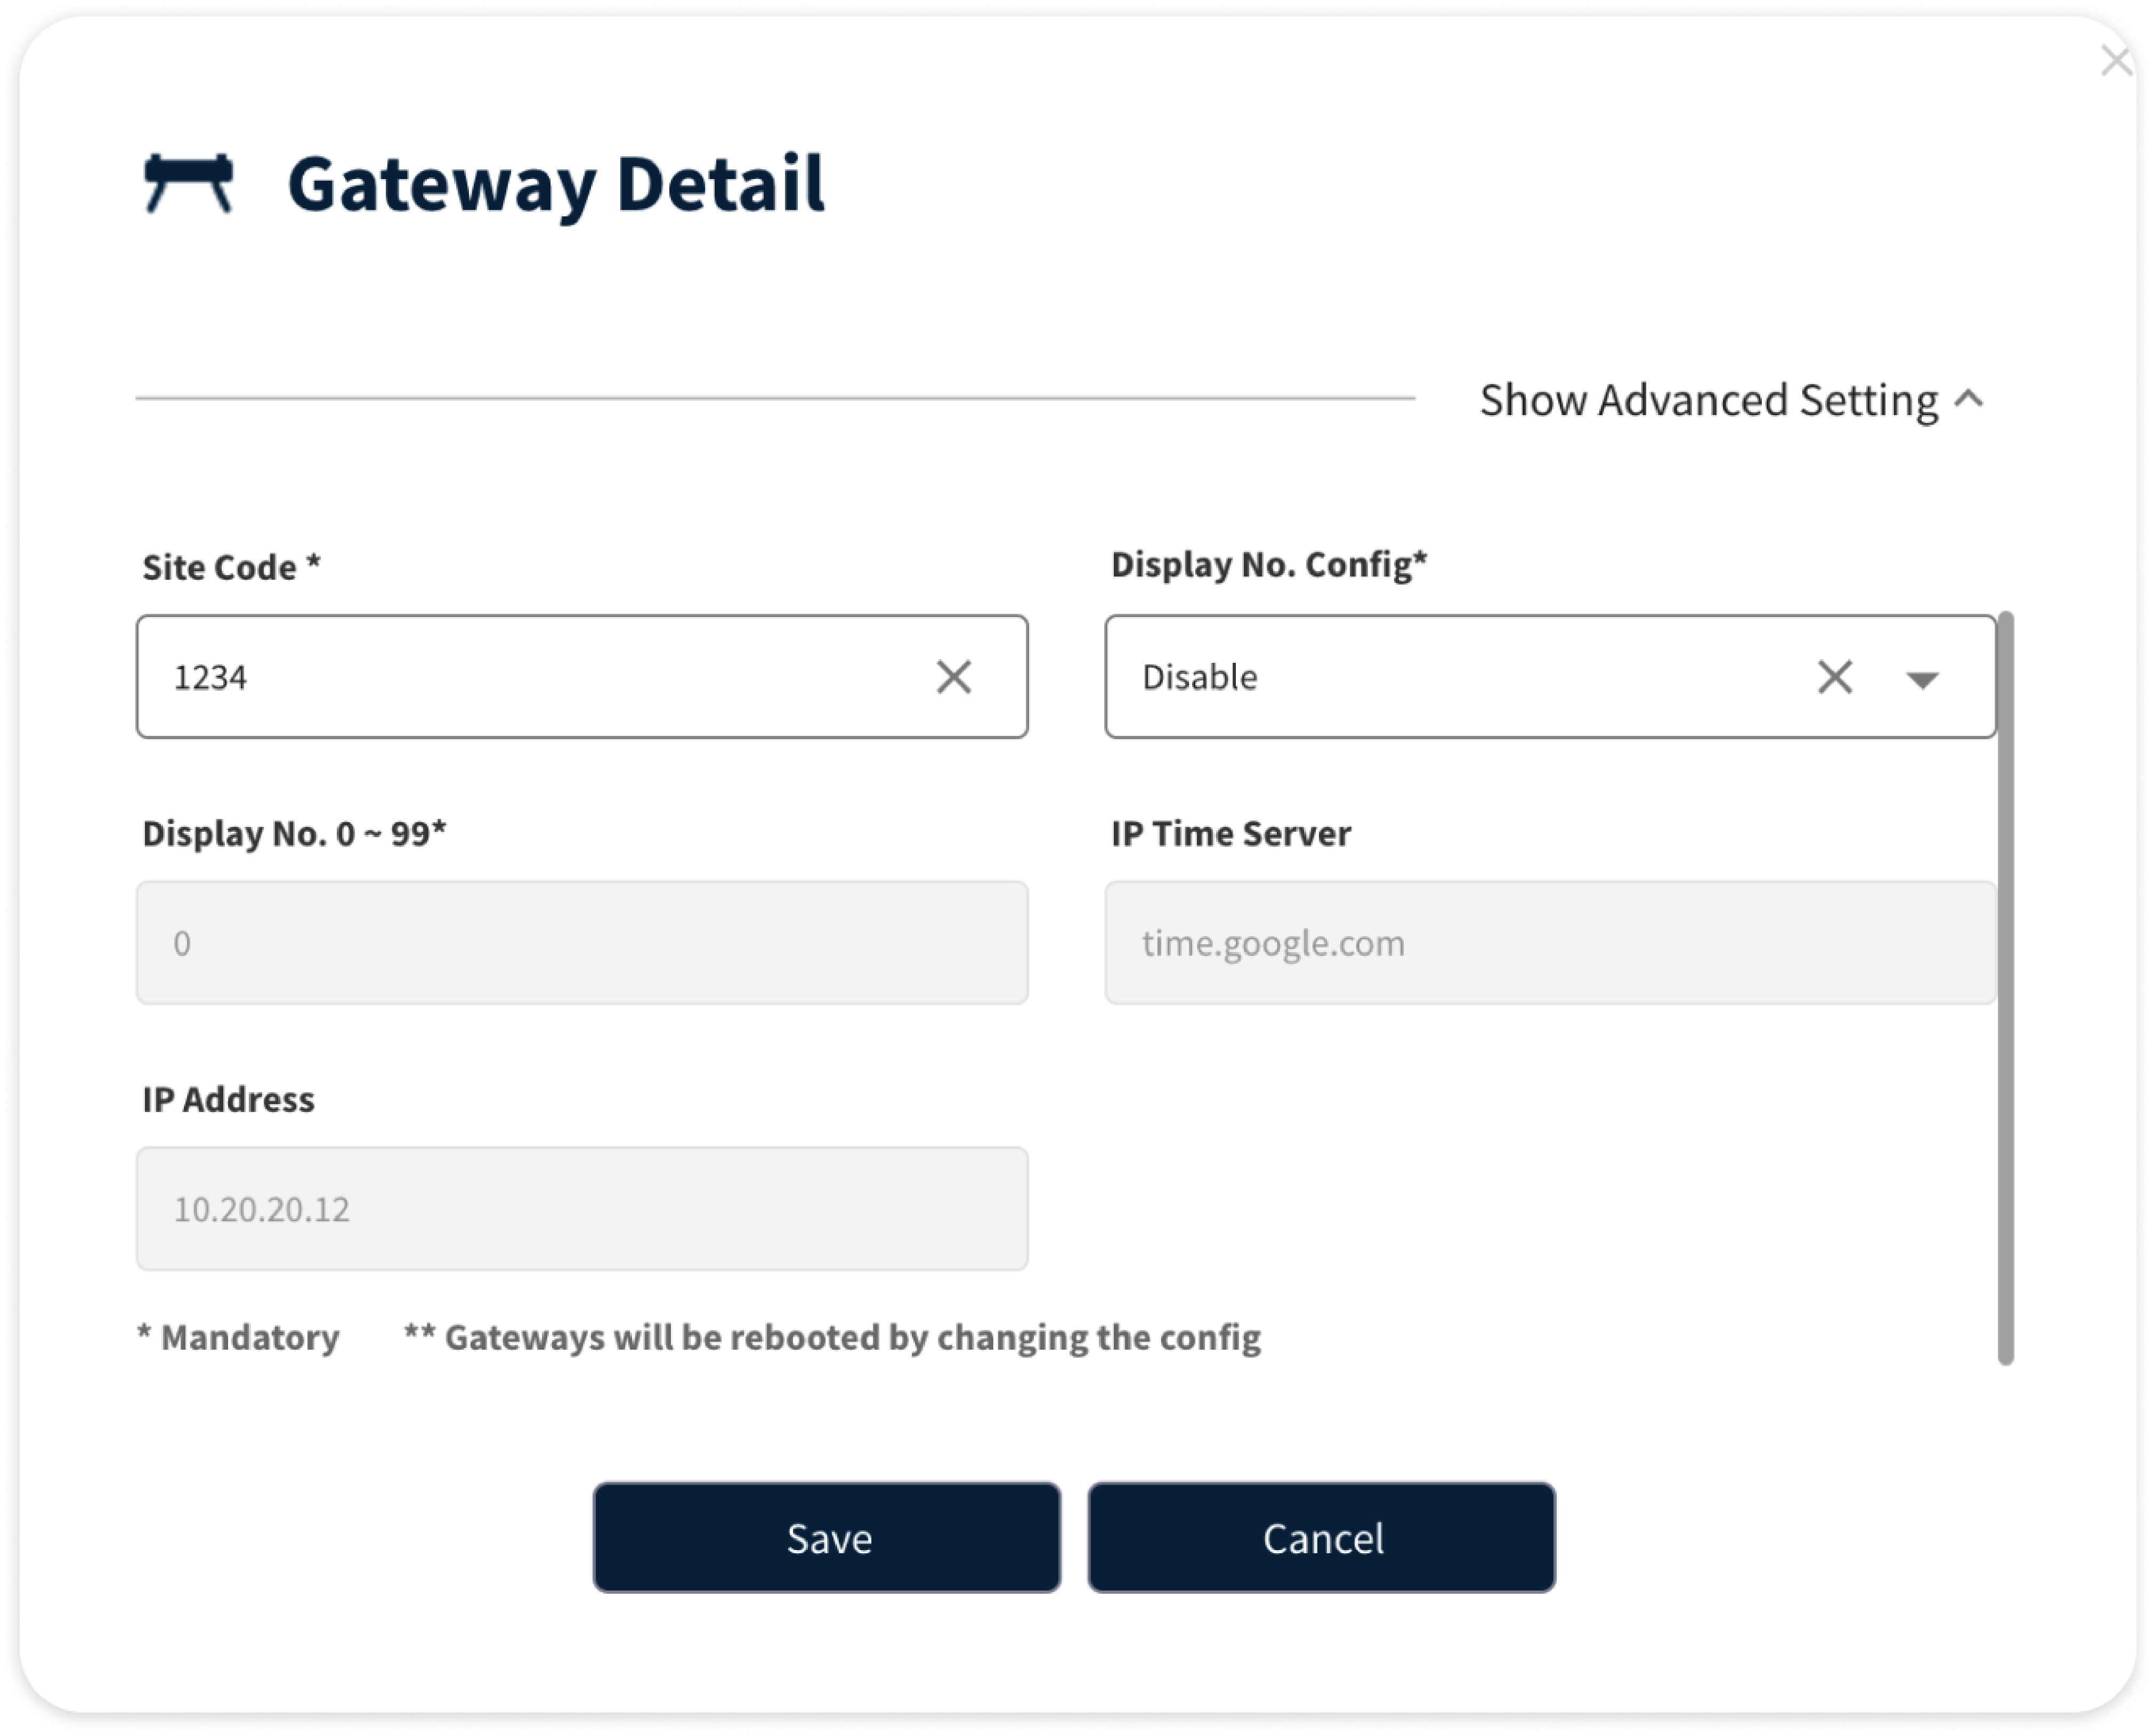
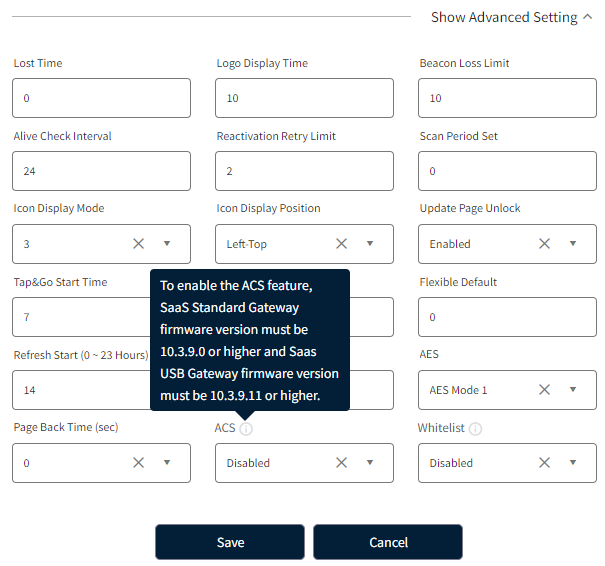
By click on Show Advanced Setting , the advanced setting fields opened.
Site code includes the identification code for communication between the gateway and labels.
Critital: Do not modify the value without Solum's approval.
The setting is used for visually ID gateway.
Select Enable or Disable value to set the LED display ON or OFF on the physical Gateway.
Sets a two-digit number (e.g., 09) to display on the gateway’s LED. Useful for quick identification of specific gateways.
Specifies the time server for gateway synchronization.
Default: time.google.com, unless configured differently in the store’s advanced settings.
Displays the IP address assigned to the gateway. Can be updated to match the network configuration.
Additional Gateway Function
User can add, delete and reboot the gateway and export the list as the excel file format.
Gateways must be registered with a store. Once the GW registered, any labels connecting to the Gateway will also be mapped to the store.
New Gateway must be registered from this Gateway Registration tab.
1
Input the MAC_ID which is found on the back of the Gateway.
2
Click Save button to register.
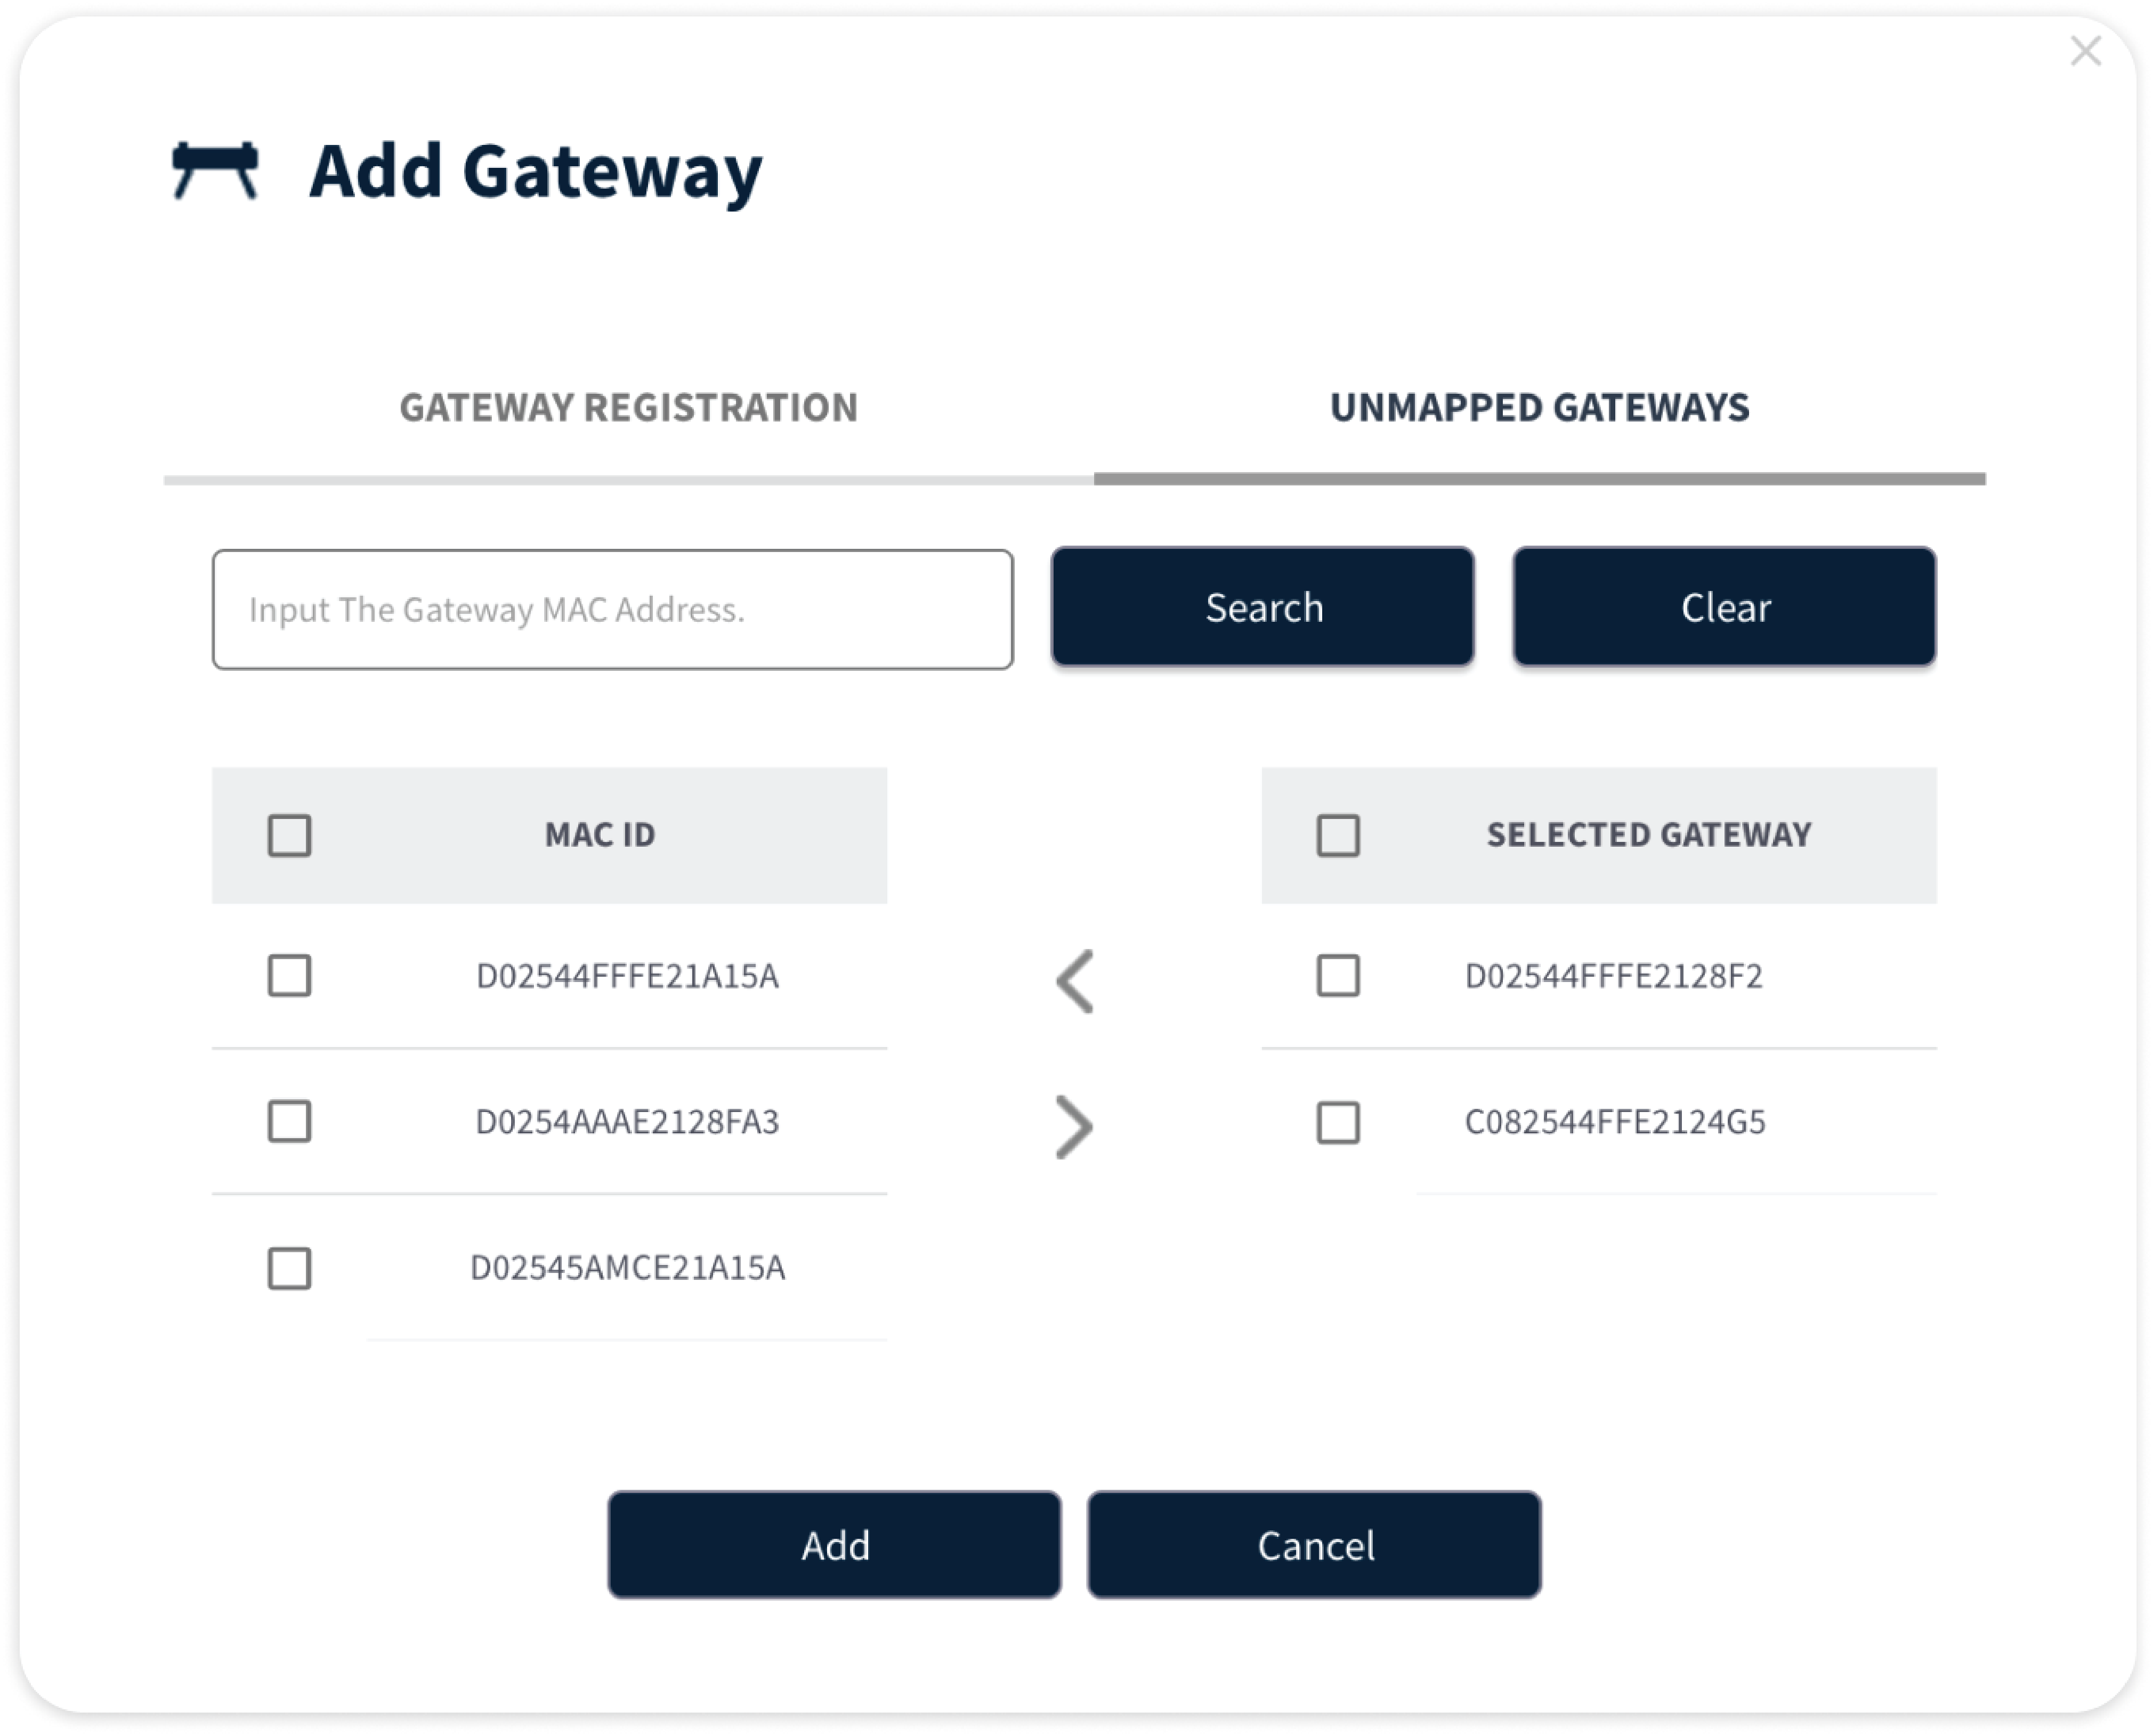
Normally Unmapped Gateways is the list of :
- Gateways that was previously registred but deleted from a Store.
- This list display Gateways registered for the Company but not mapped to a Store.
Registration step will be as below :
1
Select the Gateway by click on the checkbox.
2
Click the icon to Move Gateway to register list.
3
Click the icon to Remove Gateway to register list.
4
Click Add will register all Selected gateway.
After adding Gateway complete, Gateway item row will appear in Gateway list of GW Info page.
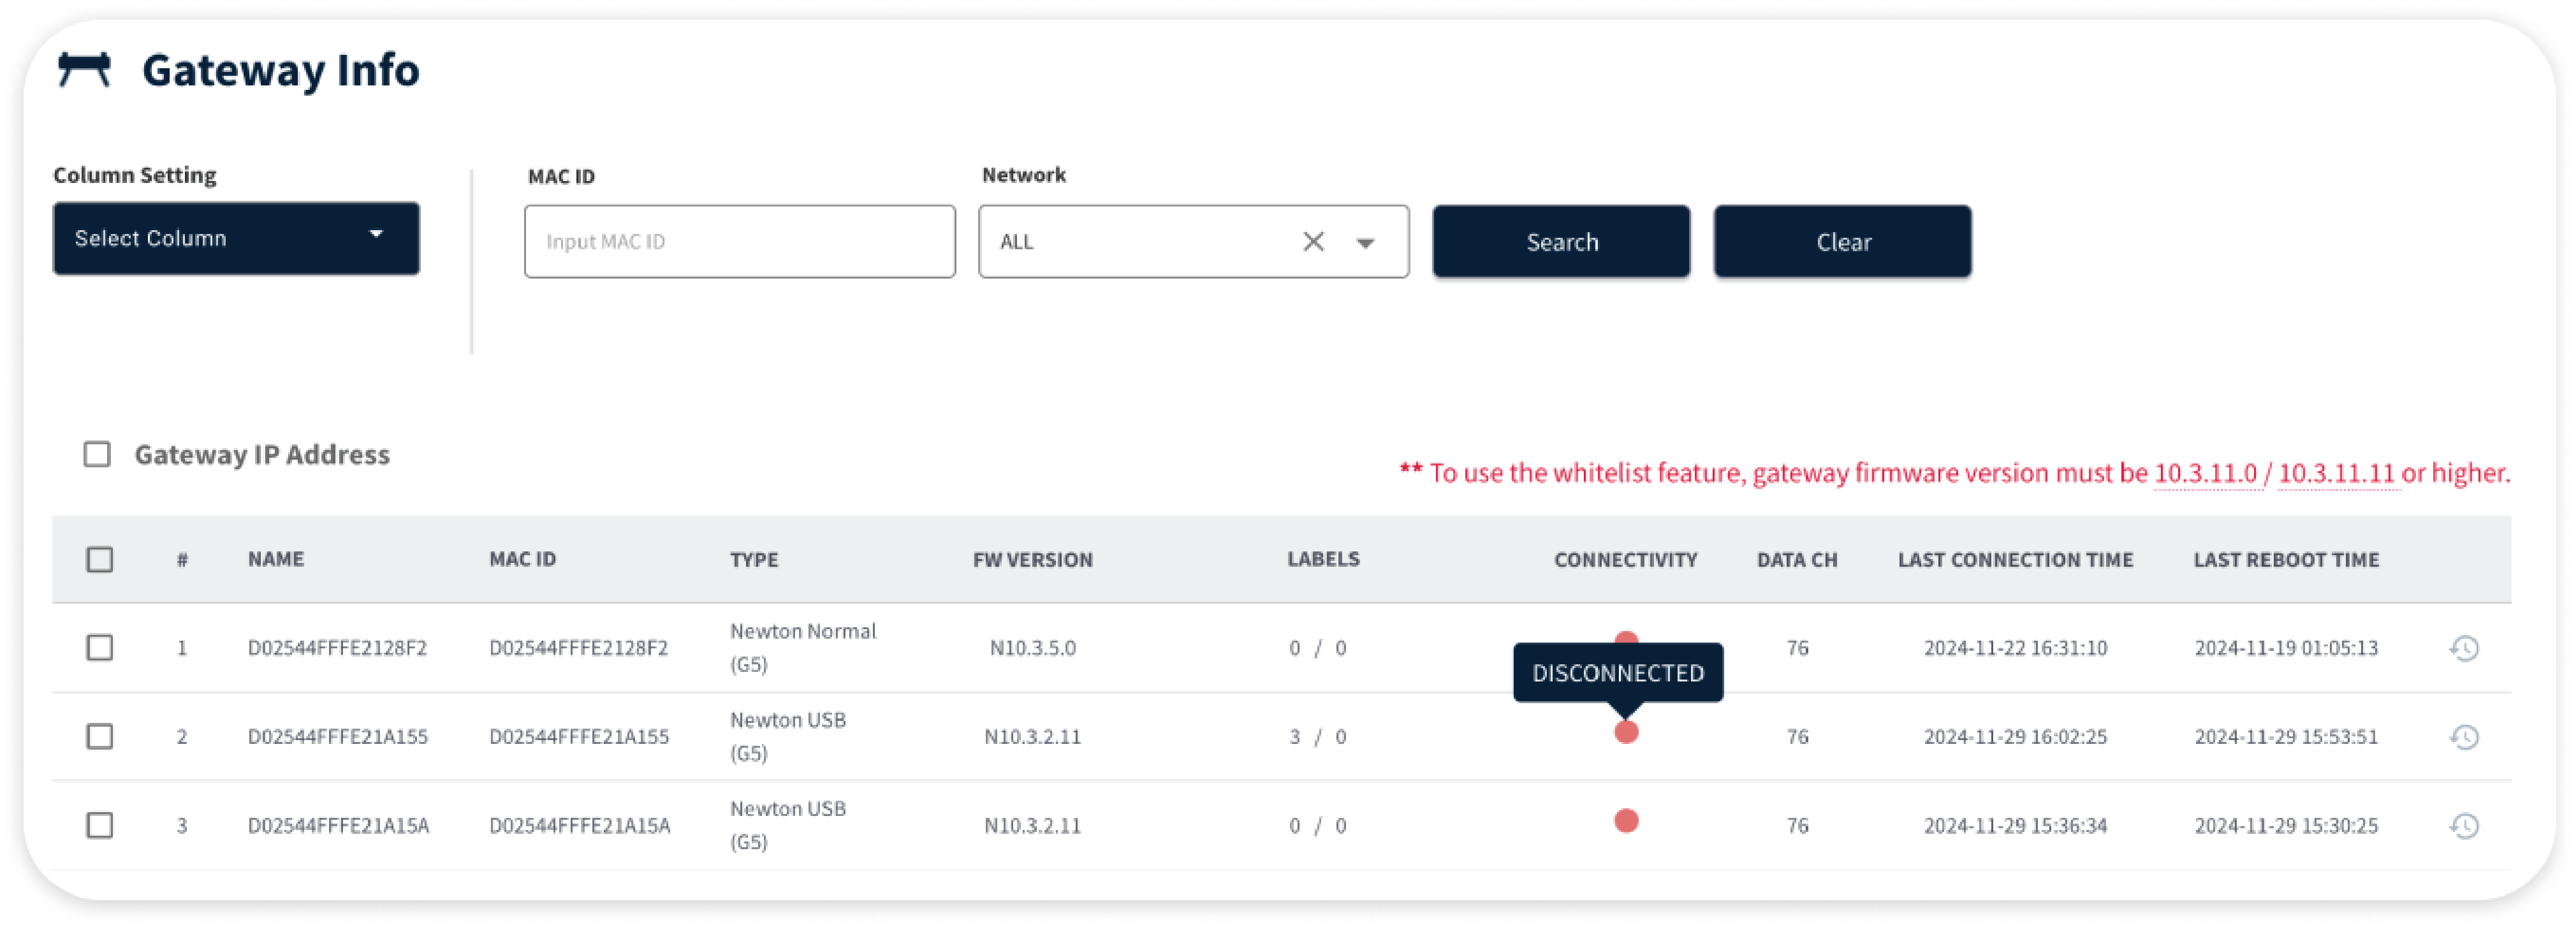
- If the Gateway is connected to the server and the configuration is correct, the
CONNECTIVITY column will update to Online in few minutes. - If it does not go Online status, check the network setting or internet connectivity.
- If it continues to stay Not ready or Disconnected for longer than five consecutive minutes, contact Solum for assistance.
This action does not remove or unassign any associated labels but will disconnect their connection to the selected GW.
1
Select the Gateway(s) from the list by clicking their checkboxes.
2
Click the Delete button to initiate the deletion process.
3
A confirmation dialog will appear. Review the details carefully and click Confirm to delete the GW
Impact of Deleting a GatewayLabel Disconnection:
Once a GW is deleted, all labels associated with it will lose their connection.
Label Scanning Process:
Within a few minutes, disconnected labels will automatically start scanning for other available GWs in the proximity zone.
- If a new Gateway is found, the labels will re-establish a connection and resume receiving updates.
- If no Gateway is detected, the labels will remain disconnected and will be unable to receive any updates until a new Gateway is available.
Rebooting a Gateway (GW) restarts its operation, refreshing its connection and initiating a reassociation process for the connected labels.
Use this function carefully to avoid unnecessary delays in operations.1
Select the Gateway by click on the checkbox.
3
Confirm the action in the dialog box that appears.
- Rebooting will power cycle the selected Gateways, forcing all connected labels to reassociate.
- Processing Time: A high volume of labels reassociating may cause delays in updates and network stabilization.
- Reboot Multiple GWs: If rebooting multiple GWs, perform the operation in phases to avoid overloading the system with bulk reassociations.
The Export function allows users to save a copy of the gateway list for offline use and record-keeping.
The exportedf file can be useful for auditing and troubleshooting gateway configurations.
- Click the Export button.
- By clicking on Export, the system generates and downloads an Excel file containing gateway details such as connection status, last connection time,
and last reboot time. The time values in the export file are displayed based on the store's timezone, allowing users to directly interpret the data without
any manual conversion.

- Optional: Save the file to your local machine for reference.
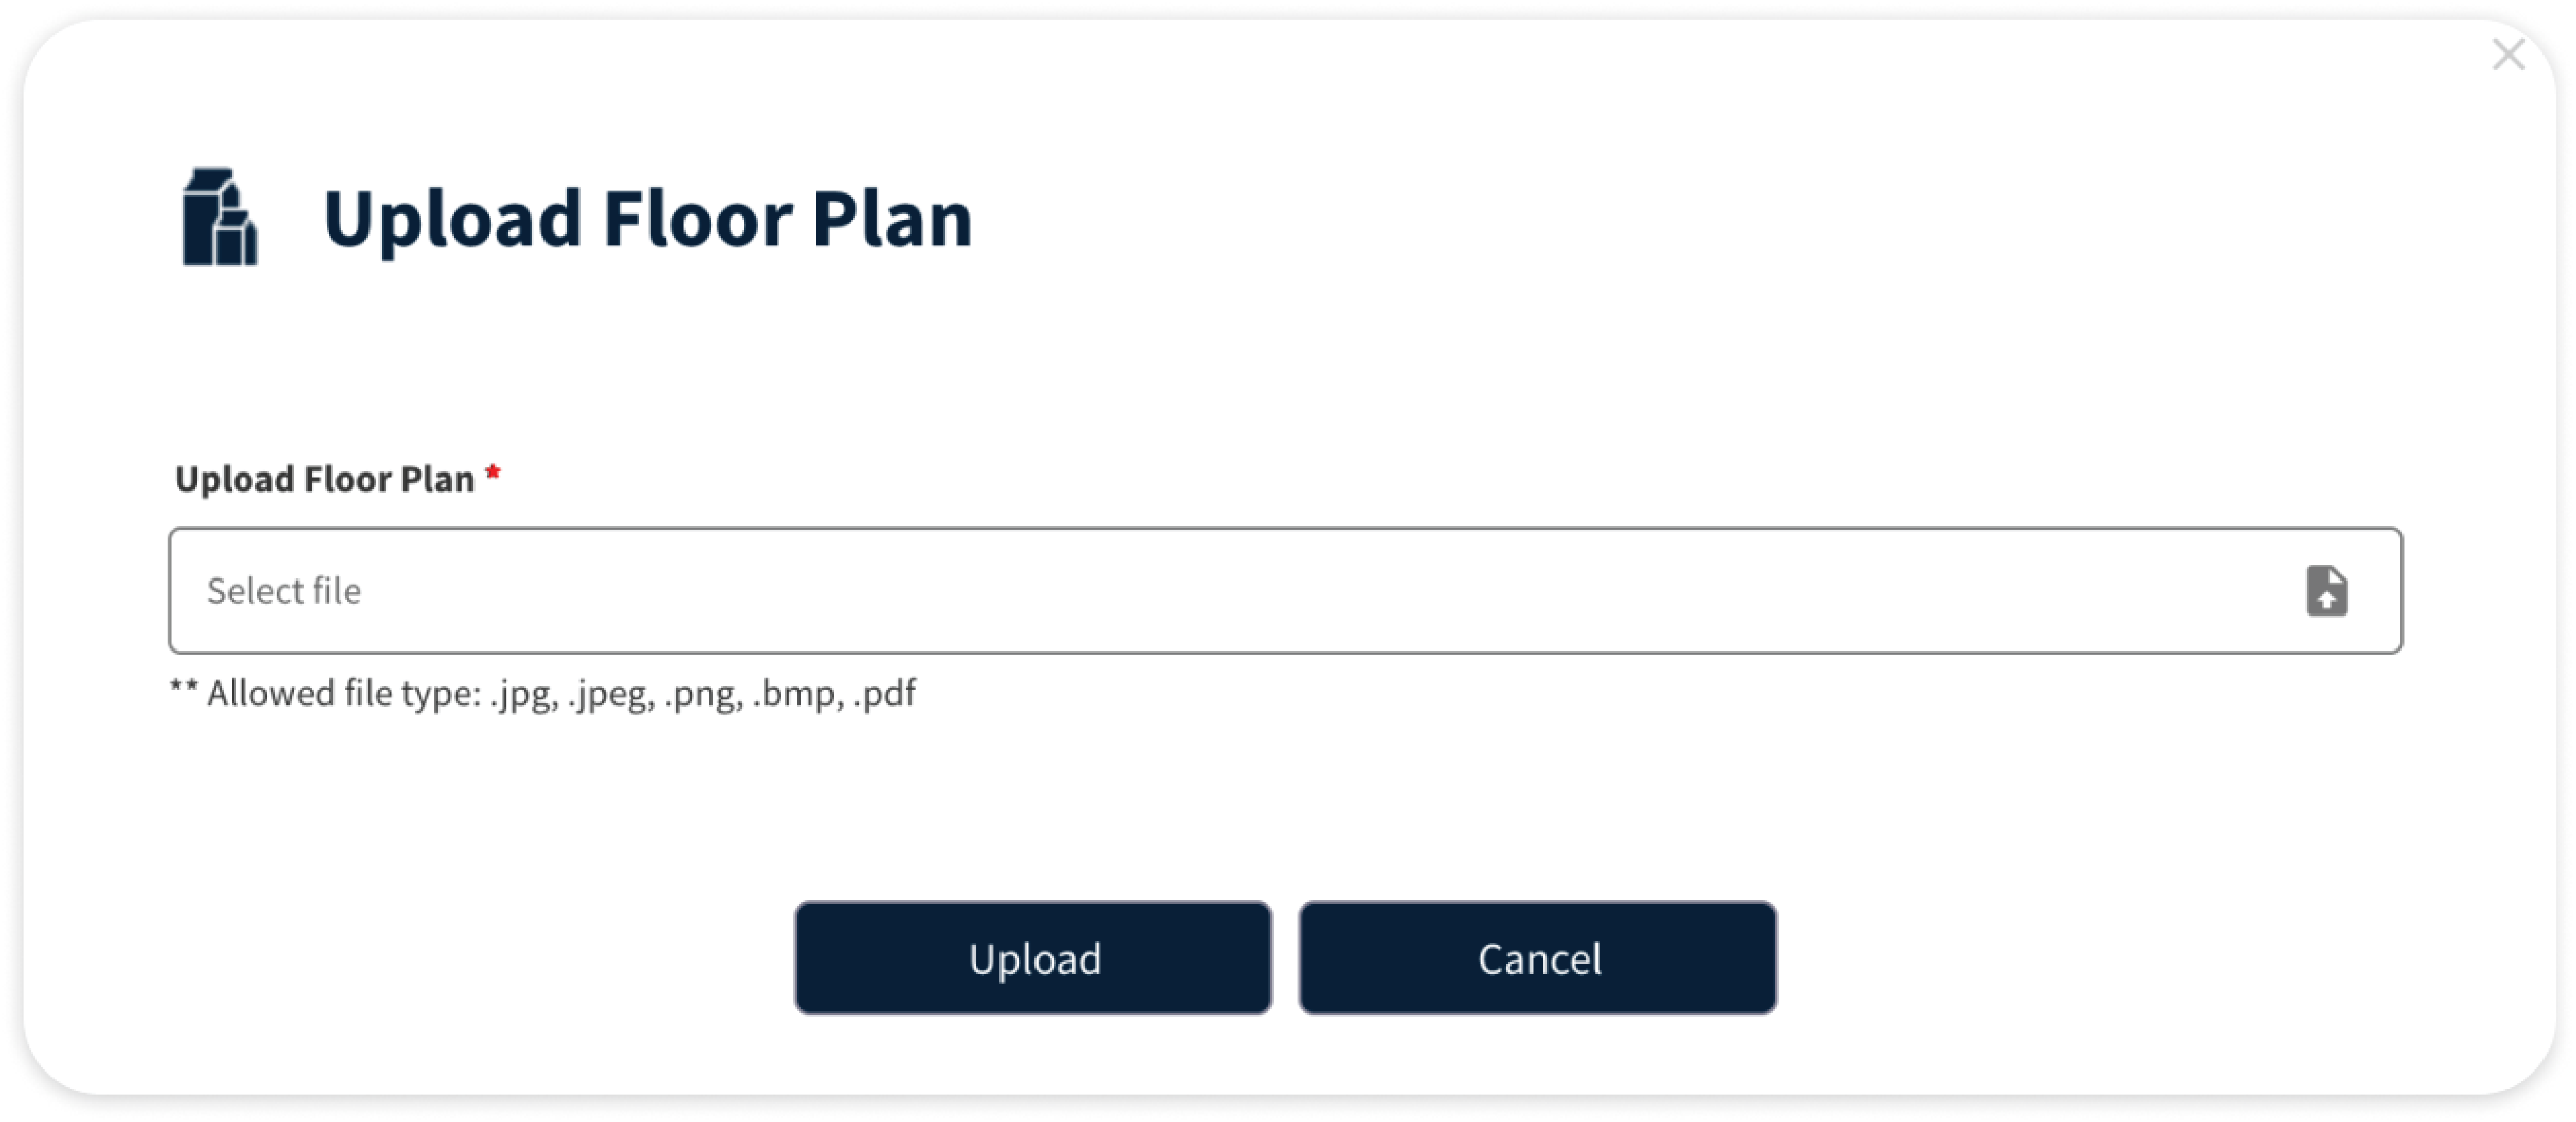
The Upload Floor Plan feature enables users to attach an image of the store’s layout, marking the installed locations of the GWs for easy reference.
This feature is for visual aid only and does not enable automatic location detection.
1
Click Upload Floor Plan button.
2
Import the Floor Plan file by click on the field. The allowed file type: .jpg, .jpeg, .png, .bmp, .pdf
- The uploaded image will replace any existing floor plan linked to the store.
- The floor plan must be created and updated manually by the user; the system does not auto-detect Gateway locations.
- Changes made here will also update the floor plan displayed on the Store Page.
The View Floor Plan feature allows users to visually reference the layout of the store and the locations of installed gateways.
This feature is particularly useful for identifying gateway placement and planning maintenance or troubleshooting.
1
Click View Floor Plan button.
2
The floor plan will include markers indicating the locations of the Gateway(s).
Each marker is labeled with the corresponding Gateway Name or MAC Address for easy identification.
To perform a Factory Reset on a Gateway, follow these steps:
1
Access the AIMS SaaS Dashboard:
Log in to your AIMS SaaS account.
2
Navigate to the Gateway Section:
• Click on ESL in the left navigation menu.
• Select Gateway from the submenu.
3
Select the Target Gateway:
• Locate the Gateway you want to reset from the list.
• Click on the Gateway to open its settings page.
4
Perform the Factory Reset:
• Locate the Gateway you want to reset from the list.
• Click on the Gateway to open its settings page.
5
Wait for the Reset Process to Complete:
• The Gateway will restart and restore to its default factory settings.
• This process may take a few minutes.
Transfer Gateway from One Store to Another
Transferring a Gateway to a different store requires performing a Factory Reset to erase all current configurations,
ensuring the Gateway can be properly set up for the new store.
How to Perform a Factory Reset on the Gateway
1
Access AIMS SaaS Dashboard:
• Log in to AIMS SaaS with an administrator account.
• Navigate to: ESL > Gateway > Gateway Info.
2
Select the Gateway to Reset:
• Locate and select the Gateway you want to transfer to a new store.
• Click on the Gateway name to open its detailed information page.
3
Perform Factory Reset:
• On the Gateway details page click the Factory Reset button.
• Confirm the action when prompted by the system.
Auto Channel Selection (ACS)
ACS Auto Channel Selection is enabled by default for all newly created customers and their stores.
For existing customers, ACS is automatically enabled at the customer level. Existing stores are not automatically updated and will retain their current ACS configuration.
Auto channel selection happens when there is disturbance with Data Channel in the
Gateway with other Gateways. At this time ACS will be set bit 1 and updates the
suitable Data channel automatically by considering all other Gateways Data channel in the
store.
ACS can be enabled from Store Settings.Contact SOLUM for access.
Steps
- Go to Dashboard → Config → Store Config → Store.
- Select the required Store.
- Open Store Settings.
- Click Show Advanced Settings.
- Enable or disable ACS.
- Save the configuration.
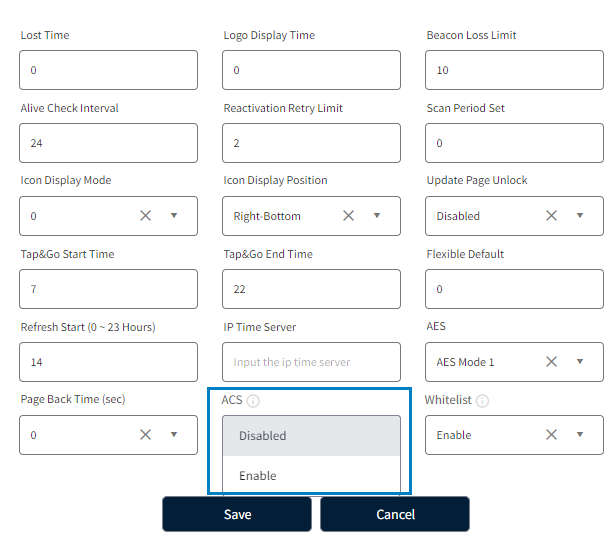
When the user updates the Store Advanced Settings:
- The Gateway will reboot.
- The updated configuration will be applied to the gateway.
Auto channel selection happens when there is disturbance with Data Channel in the
Gateway with other Gateways. At this time ACS will be set the bit 1 and updates the
suitable Data channel automatically by consider all other Gateways Data channel in the
store.
To enable the ACS feature, the following firmware versions are required:
- SaaS Standard Gateway Firmware:
10.3.9.0 or higher
- USB Gateway Firmware: Compatible version required.